
1. Introduction
The EVERLIT Survival Car Emergency Kit is a comprehensive collection of tools and supplies designed to assist you during unexpected roadside incidents. This manual provides detailed instructions for the proper use and maintenance of each item, ensuring your safety and preparedness.
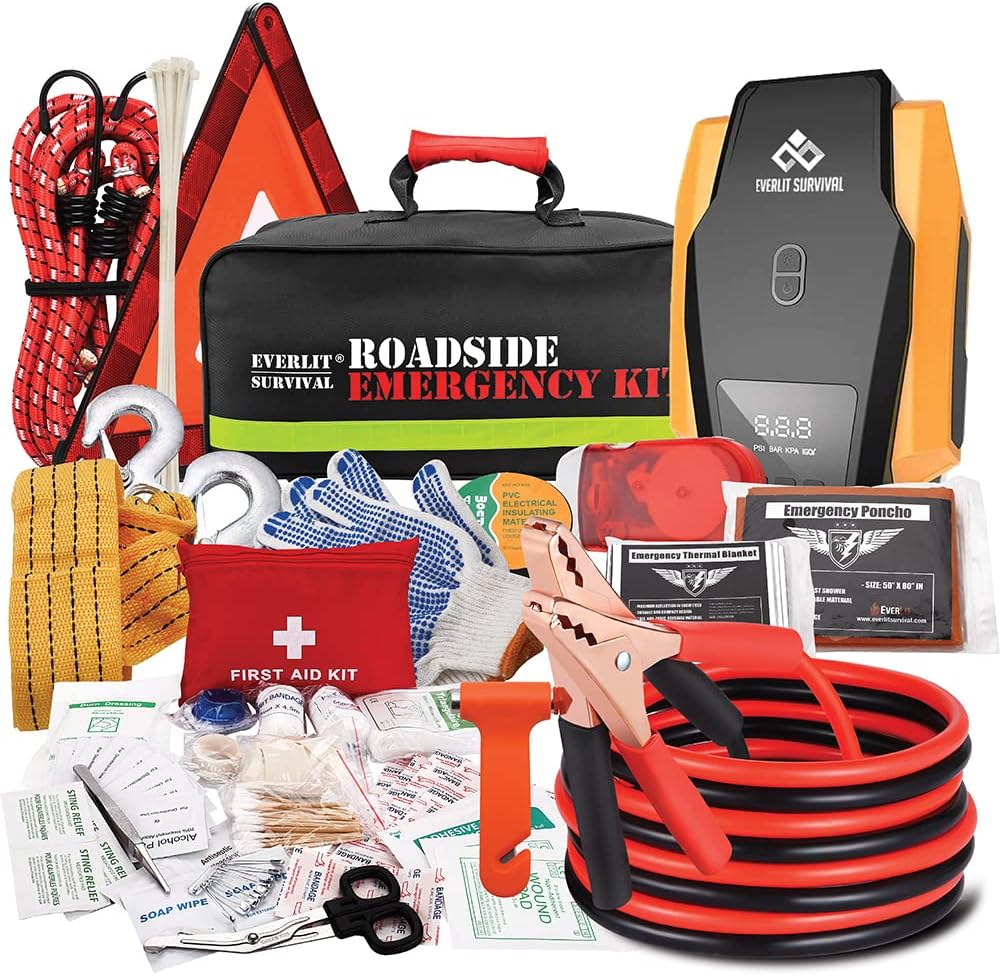
Figure 1: Overview of the EVERLIT Survival Car Emergency Kit contents.
2. Kit Contents
Your EVERLIT Survival Car Emergency Kit includes the following items:
- 12 Feet 8 Gauge 300 AMP Jumper Cable: For jump-starting vehicles.
- Digital Auto Air Compressor/Tire Inflator: With auto shutoff and LED light for tire inflation.
- 108-Piece First Aid Kit: For basic wound and hygiene treatment.
- Reflective Warning Triangle: For roadside visibility.
- Glass Breaker & Seatbelt Cutter: For emergency vehicle egress.
- Tow Rope: For vehicle recovery.
- Emergency Mylar Rain Poncho: For personal protection from rain.
- Emergency Mylar Space Blanket: For warmth and emergency signaling.
- Hand Crank Flashlight: For illumination without batteries.
- Bungee Cords (x2): For securing items.
- Cable Ties (x15): For temporary repairs or securing.
- Safety Gloves: For hand protection during tasks.
- Electrical Tape: For insulation and minor repairs.
- Everlit Survival Tool Bag: Durable storage for all components.

Figure 2: All components of the kit, including jumper cables, first aid kit, air compressor, and warning triangle.
3. Setup & Operating Instructions
3.1. Jumper Cables
The 12-foot, 8-gauge, 300 AMP copper-clad aluminum jumper cables are designed for safely jump-starting standard vehicles.
- Ensure both vehicles are turned off.
- Connect one red clamp to the positive (+) terminal of the dead battery.
- Connect the other red clamp to the positive (+) terminal of the working battery.
- Connect one black clamp to the negative (-) terminal of the working battery.
- Connect the other black clamp to an unpainted metal surface on the engine block of the dead vehicle, away from the battery.
- Start the working vehicle and let it run for a few minutes.
- Attempt to start the dead vehicle. If it doesn't start, wait a few minutes and try again.
- Once the dead vehicle starts, disconnect the cables in reverse order: black from dead vehicle, black from working vehicle, red from working battery, red from dead battery.

Figure 3: Proper connection of jumper cables to a vehicle battery.
3.2. Digital Auto Air Compressor/Tire Inflator
This portable air compressor features an auto-shutoff function and LED light for convenience.
- Plug the compressor into your vehicle's 12V power outlet.
- Attach the air hose stem securely to the tire valve.
- Set the desired tire pressure using the digital display.
- Press the power button to start inflation. The compressor will automatically stop once the preset pressure is reached.
- Use the integrated LED light for visibility during nighttime operation.

Figure 4: The digital auto air compressor in use, inflating a car tire.
3.3. 108-Piece First Aid Kit
The compact first aid kit contains essential supplies for minor injuries and hygiene.
- Familiarize yourself with the contents: alcohol pads, bandages, cotton tips, knuckle bandages, butterfly bandages, wound pads, sting relief pads, gloves, medical tape, dressing, PBT bandage, CPR mask, tweezer, safety pins, soap wipe, disinfect wipe, adhesive wound pad, triangular bandage, finger bandage.
- Use appropriate items for cleaning wounds, applying bandages, and providing basic first aid.
- Seek professional medical attention for serious injuries.

Figure 5: A person attending to a minor injury using the first aid kit.
3.4. Reflective Warning Triangle
Deploy the reflective warning triangle to alert other drivers to your presence during a roadside stop.
- If your vehicle is stopped on the roadside, place the triangle at least 50-100 feet behind your vehicle.
- On highways or busy roads, place additional triangles at greater distances (e.g., 200-300 feet).
- Ensure the triangle is stable and visible to oncoming traffic.

Figure 6: A reflective warning triangle placed behind a vehicle for enhanced visibility.
3.5. Glass Breaker & Seatbelt Cutter
In emergency situations where vehicle doors are jammed or seatbelts are stuck, this tool provides a means of escape.
- To break a window, firmly press the pointed end of the tool against a corner of the side window.
- To cut a seatbelt, slide the belt into the cutter's groove and pull firmly.
- Always keep this tool in an easily accessible location within the vehicle.
3.6. Tow Rope
Use the tow rope for vehicle recovery when safe and appropriate.
- Attach the tow rope securely to designated towing points on both the disabled and towing vehicles.
- Ensure the rope is taut before starting to move to avoid sudden jerks.
- Drive slowly and maintain a safe distance between vehicles.
- Use hazard lights and appropriate signaling.

Figure 7: A tow rope securely attached to a vehicle's tow point.
3.7. Hand Crank Flashlight
The hand crank flashlight provides light without the need for batteries.
- Crank the handle for approximately 1-2 minutes to generate sufficient power for illumination.
- Use for general illumination during nighttime repairs or signaling.
3.8. Emergency Mylar Rain Poncho & Space Blanket
These items provide personal protection from the elements and help maintain body temperature.
- Rain Poncho: Unfold and wear over clothing for protection from rain.
- Space Blanket: Unfold and wrap around your body to retain heat. The reflective surface can also be used for signaling.
3.9. Safety Gloves & Electrical Tape
These accessories are for personal protection and minor repairs.
- Safety Gloves: Wear gloves when handling tools, changing tires, or performing any task that might cause injury to your hands.
- Electrical Tape: Use for temporary insulation of exposed wires or to secure loose components.
4. Maintenance & Care
- Regularly inspect all kit components for damage or wear. Replace any damaged items immediately.
- Keep the kit stored in a cool, dry place, away from direct sunlight and extreme temperatures.
- Ensure the first aid kit contents are within their expiration dates and restock as needed.
- Periodically check the functionality of the flashlight and tire inflator.
- Keep the Everlit Survival Tool Bag clean and organized.
5. Troubleshooting
- Tire Inflator Not Working: Check the 12V power connection. Ensure the tire valve is properly attached. Verify the vehicle's 12V outlet is functional.
- Jumper Cables Not Starting Vehicle: Ensure all connections are clean and secure. Verify the working battery has sufficient charge. Allow more time for the working vehicle to charge the dead battery.
- Flashlight Not Illuminating: For hand crank flashlight, ensure sufficient cranking.
- General Issues: Refer to individual item instructions within the kit for specific troubleshooting steps.
6. Specifications
- Brand: EVERLIT
- Model: EVERLIT-Parent
- Material: Durable materials (including metal, plastic, and fabric)
- Item Dimensions (L x W x H): 17 x 7 x 7 inches
- Item Weight: 8 Pounds
- Number of Pieces: 108
- Jumper Cable: 12 Feet, 8 Gauge, 300 AMP, Copper-Clad Aluminum
- Air Compressor: Digital, 12V, Auto Shutoff, LED Light
- First Aid Kit: 108 Pcs, comprehensive contents
7. Warranty & Support
EVERLIT is committed to providing comprehensive customer service. All original EVERLIT products are covered with a 1-year satisfaction warranty. Additionally, a 60-day hassle-free return policy is offered for all products.
For support or warranty claims, please contact EVERLIT customer service through the retailer's platform or the official EVERLIT website.
8. Official Product Videos
Road Guardian Roadside Assistance Kit
This video provides a brief overview of the Everlit Road Guardian Roadside Assistance Kit, highlighting its key components and compact design.