1. Introduction
Thank you for choosing the BESTEK PD20W Power Strip Tower. This manual provides essential information for the safe and efficient use of your device. Please read it thoroughly before operation and retain it for future reference.
This compact power strip is designed to provide convenient power and charging solutions for multiple electronic devices. It features a vertical cube design, optimizing space and offering versatile placement options.

Image: The BESTEK PD20W Power Strip Tower, showcasing its 7-in-1 functionality with 3 AC outlets, 3 USB-A ports, and 1 USB-C port, connected to various devices on a nightstand.
2. Important Safety Instructions
- Do not exceed the maximum load capacity of 15 Amps.
- This device is for indoor use only. Do not expose to moisture or wet conditions.
- Keep out of reach of children.
- Do not disassemble or modify the power strip.
- Ensure the power strip is fully plugged into a grounded outlet.
- Avoid using in conjunction with other power strips or extension cords.
- The product features overvoltage, short circuit, overload, and overcurrent protection. If the power strip trips, unplug all devices and reset the power switch.
- The housing is made of flame-retardant PC material for enhanced safety.
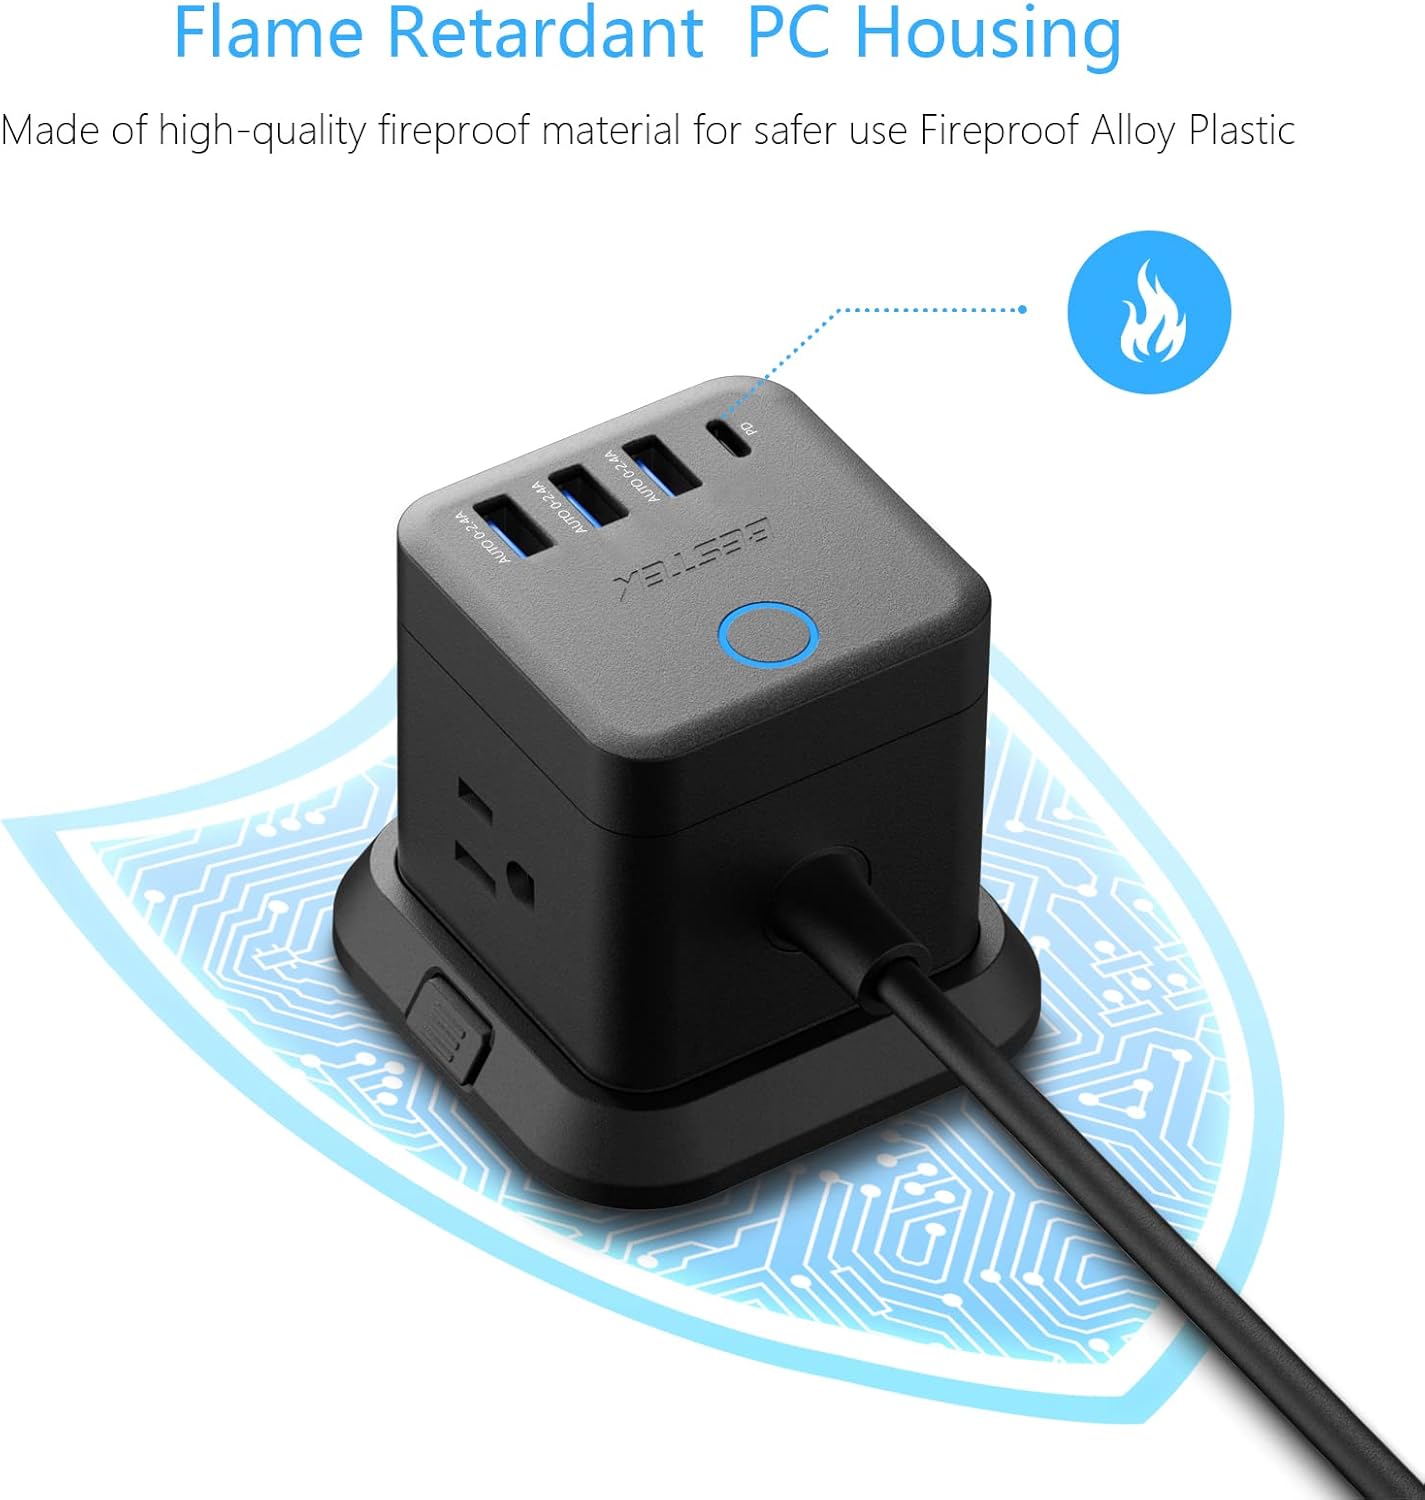
Image: Close-up of the power strip highlighting its flame-retardant PC housing, indicated by a flame icon and a protective circuit board graphic.
3. Product Components
The BESTEK PD20W Power Strip Tower includes the following components:
- 3 AC Outlets: Standard North American Type B - 3 pin outlets.
- 3 USB-A Ports: For charging various USB-A compatible devices.
- 1 USB-C PD 20W Port: For fast charging compatible USB-C devices.
- 5-Foot Extension Cord: Provides flexibility in placement.
- Detachable Base: Allows for stable desktop use or mounting.
- Power Switch: Controls power to all outlets and USB ports.
- 45-Degree Flat Plug: Designed to fit in narrow spaces behind furniture.

Image: Illustration showing the 45-degree flat plug design, demonstrating how it allows furniture to sit closer to the wall.
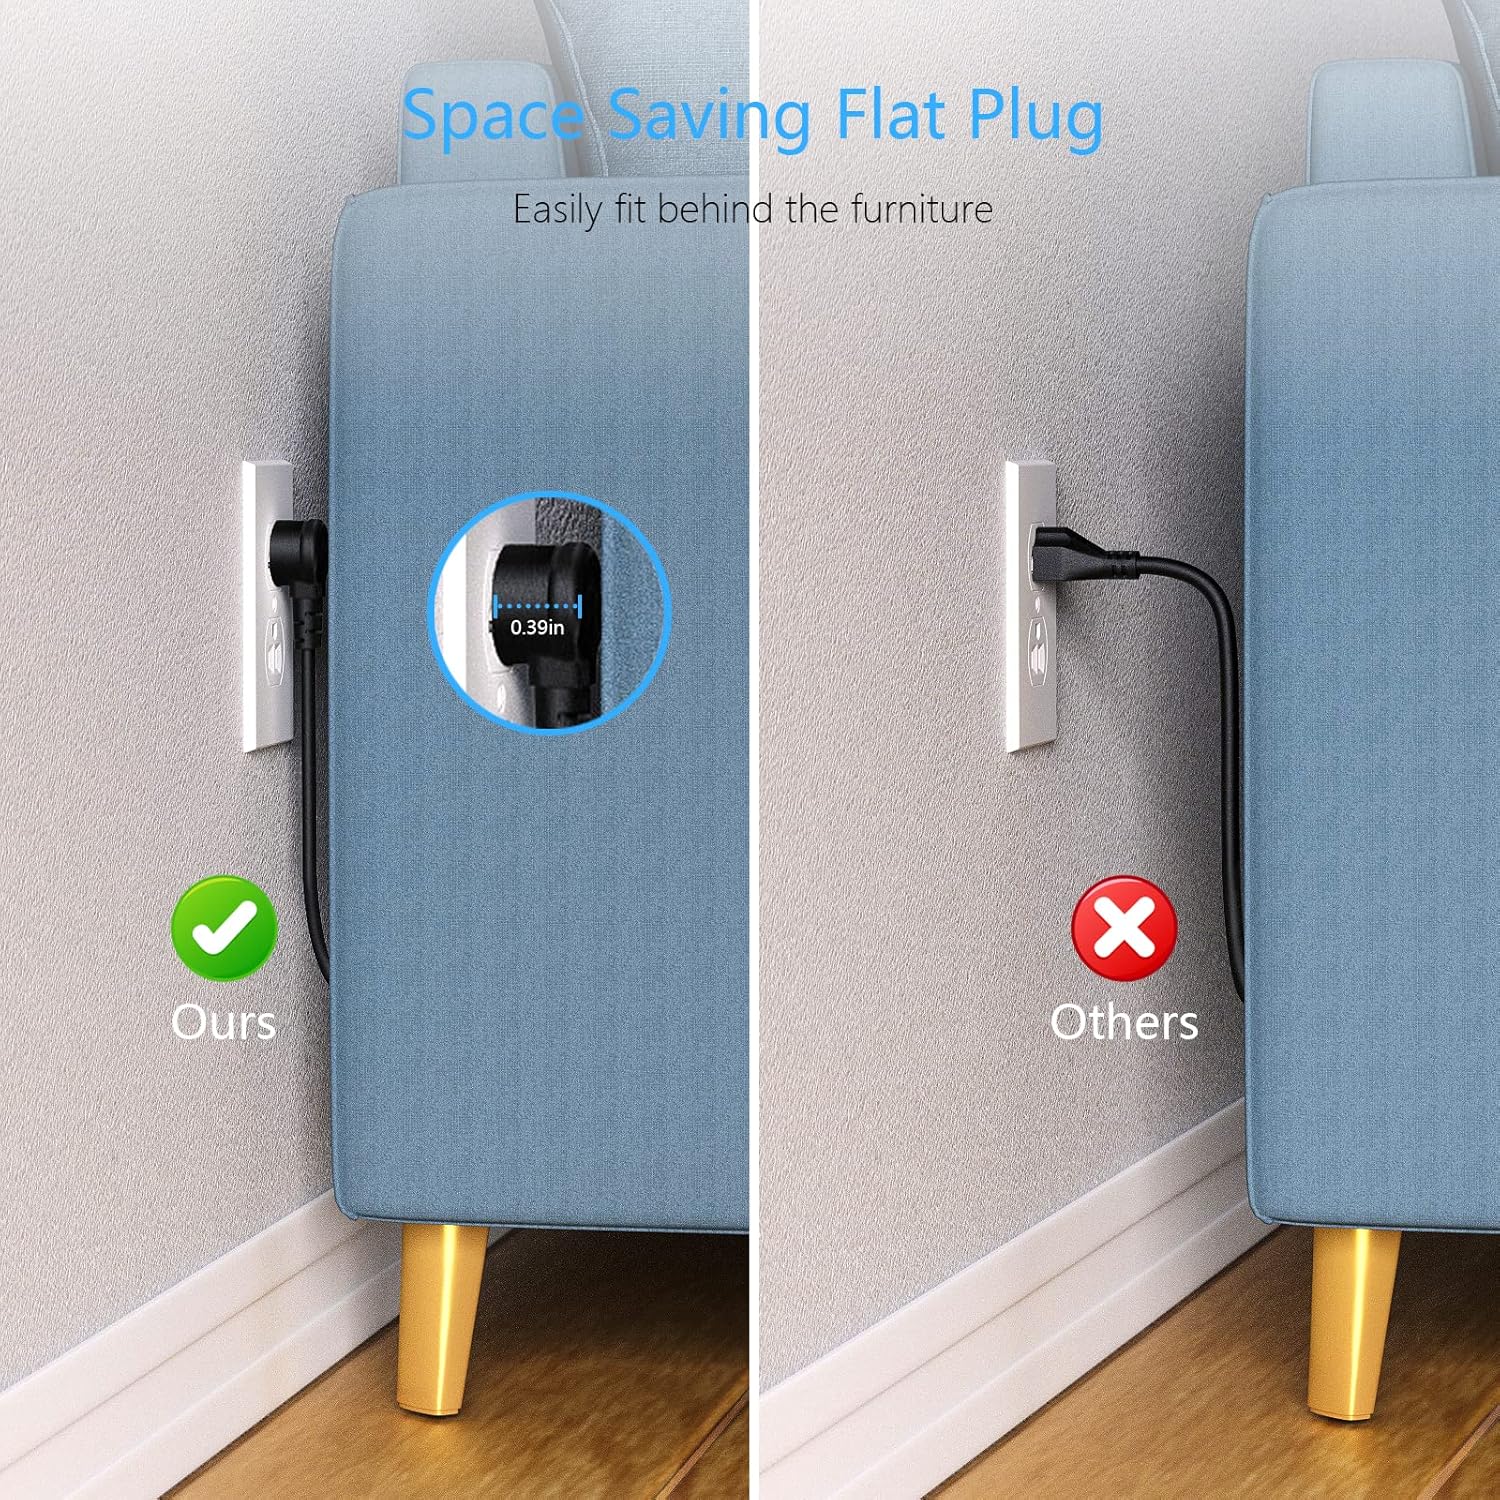
Image: A comparison showing the space-saving benefit of the flat plug, allowing a couch to be placed closer to the wall compared to a standard plug.
4. Setup & Installation
4.1 Desktop Use
- Place the power strip on a stable, flat surface.
- Ensure the detachable base is securely attached for stability.
- Plug the power strip's 5-foot extension cord into a grounded wall outlet.
- Press the power switch on top of the unit to turn it on. The indicator light will illuminate.

Image: The BESTEK Power Strip Tower placed on a desk, ready for use.
4.2 Mounting Options
The power strip can be mounted using screws or adhesive (included). Ensure the mounting surface is clean, dry, and suitable for holding the device and connected cables.
- Screw Fixing:
- Detach the base from the power strip.
- Use the provided screws to secure the base to your desired surface (e.g., under a desk, on a wall).
- Reattach the power strip to the secured base.
- 3M Glue Fixing (Adhesive):
- Clean the mounting surface thoroughly.
- Apply the 3M adhesive pads to the bottom of the detachable base.
- Press the base firmly onto the desired surface for at least 30 seconds.
- Allow the adhesive to cure for 24 hours before attaching the power strip and connecting devices.

Image: The BESTEK Power Strip Tower mounted discreetly under a desk, demonstrating its space-saving capability.

Image: Detailed view of the screw fixing method for mounting the power strip's base.

Image: Detailed view of the 3M adhesive fixing method for mounting the power strip's base.
5. Operating Instructions
5.1 Connecting Devices
- Ensure the power strip is plugged into a wall outlet and the power switch is ON.
- For AC Powered Devices: Plug your devices directly into any of the 3 AC outlets.
- For USB-A Powered Devices: Connect your device's USB-A charging cable to one of the 3 USB-A ports. These ports provide up to 2.4A Max output per port.
- For USB-C Powered Devices: Connect your device's USB-C charging cable to the USB-C PD 20W port. This port supports PD3.0 with output options of 5V/3A, 9V/2.22A, or 12V/1.67A for fast charging compatible devices.
The built-in smart technology detects connected devices and delivers optimal charging speed automatically.
Video: A demonstration of the BESTEK Power Strip Tower, showcasing its compact design and various ports for connecting multiple devices simultaneously.
6. Maintenance
- Unplug the power strip from the wall outlet before cleaning.
- Wipe the exterior with a soft, dry cloth. Do not use liquid cleaners or aerosols.
- Keep the power strip away from dust and debris to ensure proper ventilation.
- Regularly check the power cord for any signs of damage. If damaged, discontinue use immediately.
7. Troubleshooting
| Problem | Possible Cause | Solution |
|---|---|---|
| No power to devices. | Power switch is off, power strip is unplugged, or circuit breaker tripped. | Ensure power switch is ON. Check if the power strip is securely plugged into a live wall outlet. If the power strip has an overload protection reset button, press it. Reduce the number of connected devices if overloaded. |
| Devices not charging via USB ports. | Cable issue, device not compatible, or power strip is off. | Try a different USB cable. Ensure your device is compatible with the USB port type (USB-A or USB-C PD). Verify the power strip is on. |
| Power strip feels warm. | Normal operation or excessive load. | A slight warmth during operation is normal. If it feels excessively hot, unplug all devices immediately and reduce the load. Ensure proper ventilation around the unit. |
8. Specifications
- Brand: BESTEK
- Model Number: 1
- Color: Black
- Total Power Outlets: 3 AC Outlets
- Total USB Ports: 4 (3 USB-A, 1 USB-C)
- USB-A Output: 2.4A Max per port
- USB-C Output (PD3.0): 5V/3A, 9V/2.22A, 12V/1.67A (20W Max)
- Maximum Current: 15 Amps
- Surge Protection Rating: 600 Joules
- Power Plug Type: Type B - 3 pin (North American)
- Cord Length: 5 Feet
- Material: Copper, Plastic, Rubber (Flame Retardant PC Housing)
- Special Features: Compact, Portable, Detachable Base, 45-Degree Flat Plug
- Compatible Devices: Camera, Laptop, Personal Computer, Printer, Router, Scanner, Smartphone, Smartwatch, Speaker, Tablet
9. Warranty & Support
This BESTEK product comes with a 24-month protection plan. In addition, a 30-day return policy is available for refunds or replacements. Please refer to your purchase documentation for specific terms and conditions.
For technical support or warranty claims, please contact BESTEK customer service:
- Email: Refer to your product packaging or the official BESTEK website for contact details.
- Phone: Refer to your product packaging or the official BESTEK website for contact details.
- Online Support: Visit the official BESTEK website for FAQs and support resources.
Image: Icons representing BESTEK's service plan (24 months protection, 30 days return, return on defects) and customer support options (24H, Email, Phone).