1. Introduction
This manual provides essential instructions for the safe and effective operation of your Etrogo Intelligent 12V/24V 10A Automatic Battery Charger Maintainer. This device is designed to charge and maintain 12V and 24V lead-acid batteries (6-200Ah), including dry, flooded, start-stop (AGM/GEL/EFB/SLA/VRLA) types. It is suitable for use with cars, boats, motorcycles, and lawn mowers.
Important: This charger is not compatible with lithium batteries or LiFePO4 batteries.
2. Safety Information
Please read and understand all safety warnings and operating instructions before using this product. Failure to do so may result in electric shock, fire, or serious injury.
- Indoor Use Only: This charger is not waterproof. Do not expose it to rain, moisture, or wet conditions.
- Ventilation: Ensure adequate ventilation during charging. Batteries can produce explosive gases.
- Eye and Skin Protection: Always wear eye protection and gloves when working with batteries. Battery acid is corrosive.
- Keep Away from Children: This device is not a toy. Keep it out of reach of children.
- Proper Connection: Always connect the charger to the battery terminals correctly (red to positive, black to negative) before plugging into a power outlet. Disconnect in reverse order.
- Damaged Cables: Do not operate the charger with damaged cords or clamps. Contact customer support for replacement.
- No Disassembly: Do not attempt to disassemble or modify the charger. Servicing should be performed by qualified personnel only.
3. Product Overview
Familiarize yourself with the components of your Etrogo battery charger.

Figure 1: Front view of the Etrogo battery charger, showing the LED display, charging mode switch (AUTO/MOTOR), and charging indicators. The attached battery clamps and power cord are also visible.

Figure 2: Diagram illustrating the physical dimensions of the charger (17cm x 13cm x 7cm) and the lengths of its cables: 1.5m for the AC power cord and 1.2m for the DC output cables with red (positive) and black (negative) copper clips.
4. Setup and Connection
Follow these steps to connect the charger to your battery:
- Identify Battery Terminals: Locate the positive (+) and negative (-) terminals on your battery. The positive terminal is usually marked with a plus sign and is larger, while the negative terminal is marked with a minus sign.
- Connect Clamps: Attach the red (+) clamp of the charger to the positive (+) terminal of the battery. Attach the black (-) clamp of the charger to the negative (-) terminal of the battery. Ensure a secure connection.
- Plug into Power: Plug the charger's AC power cord into a standard 110V AC outlet. The charger will automatically detect the battery voltage (12V or 24V).

Figure 3: This diagram shows two connection methods: 1) Connecting the charger to a single 12V or 24V battery. 2) Connecting the charger to two 12V batteries in series to achieve 24V charging.
5. Operating Instructions
5.1 Automatic Voltage Detection
The charger features an intelligent chip that automatically detects the battery voltage (8-29V) and adjusts the output accordingly for 12V or 24V batteries.

Figure 4: The charger's display indicating automatic recognition of battery voltage, showing separate indicator lights for 12V (10V-14.5V) and 24V (18V-29V) battery types.
5.2 Charging Modes
The charger offers two charging modes, selectable via the 'Charging Mode' switch:
- AUTO Mode: This is the fast charging mode, recommended for batteries with a capacity greater than 20Ah (20Ah-200Ah) or when charging in cold conditions (below -10°C). Use this mode if the 'MOTOR' mode cannot initiate charging.
- MOTOR Mode: This is the gentle or intelligent charge mode, suitable for general use or for smaller batteries with a capacity less than 20Ah (3Ah-20Ah). This is often the default mode.
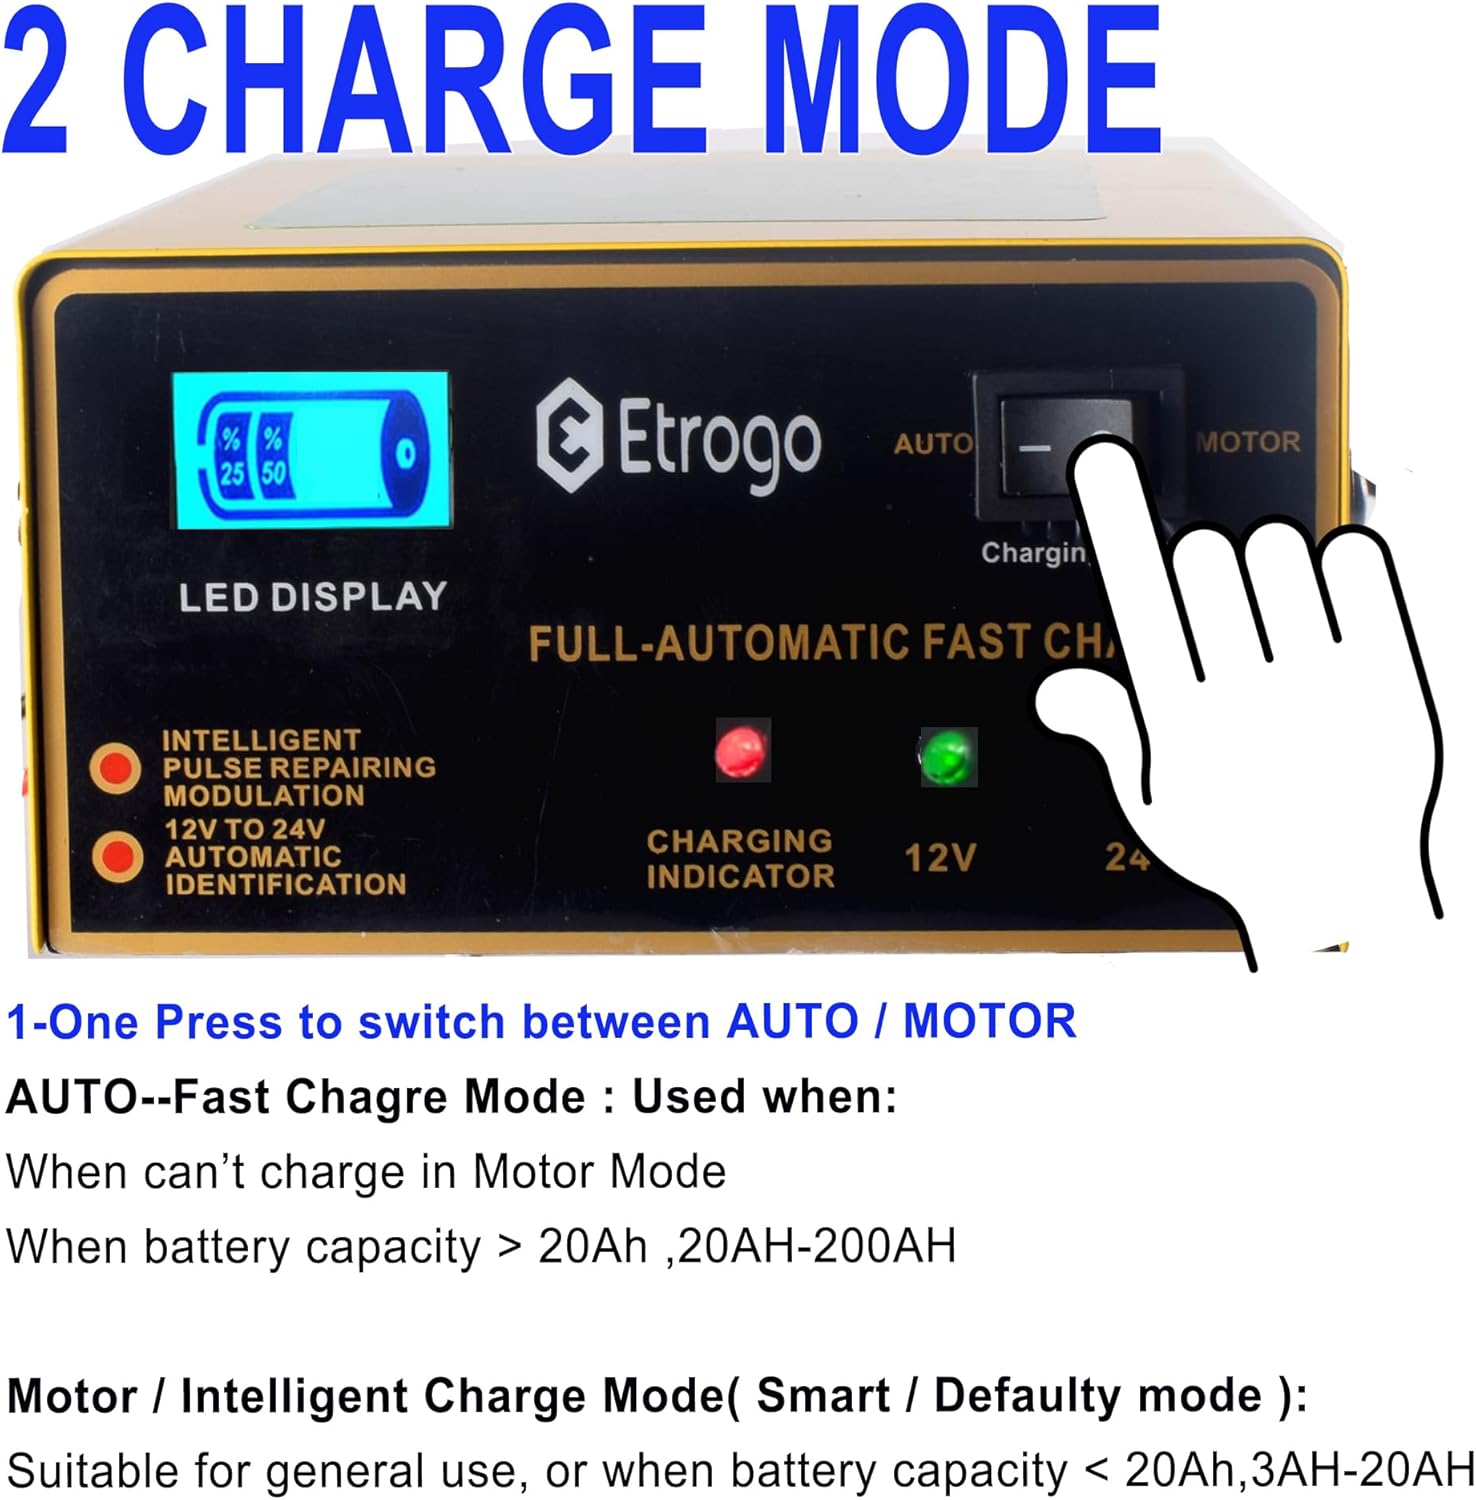
Figure 5: Close-up of the charger's control panel, highlighting the switch to select between 'AUTO' and 'MOTOR' modes.
5.3 Charging Process and Indicators
The charger provides real-time feedback on the charging status:
- LED Display: The screen shows the charging percentage progress.
- Charging Indicator: A red LED light indicates that the battery is currently charging.
- Automatic Stop: The charger will automatically stop output when the battery reaches 100% charge, preventing overcharge. At this point, the LED display will show 100%, and the charging indicator light will turn off.

Figure 6: Visual representation of the charging process: the LED bar screen shows percentage progress and the charging indicator light is on during charging. When fully charged, the LED bar shows 100%, and the charging indicator light turns off.
5.4 Pulse Repair Function
The charger incorporates PMW pulse technology for pulse repair, which can help recover dead batteries, even in cold temperatures.

Figure 7: Examples of vehicles and equipment compatible with the charger, such as cars, vans, boats, motorcycles, and golf carts, emphasizing its use for 12V/24V lead-acid batteries only.
6. Maintenance
To ensure the longevity and optimal performance of your charger:
- Cleaning: Wipe the charger's exterior with a dry, soft cloth. Do not use harsh chemicals or abrasives.
- Storage: Store the charger in a cool, dry place away from direct sunlight and moisture when not in use.
- Cable Inspection: Regularly inspect the power cord and battery clamps for any signs of damage, fraying, or corrosion. Replace if necessary.
7. Troubleshooting
If you encounter issues with your charger, refer to the following common problems and solutions:
- Charger Not Turning On:
- Ensure the power cord is securely plugged into a live 110V AC outlet.
- Check if the battery clamps are correctly connected to the battery terminals.
- Charger Not Charging:
- Verify that the battery is a 12V or 24V lead-acid type. This charger is not for lithium batteries.
- Ensure the battery voltage is within the detectable range (8-29V).
- Try switching between 'AUTO' and 'MOTOR' modes. If a battery is deeply discharged, 'AUTO' mode might be required.
- Check for reverse polarity connection; the charger has protection but will not charge if connected incorrectly.
- Overheating Protection: The charger has built-in overheating protection. If it becomes too hot, it may temporarily reduce output or shut down. Allow it to cool down in a well-ventilated area.
- Other Protections: The charger includes short-circuit, reverse-connection, overcurrent, and overpressure protection. If these protections are activated, the charger may stop operating. Check connections and battery condition.

Figure 8: An illustration highlighting the charger's built-in safety features: reverse connection protection, short circuit protection, and overcurrent protection, ensuring safe operation.
8. Specifications
| Feature | Specification |
|---|---|
| Brand | Etrogo |
| Model Number | 1 |
| Input Voltage | 110 Volts (AC) |
| Output Voltage | 12 Volts (DC), 24 Volts (DC) |
| Current Rating | 10 Amps |
| Power | 250W |
| Battery Compatibility | 12V/24V Lead-Acid (6-200Ah) - Dry/Flooded/AGM/GEL/EFB/SLA/VRLA |
| Battery Cell Composition | Lead Acid |
| Product Dimensions | 7D x 13W x 17H Centimetres (7 x 13 x 17 cm) |
| Item Weight | 708 Grams |
| AC Cable Length | 1.5m |
| DC Cable Length | 1.2m |
| Special Features | Automatic Detection, Pulse Repair, LED Screen, Multi-Protections |
9. Warranty and Support
Specific warranty details are not provided in this manual. For warranty information, please refer to the product packaging or contact the seller directly. For technical support or inquiries, please reach out to the Etrogo customer service department through your purchase platform.


