1. Safety Information
Please read all instructions and safety warnings before assembling and operating this product. Failure to follow these instructions could result in property damage or personal injury.
- Always use heat-resistant gloves when handling hot components.
- Ensure the grill is on a stable, non-combustible surface.
- Keep children and pets away from the hot grill.
- Do not use the electric motor in wet conditions.
- Ensure proper ventilation when operating the charcoal grill.
2. Package Contents
Verify all components are present before assembly:
- Stainless Steel Rotisserie Ring
- 110V Electric Rotisserie Motor
- Stainless Steel Spit Rod
- Meat Forks (2 sets)
- Counterbalance Weight
- Thermometer (integrated into ring)
- 15-inch Round Pizza Stone
- Pizza Peel
- Support Chips (4 pieces)
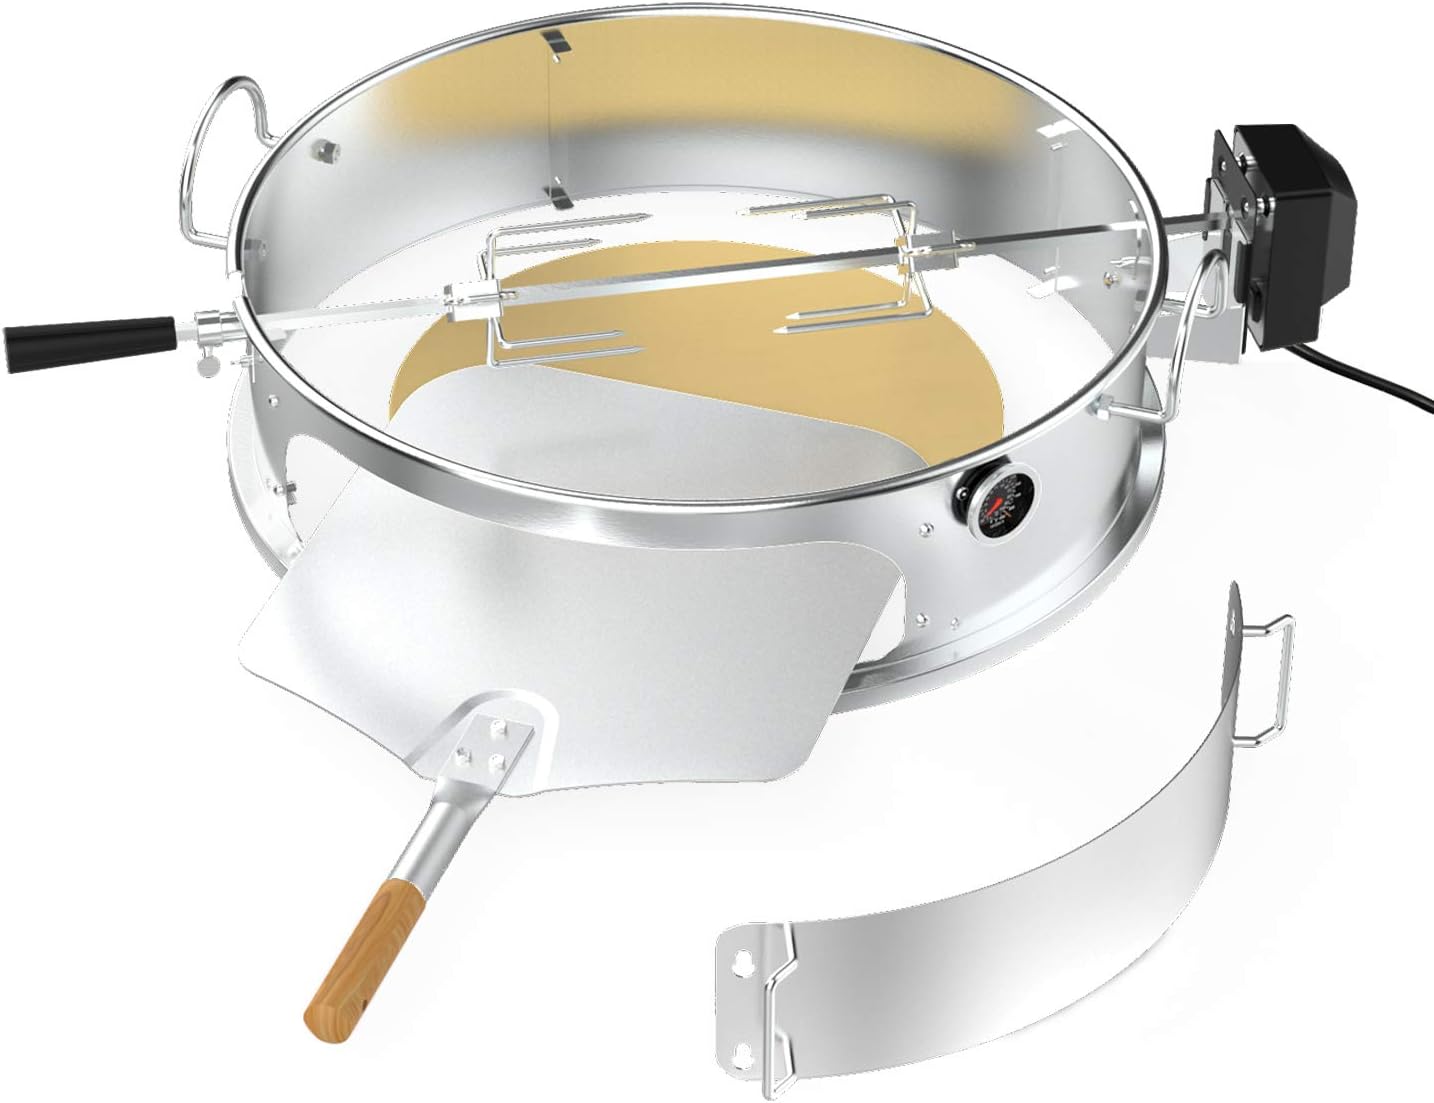
Figure 1: All components of the onlyfire Stainless Steel Multi-purpose Rotisserie and Pizza Combo Kit.
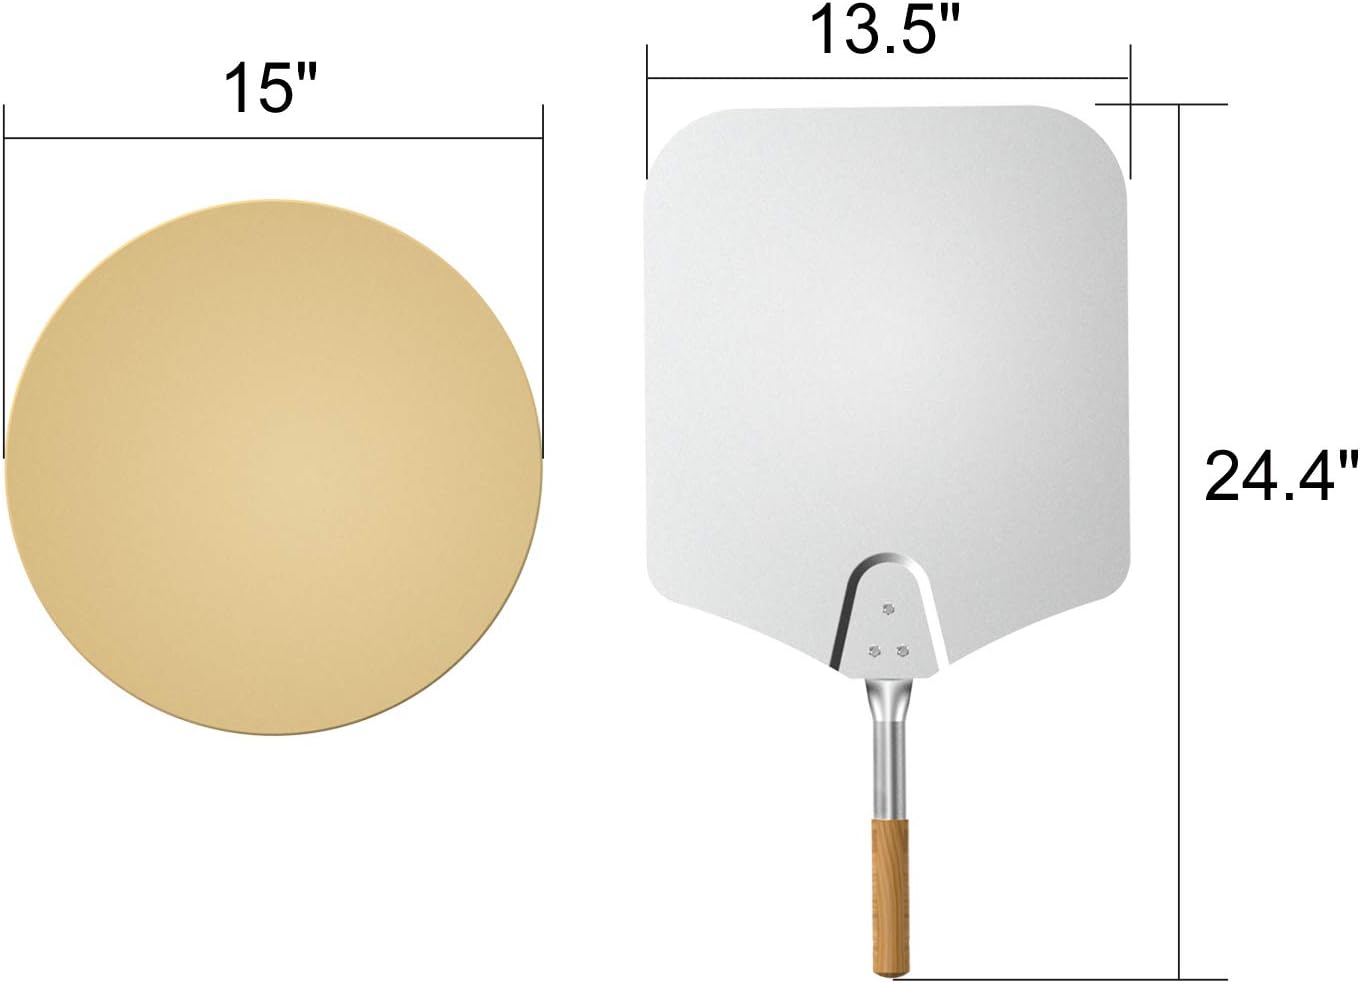
Figure 2: The 15-inch round pizza stone and pizza peel included in the kit.
3. Setup Instructions
3.1 Initial Assembly of Rotisserie Ring
- Attach the handles to the rotisserie ring using the provided nuts and bolts. Ensure they are securely tightened.
- Install the motor bracket onto the rotisserie ring.
3.2 Placing the Rotisserie Ring on the Grill
Place the assembled stainless steel rotisserie ring directly onto your Weber 22-inch kettle charcoal grill base. Ensure it sits flush and securely.
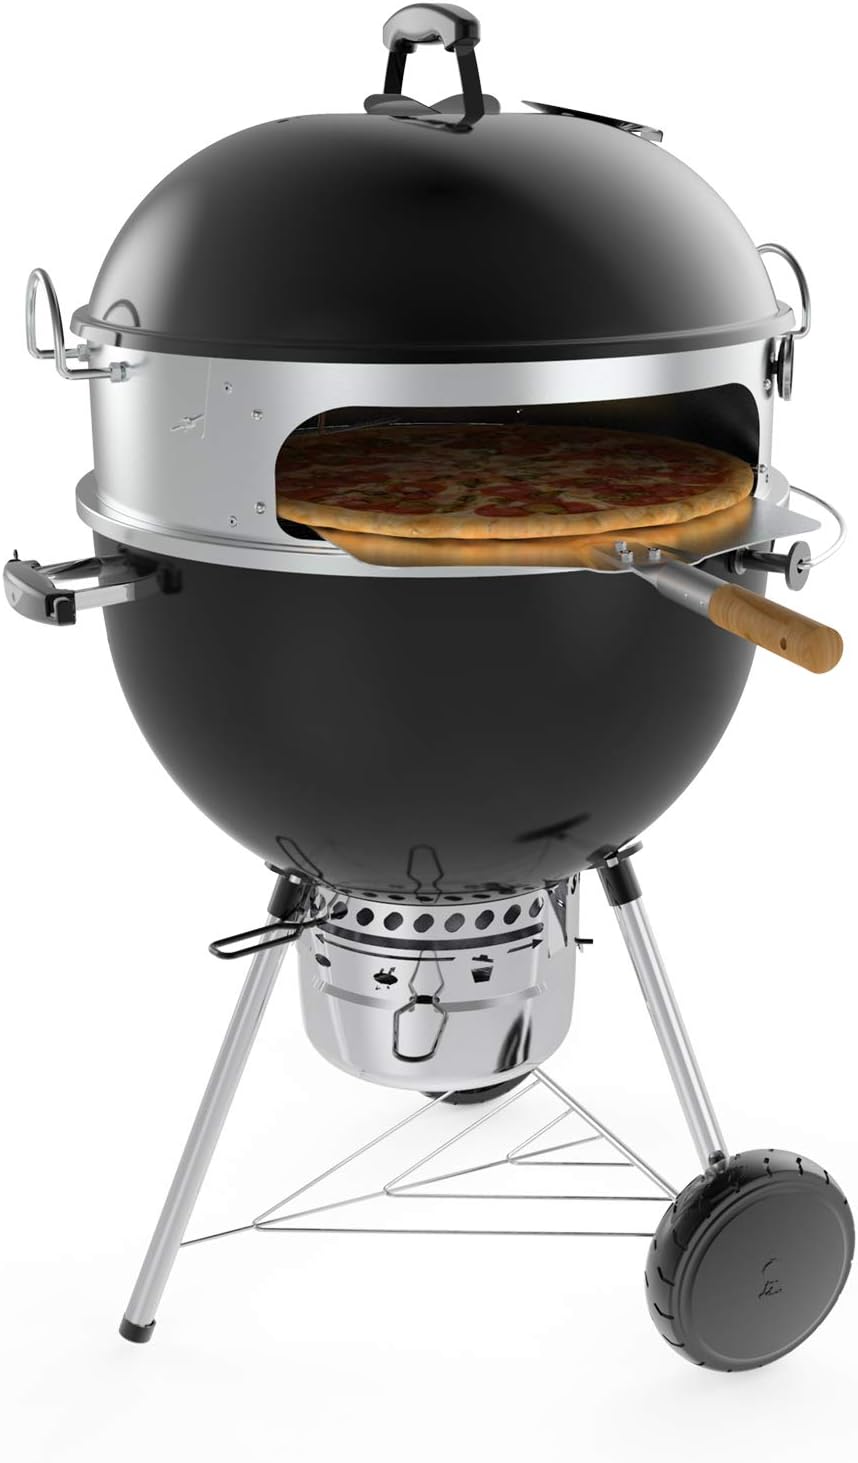
Figure 3: The onlyfire rotisserie ring installed on a Weber kettle grill, ready for use.
3.3 Charcoal Setup
For both rotisserie and pizza functions, arrange charcoal in a circular pattern around the perimeter of the grill's charcoal grate, leaving the center clear. This creates indirect heat for rotisserie and allows for high heat for pizza.
3.4 Installing Support Chips (for Pizza Stone)
The kit includes four support chips to elevate your cooking grate or to support the pizza stone. Insert these chips into the designated slots on the inner wall of the rotisserie ring.
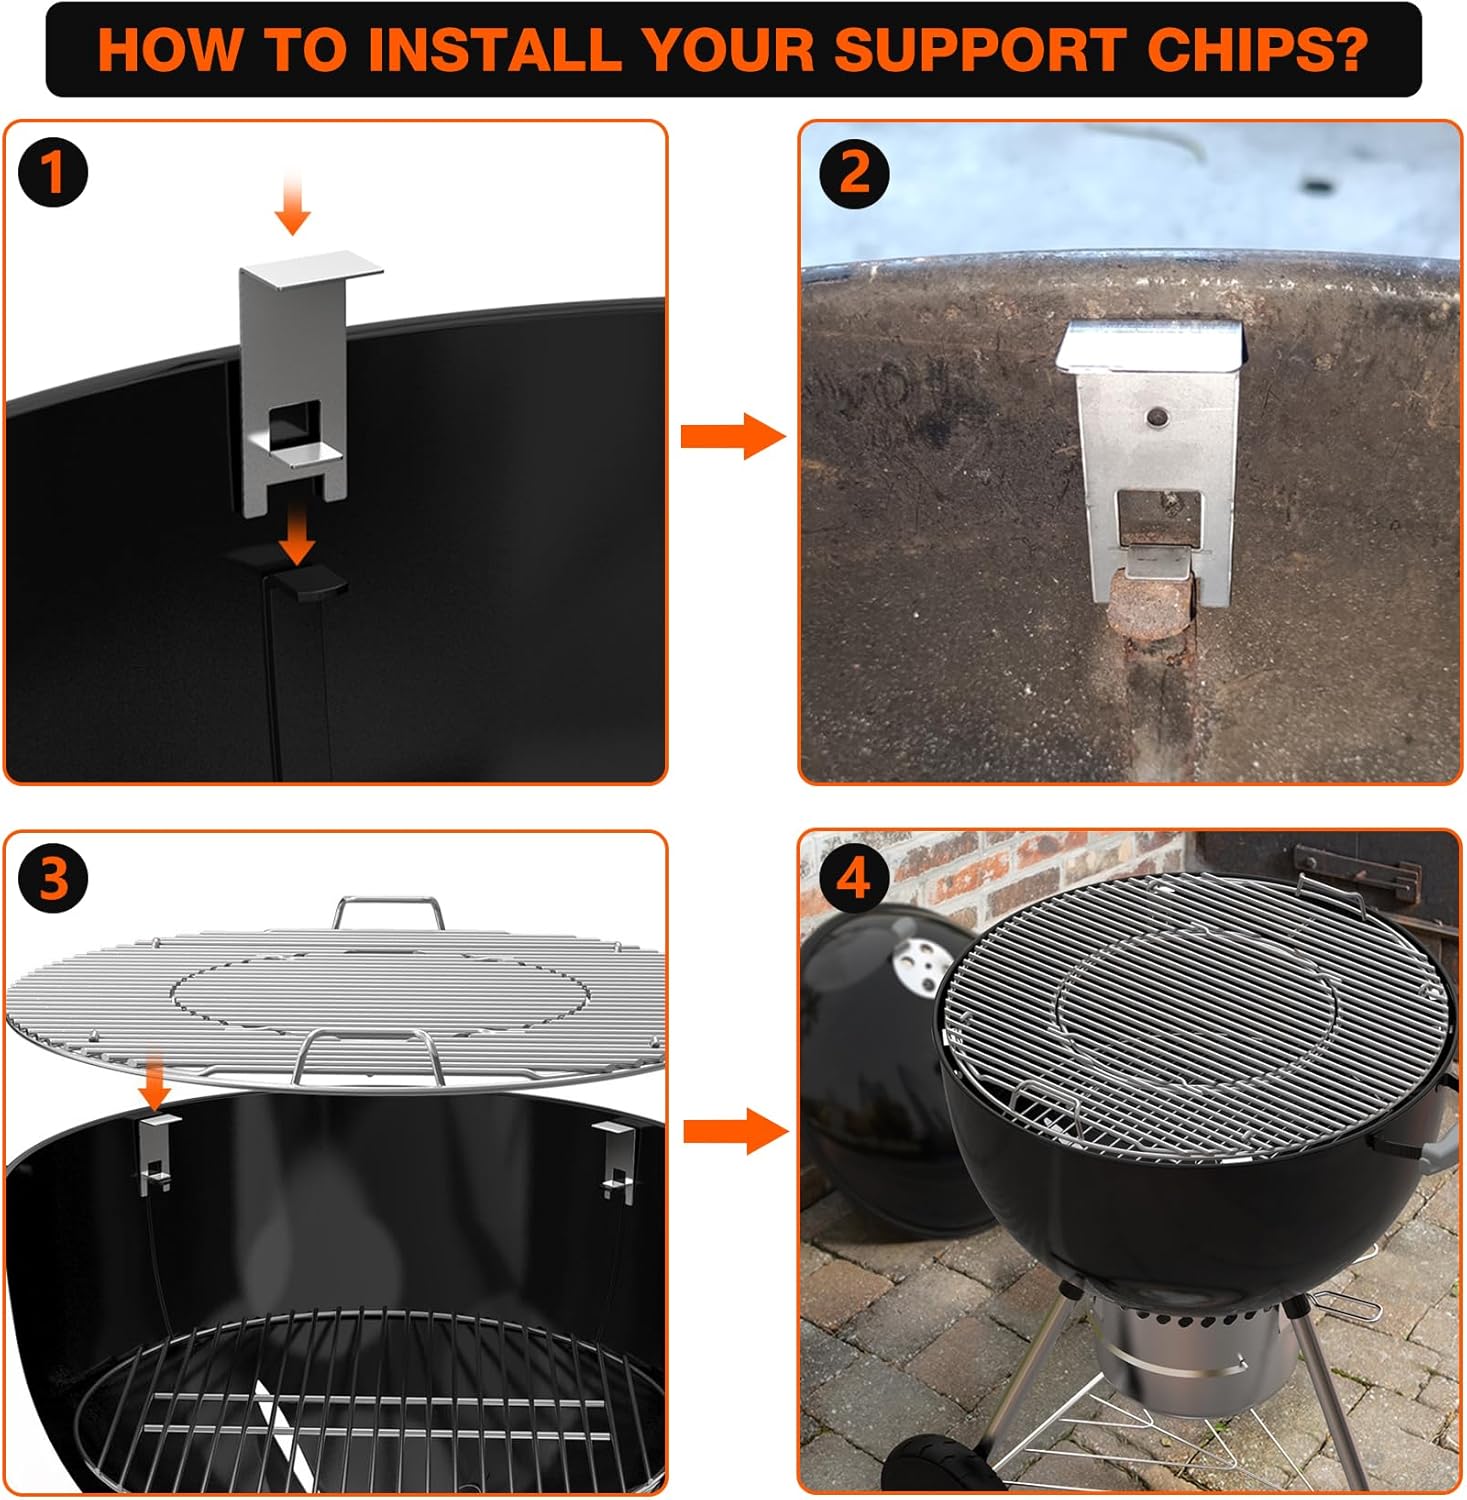
Figure 4: Step-by-step guide on installing the support chips to hold the cooking grate or pizza stone.
3.5 Attaching Rotisserie Spit and Motor
- Slide the meat forks onto the spit rod and secure them.
- Insert the spit rod through the designated holes in the rotisserie ring.
- Attach the electric motor to its bracket on the side of the ring. Ensure the spit rod engages with the motor's drive.
- Plug in the motor to a suitable power outlet.
Video 1: This video demonstrates the setup and use of the onlyfire Multi-purpose Rotisserie Ring Kit, including attaching the motor and spit rod, and cooking chicken.
4. Operating Instructions
4.1 Rotisserie Function
- Prepare Food: Season and truss your meat (e.g., chicken, roast) to ensure even cooking and prevent parts from dangling.
- Load Spit: Carefully slide the prepared meat onto the spit rod, securing it with the meat forks. Use the counterbalance weight if necessary for heavier, unevenly shaped items to ensure smooth rotation.
- Start Motor: Once the spit rod is in place and the motor is attached and plugged in, turn on the motor. The meat will begin to rotate slowly.
- Monitor Temperature: Use the integrated thermometer to monitor the internal temperature of the grill. Adjust charcoal or vents as needed to maintain desired cooking temperature.
- Cooking Time: Cooking times vary based on meat type, size, and desired doneness. Always use a meat thermometer to ensure food reaches a safe internal temperature.
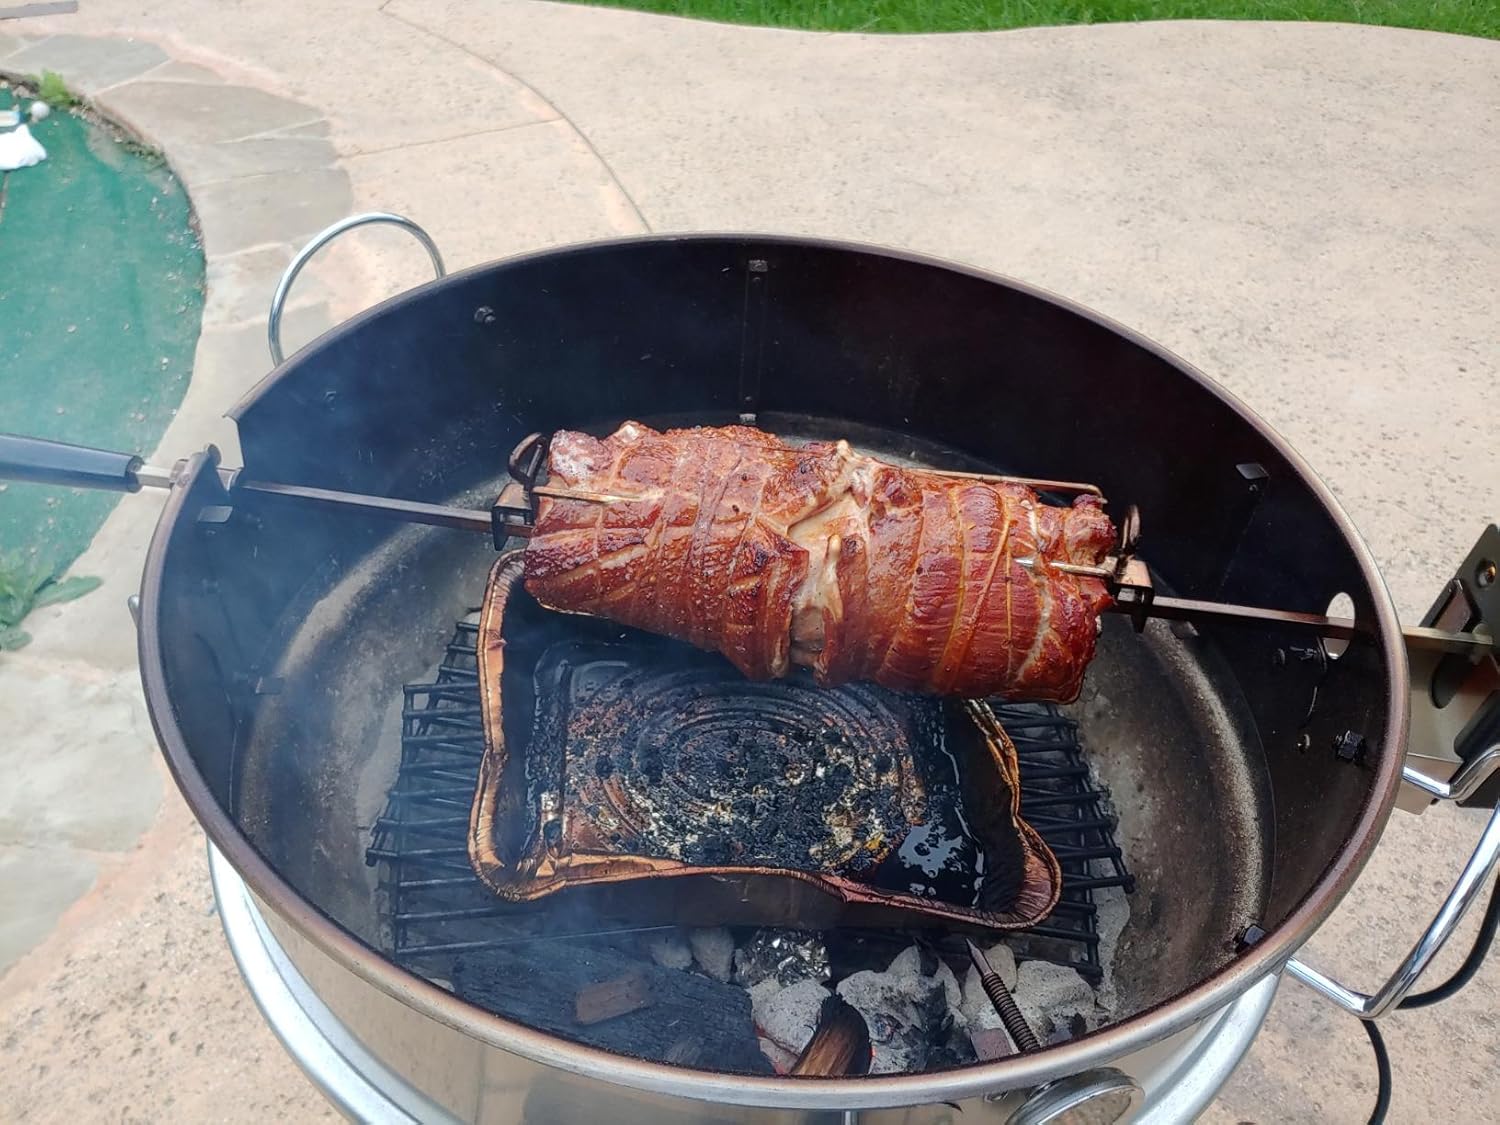
Figure 5: A whole chicken rotating on the rotisserie spit, cooking over indirect heat in the kettle grill.
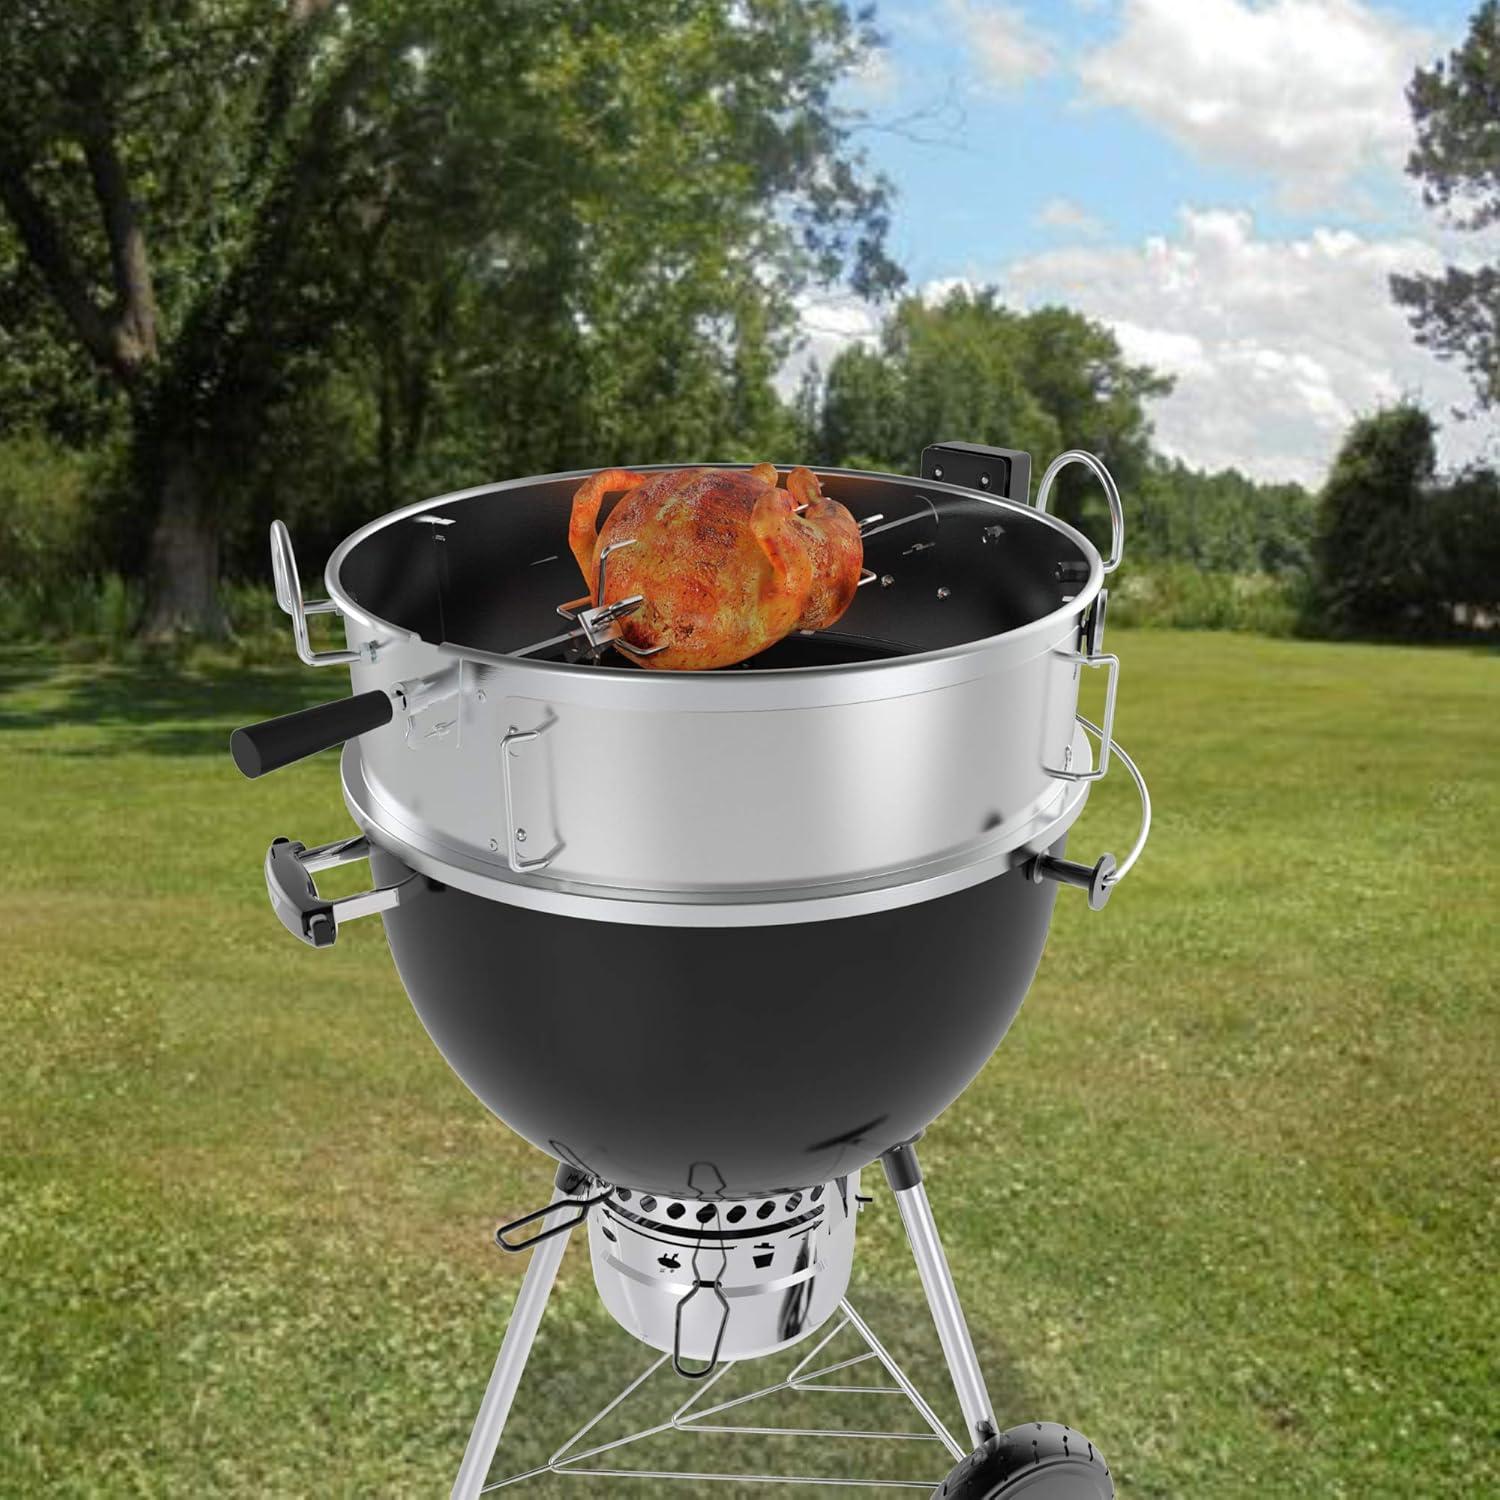
Figure 6: Another view of a rotisserie chicken cooking, showing the smoke and setup.
4.2 Pizza Oven Function
- Preheat Stone: Place the 15-inch pizza stone on the cooking grate inside the rotisserie ring. Arrange charcoal for high heat. Allow the grill and stone to preheat for at least 20-30 minutes, aiming for temperatures between 600-800°F (315-425°C) for optimal results.
- Launch Pizza: Prepare your pizza on the pizza peel, ensuring a light dusting of flour or cornmeal to prevent sticking. Slide the pizza onto the preheated stone through the removable opening in the rotisserie ring.
- Rotate Pizza: After 1-2 minutes, use the pizza peel to rotate the pizza 180 degrees to ensure even cooking.
- Monitor Cooking: Pizzas cook quickly at high temperatures (typically 2-5 minutes). Watch for a golden-brown crust and melted, bubbly cheese.
- Remove Pizza: Use the pizza peel to carefully remove the cooked pizza from the stone.
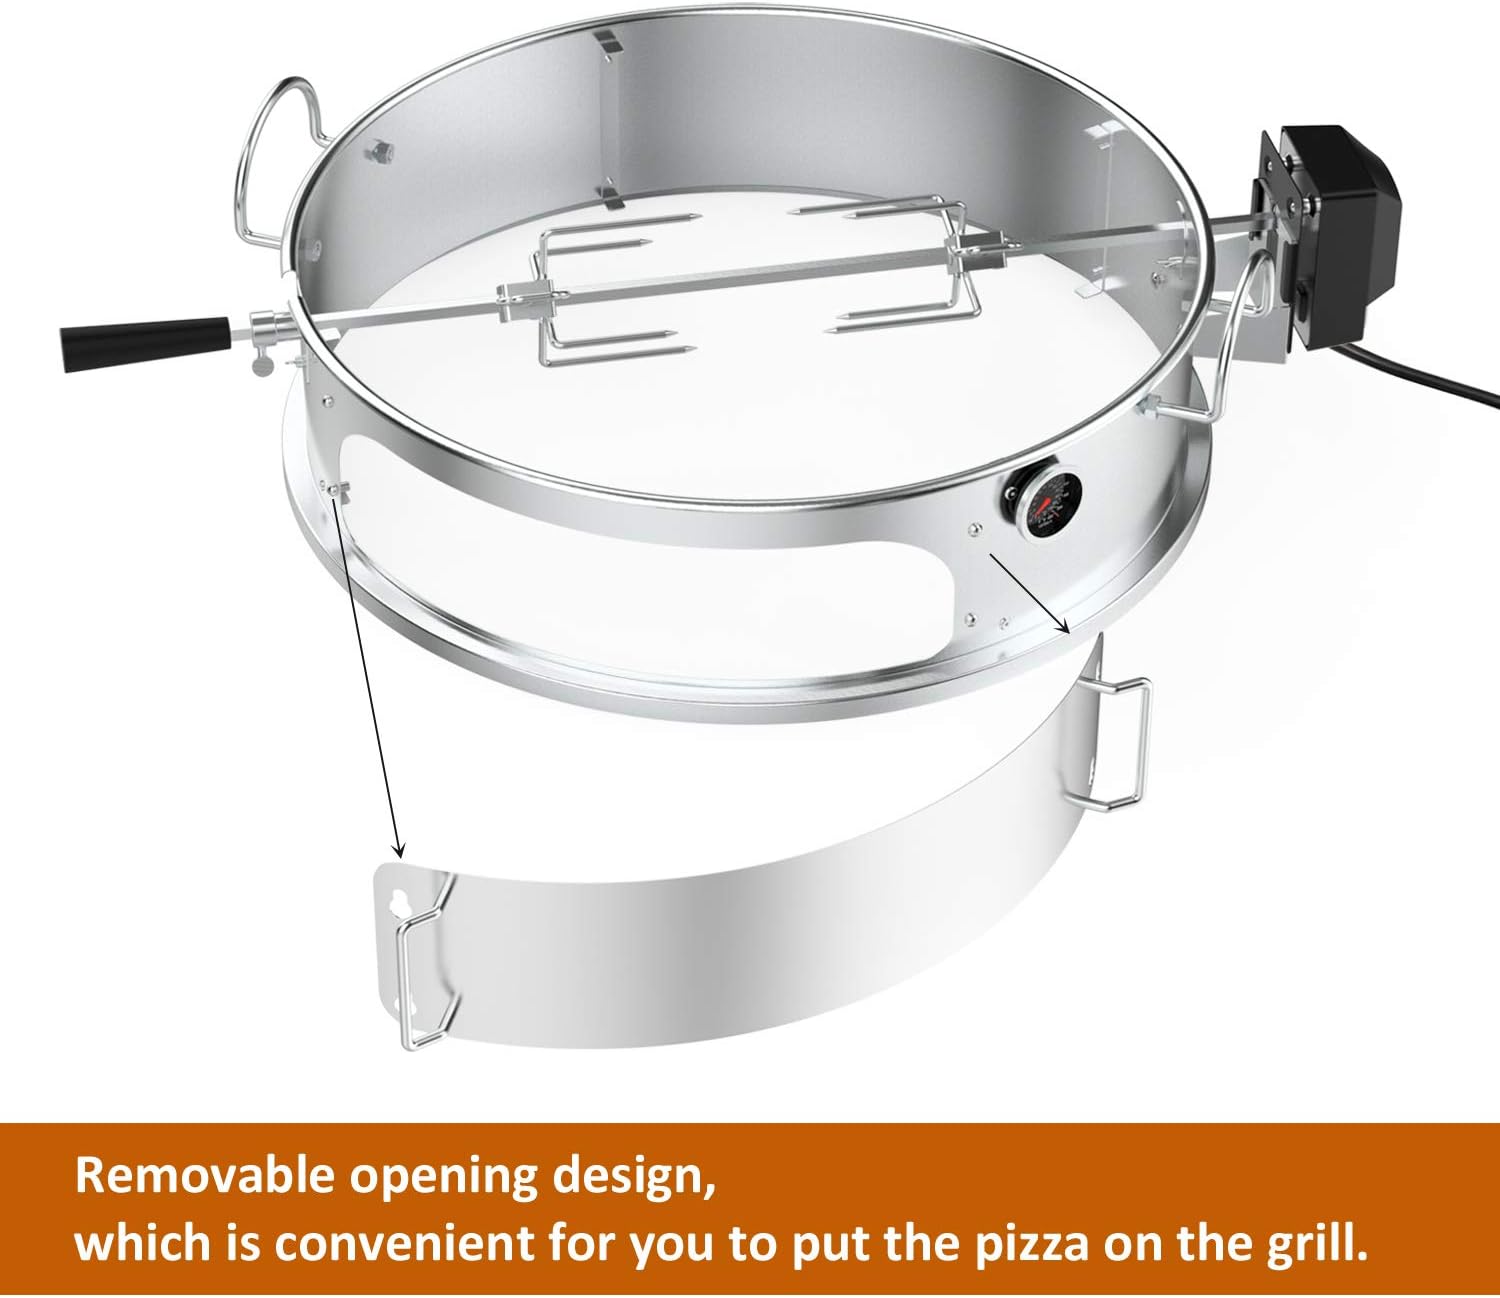
Figure 7: The removable opening design on the rotisserie ring, allowing easy access for placing and removing pizzas.
5. Maintenance
5.1 Cleaning
- Stainless Steel Components: After each use, allow components to cool. Wash with warm, soapy water and a non-abrasive cloth. Rinse thoroughly and dry immediately to prevent water spots.
- Pizza Stone: Allow the stone to cool completely before cleaning. Scrape off any excess food with a spatula. For stubborn residue, use a stiff brush and warm water. Do NOT use soap, as it can be absorbed by the porous stone and affect future food flavors. Air dry completely before storage.
- Electric Motor: Wipe the motor housing with a damp cloth. Do not immerse the motor in water.
5.2 Storage
Store all components in a dry, protected area when not in use. Ensure the pizza stone is completely dry before storing to prevent mold or cracking.
6. Troubleshooting
- Motor Not Turning: Check if the motor is securely plugged in and the power switch is on. Ensure the spit rod is correctly engaged with the motor drive. Verify the counterbalance is properly adjusted for heavy loads.
- Uneven Cooking (Rotisserie): Ensure the meat is properly trussed and centered on the spit rod. Adjust the counterbalance if needed. Check for consistent heat distribution from the charcoal.
- Pizza Sticking to Peel/Stone: Use ample flour or cornmeal on the pizza peel before launching. Ensure the pizza stone is fully preheated before placing the pizza.
- Low Pizza Oven Temperature: Add more charcoal or adjust vents to increase airflow and heat. Ensure the grill lid is properly seated on the rotisserie ring to retain heat.
7. Specifications
| Brand | onlyfire |
| Model Name | F-BRK6055-SS1 |
| Material | Stainless Steel |
| Color | Stainless Steel |
| Fuel Type | Electric (for motor) |
| Recommended Uses | Outdoor |
| Assembly Required | Yes |
| Item Weight | 18.06 pounds |
| Package Dimensions | 23.6 x 23.6 x 7.2 inches |
| Pizza Stone Size | 15-inch Round |
8. Warranty and Support
For warranty information or product support, please refer to the manufacturer's official website or contact their customer service directly. Keep your proof of purchase for any warranty claims.