LoraTap AK3-AT1-GL-M-X
LoraTap WiFi Smart Blind Switch User Manual
Model: AK3-AT1-GL-M-X
Introduction
Welcome to the user manual for your LoraTap WiFi Smart Blind Switch. This device allows you to control your roller shutters or blinds conveniently via a touch panel, an RF remote control, or through a smartphone app. It also supports voice control with popular smart home assistants, enhancing your home automation experience.
Key Features
- Integrated RF Remote Control for flexible operation.
- Smart Life App compatibility for remote control and scheduling.
- Timer function for automated opening and closing.
- Voice control support with Google Home and Amazon Alexa.
Safety Information
Important: Always disconnect power before installation or maintenance to prevent electric shock.
Professional Installation Recommended: If you are unsure about electrical wiring, consult a qualified electrician.
Compatibility: This switch is designed for motors with four wires (Live, Neutral, Up, Down). Ensure your motor is compatible before installation.
Power Rating: Do not exceed the maximum load capacity of 600W to avoid damage to the device or motor.
Package Contents
Please verify that all items are present in your package:
- LoraTap WiFi Smart Blind Switch
- RF Remote Control
- Mounting Screws
- Small Screwdriver
- Additional Terminal for Neutral Conductor (if applicable)
Setup & Installation
Wiring Diagram
Ensure power is disconnected before proceeding. This switch requires a neutral wire. Confirm your motor has four wires (Blue=Neutral, Black=Up/Down, Brown=Down/Up, Green/Yellow=Ground).

Input L: Live wire (100-250VAC)
Input N: Neutral wire
Output N: Neutral output to motor
Output L1: Up/Down control wire to motor
Output L2: Down/Up control wire to motor
Ground Wire (Green/Yellow): Do not connect to the switch.
Motor Compatibility
This switch is compatible only with 4-wire motors. Please verify your motor's wiring configuration before installation.

Blue: Neutral Conductor
Black: Up/Down
Brown: Down/Up
Green/Yellow: Earth
Max Load: ≤600W
WLAN Signal Confirmation
For optimal performance, the device should be installed within 10 meters of your WLAN router to ensure a strong and stable signal.

Operating Instructions
Control Methods
Your LoraTap Smart Blind Switch offers multiple ways to control your blinds:
Touch Panel Control
The switch features a touch-sensitive glass panel for direct control.

- Touch the Up arrow to open the blinds.
- Touch the Down arrow to close the blinds.
- Touch the Pause button to stop the blinds at any position.
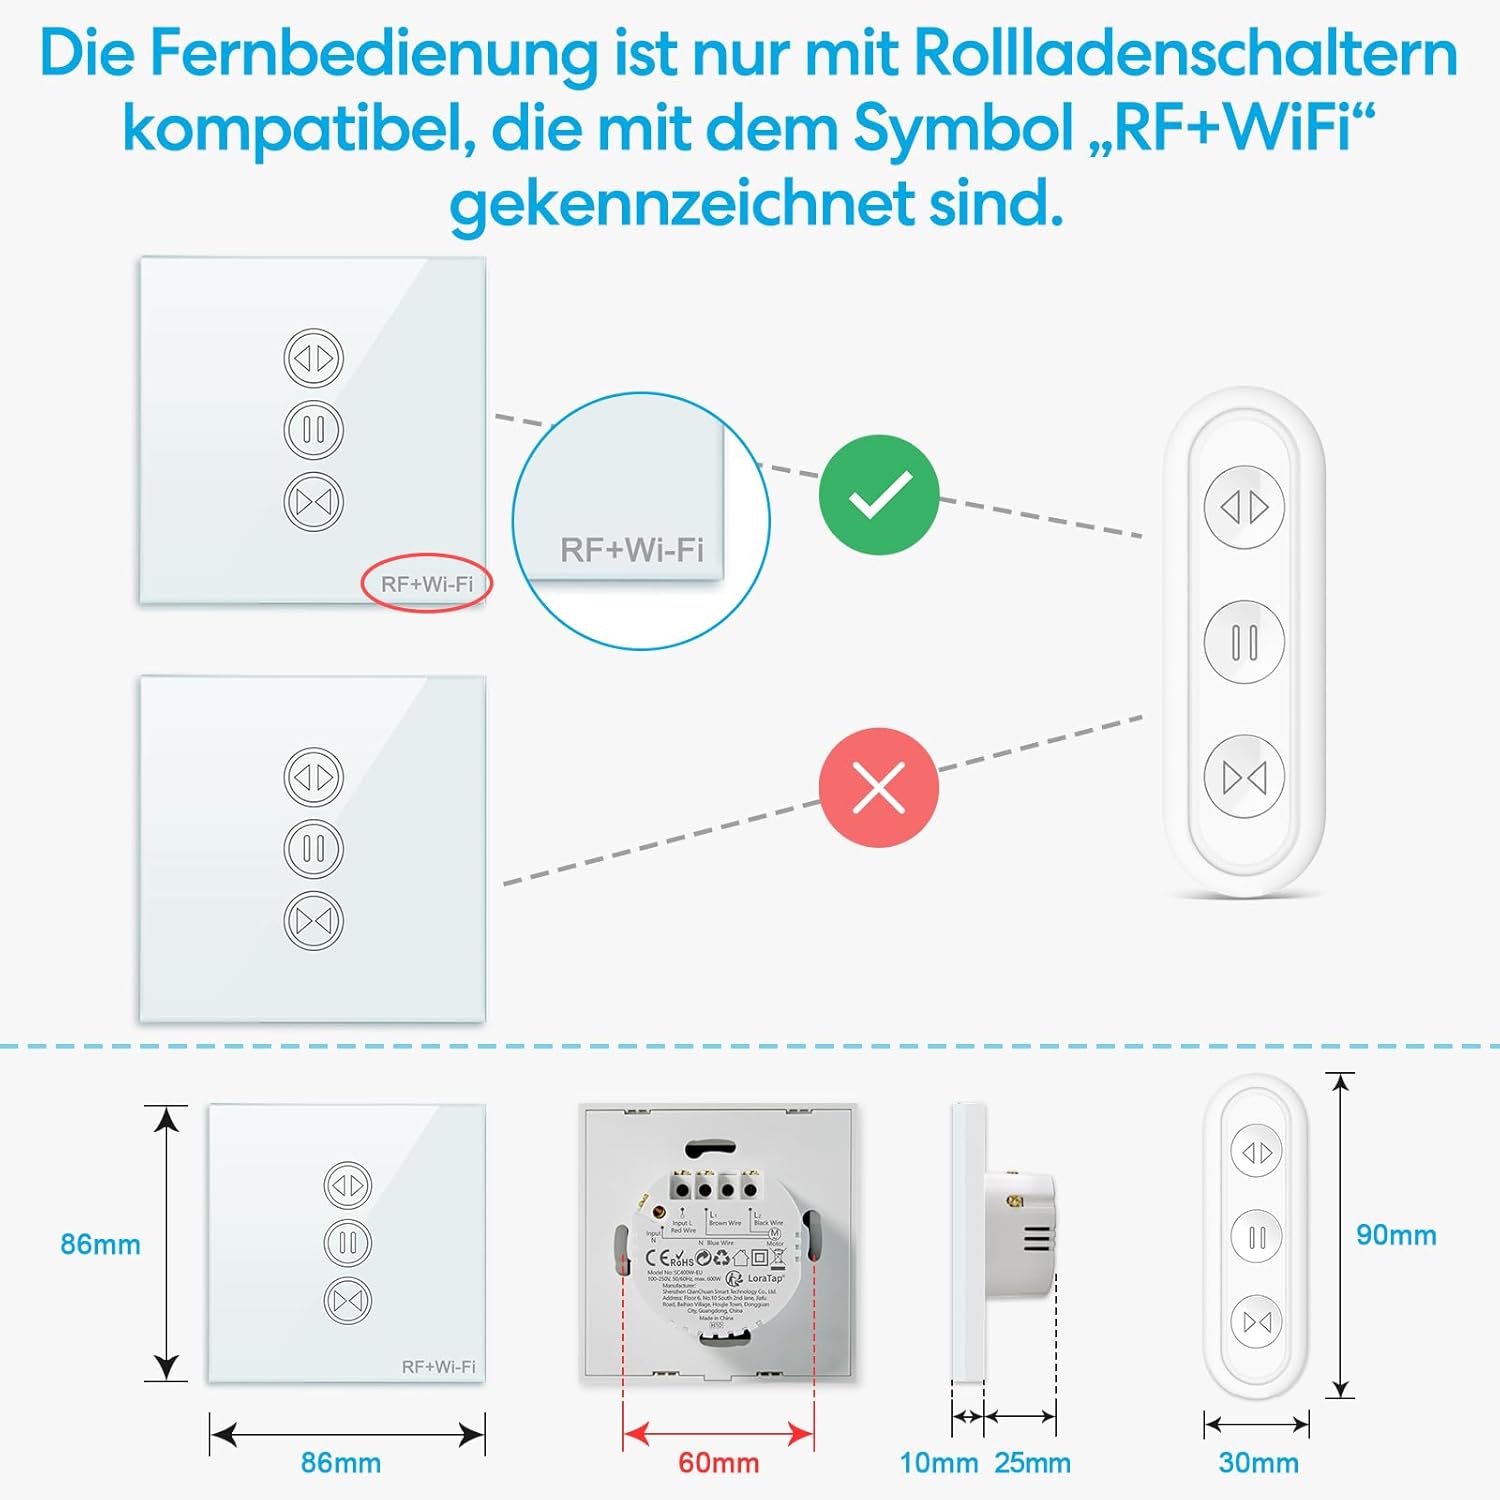
RF Remote Control
The included RF remote control allows for convenient operation from anywhere within your home.

The remote control is pre-paired with the switch. Ensure your switch is marked with "RF+Wi-Fi" for compatibility.
Smart Life App Control
Download the free Smart Life App (or Tuya App) on your smartphone or tablet to control your blinds remotely from anywhere.

- Open the app and select your device.
- Use the virtual buttons to open, close, or pause your blinds.
- Receive real-time status updates.
Timer Function
Set schedules within the Smart Life App to automatically open or close your blinds at specific times.

- In the Smart Life App, navigate to the device settings.
- Select "Schedule" or "Timer" to create new automation rules.
- Set desired times for opening and closing.
Voice Control
Integrate your LoraTap Smart Blind Switch with Google Home or Amazon Alexa for convenient voice commands.

- Ensure your Smart Life account is linked to your Google Home or Amazon Alexa app.
- Use commands like "Alexa, open the roller shutter" or "Hey Google, close the blinds."
Pairing Instructions (Smart Life App)
Follow these steps to pair your switch with the Smart Life or Tuya App:

- WLAN Network Compatibility: Ensure your Wi-Fi network is 2.4GHz. 5GHz networks or combined 2.4GHz/5GHz networks are not supported for initial pairing.
- Enter Pairing Mode: Press and hold the Pause button on the switch for 5 seconds until the indicator light flashes rapidly.
- Open App: Open the Smart Life or Tuya App on your smartphone.
- Add Device: Tap the "+" icon or "Add Device" to begin the pairing process.
- Select Device Type: Choose "Curtain Switch" or similar from the device list.
- Connect to WLAN: Select your 2.4GHz Wi-Fi network and enter the password.
- Confirm Pairing: The app will search for and connect to the device. Once successful, the device will be added to your app.
Maintenance
To ensure the longevity and proper functioning of your LoraTap Smart Blind Switch, follow these simple maintenance guidelines:
- Cleaning: Wipe the glass panel with a soft, dry cloth. Avoid using abrasive cleaners or solvents that could damage the surface.
- Power Cycle: If the switch becomes unresponsive, try turning off the power at the circuit breaker for a few minutes, then restore power.
- Firmware Updates: Periodically check the Smart Life App for any available firmware updates for your device to ensure optimal performance and security.
Troubleshooting
| Problem | Possible Cause | Solution |
|---|---|---|
| Switch not responding to touch. | No power; Incorrect wiring; Device malfunction. | Check power supply. Verify wiring according to the diagram. Contact support if issue persists. |
| Remote control not working. | Battery low/dead; Not paired; Out of range. | Replace CR2032 battery. Re-pair the remote if necessary (refer to remote's specific pairing instructions, usually holding a button on the remote and switch). Ensure remote is within range of the switch. |
| Cannot connect to Wi-Fi. | Incorrect Wi-Fi password; 5GHz network; Router too far; Device not in pairing mode. | Double-check Wi-Fi password. Ensure you are connecting to a 2.4GHz network. Move router closer or use a Wi-Fi extender. Put the switch into pairing mode (hold pause button for 5 seconds). |
| Blinds not moving correctly. | Motor wiring incorrect; Motor malfunction; Calibration needed. | Verify L1/L2 wiring to the motor. Consult motor manual for troubleshooting. Some smart switches require calibration for full open/close positions in the app. |
| Voice control not working. | App not linked; Incorrect commands; Internet connection issue. | Ensure Smart Life/Tuya account is correctly linked to Google Home/Alexa. Use precise commands. Check internet connection for both the switch and your smart speaker. |
Specifications
| Feature | Detail |
|---|---|
| Model Number | AK3-AT1-GL-M-X |
| Brand | LoraTap |
| Color | White |
| Material | Plastic |
| Item Weight | 230 g |
| Product Dimensions | 11.7 x 10.4 x 4.9 cm |
| Operating Voltage | 100-250VAC |
| Current Rating | 10 Amps |
| Max Load Power | 600W |
| Switch Type | 1-Way |
| Connectivity | Wi-Fi (2.4GHz), RF |
| Batteries Required | Yes (1 CR2032 for remote, included) |
| Compatible Apps | Smart Life, Tuya |
| Voice Assistants | Google Home, Amazon Alexa |
Warranty and Support
For warranty information and technical support, please refer to the official LoraTap website or contact their customer service directly. Keep your purchase receipt as proof of purchase.
Related Documents - AK3-AT1-GL-M-X
 |
LoraTap SC420W-EU Smart Curtain Switch Installation Guide Detailed installation instructions for the LoraTap SC420W-EU Smart Curtain Switch, compatible with Tuya Smart Life, Google Home, and Alexa voice assistants for controlling roller shutter electric motors. |
 |
LoraTap SC400W-EU Smart Blinds Switch Wiring and Installation Guide Comprehensive guide for installing and wiring the LoraTap SC400W-EU smart switch for electric blinds and curtains. Includes detailed steps, connection diagrams, and product specifications for smart home integration with Tuya, Google Home, and Alexa. |
 |
LoraTap Smart Curtain Switch User Manual User manual for the LoraTap Smart Curtain Switch, detailing installation, app control via Smart Life, and troubleshooting for Wi-Fi connected electric blinds and curtains. |
 |
LoraTap SC500W Smart Curtain Switch Installation Guide & Wiring Diagrams Detailed installation guide and wiring instructions for the LoraTap SC500W smart curtain switch module. This document covers installation cautions, wiring for standard blinds and blinds with built-in drivers, and options for use without a physical manual switch, ensuring proper AC power connection for smart home automation. |
 |
LoraTap SC500W Roller Shutter Module User Guide and Installation Comprehensive user guide for the LoraTap SC500W Roller Shutter Module, covering installation, wiring, setup with the Smart Life app, and troubleshooting for smart home automation. |
 |
LoraTap BA101KS Smart Wi-Fi Light Socket User Guide Comprehensive user guide for the LoraTap BA101KS Smart Wi-Fi LED Light Bulb Socket Adapter, covering setup, app control, troubleshooting, and specifications. |
Ask a question about this manual
Ask about setup, troubleshooting, compatibility, parts, safety, or missing instructions. Manuals+ will review the question and use this page’s manual context to help answer it.