1. Product Overview
This manual provides instructions for the installation, operation, and maintenance of the ECOTRIC Front Bumper. This bumper is designed to enhance the vehicle's front-end protection and functionality, featuring integrated lighting and a winch plate.

Image 1.1: ECOTRIC Front Bumper installed on a Jeep Wrangler.
2. Compatibility
The ECOTRIC Front Bumper (Model VC-LYAM-302S) is compatible with the following vehicle models:
- 2007-2018 Jeep Wrangler JK
- 2007-2025 Jeep Wrangler JL & Unlimited JT
- 2018-2025 Jeep Wrangler Unlimited JLU
Note: This bumper is not compatible with the 2017 JK Rubicon Recon model.

Image 2.1: Vehicle compatibility overview.
3. Safety Information
Always prioritize safety during installation and operation. Failure to follow safety guidelines may result in injury or damage to the vehicle.
- Wear appropriate personal protective equipment (PPE), including safety glasses and gloves.
- Ensure the vehicle is parked on a level surface and secured with wheel chocks before beginning any work.
- Disconnect the vehicle's battery before performing any electrical work.
- Do not exceed the rated capacity of the D-ring mounts or winch plate.
- Seek professional assistance if you are unsure about any installation steps.

Image 3.1: Safety considerations for bumper installation.
4. Package Contents
Verify that all components listed below are present in the package before beginning installation. If any items are missing or damaged, contact customer support.
- 1 x ECOTRIC Front Bumper
- 2 x 18W CREE LED Fog Lights
- 2 x 2W CREE LED Work Lights
- 2 x 4.75-ton D-ring Isolators
- All necessary wiring harnesses for included lights
- Mounting Hardware Kit, including:
- 2 x D-shackles
- 6 x Nuts
- 6 x Large Washers
- 8 x Bolts
- 8 x Medium Washers
- 8 x Small Washers
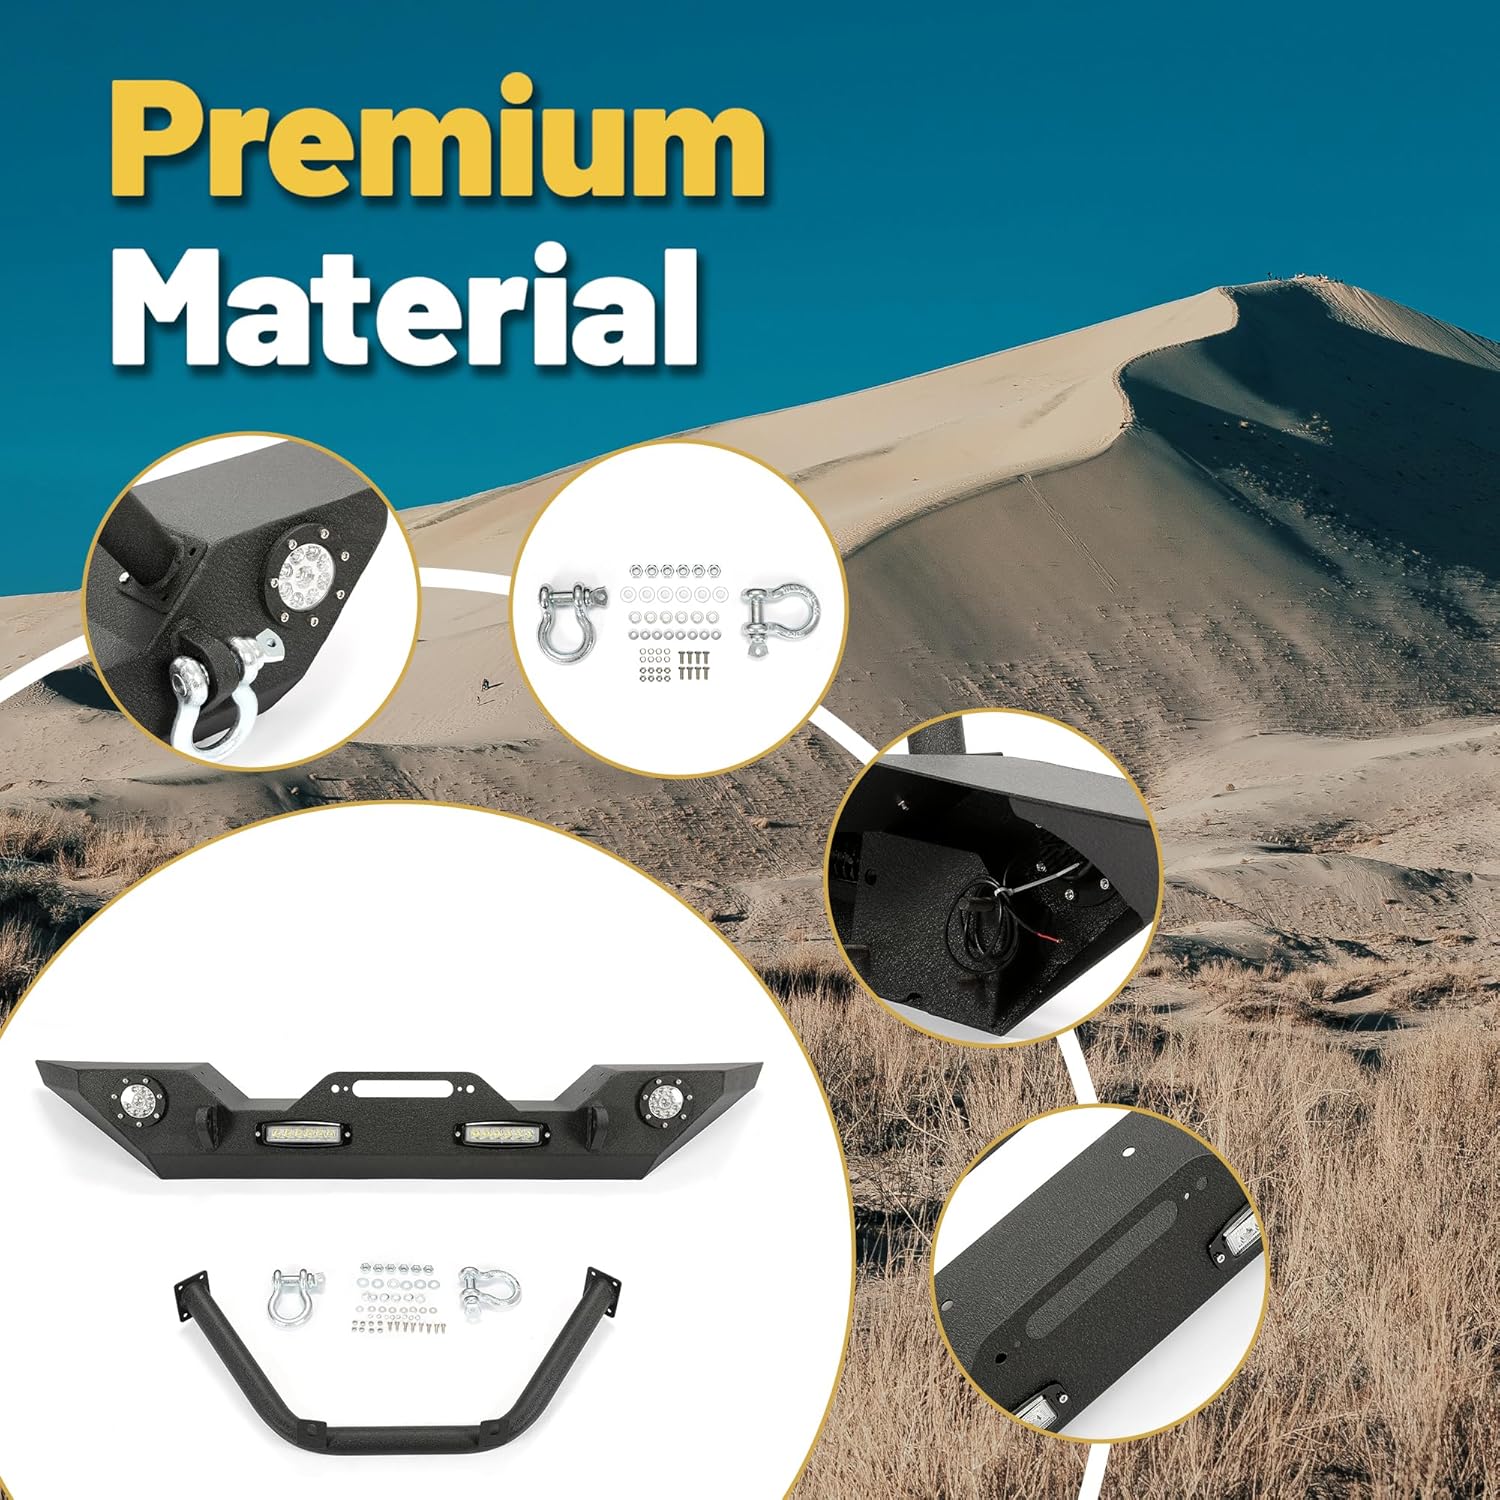
Image 4.1: Bumper components and hardware.

Image 4.2: Bumper dimensions and hardware details.
5. Installation Instructions
5.1 Tools Required
- Socket Wrench Set
- Torque Wrench
- Pry Tool (for plastic clips)
- Wire Strippers/Crimpers (for electrical connections)
- Electrical Tape or Heat Shrink Tubing
- Measuring Tape
- Marker
5.2 Pre-Installation Steps
- Park the vehicle on a flat, stable surface and engage the parking brake.
- Disconnect the negative terminal of the vehicle's battery.
- Remove the factory front bumper. This typically involves removing several bolts and clips located under the bumper, inside the wheel wells, and behind the grille. Consult your vehicle's service manual for specific removal procedures.
- Carefully disconnect any fog light wiring from the factory bumper.
5.3 Bumper Installation
- Attach the bull bar (if separate) to the main bumper body using the provided hardware. Ensure all bolts are hand-tightened.
- Install the 18W CREE LED Fog Lights and 2W CREE LED Work Lights into their designated openings on the bumper. Secure them with the provided hardware.
- Route the wiring harnesses for the LED lights through the bumper and towards the vehicle's existing wiring or a new power source.
- Carefully lift the ECOTRIC Front Bumper and align its mounting brackets with the vehicle's frame mounting points. It is recommended to have assistance for this step due to the bumper's weight.
- Insert the provided bolts through the bumper's mounting brackets and into the vehicle's frame. Hand-tighten all bolts.
- Once all bolts are in place, progressively tighten them to the manufacturer's specified torque settings. Ensure the bumper is centered and level before fully tightening.
- Connect the LED light wiring harnesses. If connecting to existing fog light wiring, ensure proper polarity. If connecting to a new power source, use an appropriate switch and fuse (not included). Secure all connections with electrical tape or heat shrink tubing.
- Attach the 4.75-ton D-ring isolators to the D-ring mounts on the bumper.
- Reconnect the vehicle's battery.
- Test all lights to ensure they are functioning correctly.

Image 5.1: Detail of LED light wiring connection.
6. Operating Features
6.1 LED Lights
The bumper includes integrated 18W CREE LED Fog Lights and 2W CREE LED Work Lights. These lights are designed to provide additional illumination for off-road driving or adverse weather conditions. Operate them via the vehicle's existing fog light switch or a newly installed auxiliary switch, depending on your wiring configuration.

Image 6.1: Integrated LED lights in operation.
6.2 Winch Plate
The bumper features a built-in winch plate designed to accommodate most standard winches up to 12,000 lbs. Ensure your winch is properly mounted and secured according to the winch manufacturer's instructions. Always follow safe winching practices.
6.3 D-Ring Mounts
Two heavy-duty D-ring mounts are integrated into the bumper for recovery operations. Use the provided 4.75-ton D-ring isolators to prevent rattling and protect the bumper's finish. Always use appropriate recovery straps and follow safe recovery procedures.
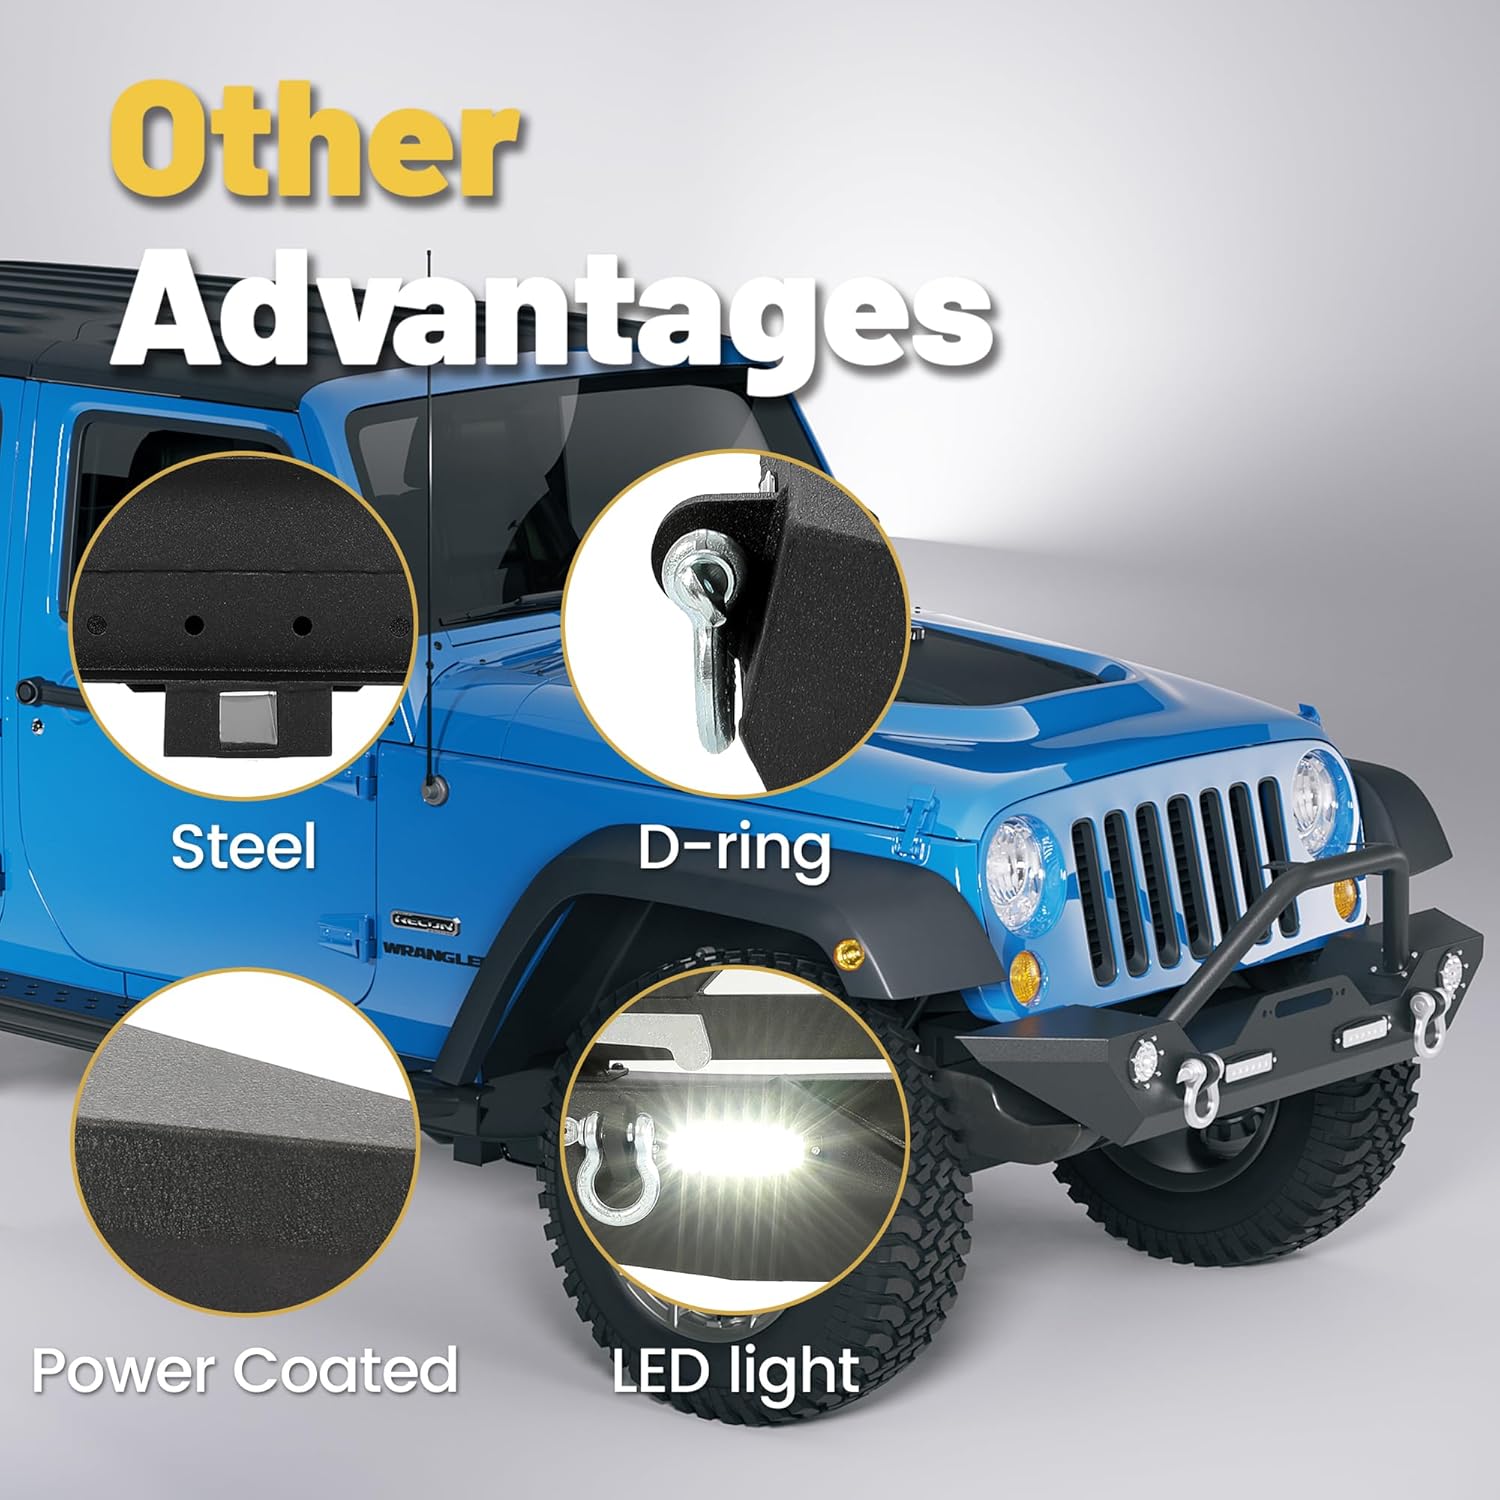
Image 6.2: Bumper features including D-ring mounts and LED lights.
7. Maintenance
Regular maintenance will help preserve the appearance and functionality of your ECOTRIC Front Bumper.
- Cleaning: Wash the bumper regularly with mild soap and water to remove dirt, mud, and road grime. Avoid abrasive cleaners or harsh chemicals that could damage the powder-coated finish.
- Inspection: Periodically inspect all mounting bolts for tightness. Re-torque if necessary. Check the bumper for any signs of damage, rust, or wear.
- Finish Protection: The bumper features a powder-coated textured black finish. Minor scratches can be touched up with a suitable automotive paint or bedliner spray to prevent rust.
- Electrical Connections: Ensure all electrical connections for the LED lights remain secure and free from corrosion.
8. Troubleshooting
Refer to the table below for common issues and their potential solutions.
| Issue | Possible Cause | Solution |
|---|---|---|
| LED Lights not working | Loose wiring connection, blown fuse, incorrect wiring, faulty light. | Check all wiring connections, inspect fuse, verify wiring diagram, test lights with a separate power source. |
| Bumper appears loose or rattles | Mounting bolts are not sufficiently tightened. | Inspect and re-torque all mounting bolts to specifications. |
| Difficulty aligning bumper during installation | Minor manufacturing tolerances, vehicle frame variations. | Ensure vehicle is level. Loosely attach all bolts before tightening. Slight manipulation of mounting points may be necessary. |
9. Specifications
| Feature | Specification |
|---|---|
| Brand | ECOTRIC |
| Model Number | VC-LYAM-302S |
| Manufacturer Part Number | ECOCA135 |
| Material | Alloy Steel |
| Color | Black |
| Exterior Finish | Powder-coated textured black |
| Product Dimensions (Approx.) | 61.42" (Width) x 11.81" (Depth) x 11.42" (Height) |
| Item Weight | 51.7 pounds |
| Winch Plate Capacity | Up to 12,000 lbs |
| D-Ring Shackle Rating | 4.75 tons |
| Fog Lights | 2 x 18W CREE LED |
| Work Lights | 2 x 2W CREE LED |
10. Warranty and Support
10.1 Warranty Information
For specific warranty details regarding your ECOTRIC Front Bumper, please refer to the warranty card included with your purchase or visit the official ECOTRIC website. Keep your proof of purchase for any warranty claims.
10.2 Customer Support
If you have any questions, require technical assistance, or need to report a missing/damaged part, please contact ECOTRIC customer support through the retailer where the product was purchased or via the contact information provided on the official ECOTRIC website.