1. Introduction
This manual provides comprehensive instructions for the proper setup, operation, and maintenance of your LILLIPUT A11 10.1-inch 4K Camera Monitor. Designed for professional video production, the A11 offers a 1920x1200 Full HD display with 4K HDMI and 3G-SDI input/output capabilities, along with a suite of advanced monitoring tools. Please read this manual thoroughly before using the product to ensure optimal performance and longevity.

2. Important Safety Information
- Do not expose the monitor to rain or moisture to prevent fire or electric shock.
- Avoid placing the monitor in direct sunlight or near heat sources.
- Use only the power adapter supplied with the unit or a compatible power source (7-24V DC).
- Do not block ventilation openings. Ensure adequate airflow around the monitor.
- Clean the monitor screen and body with a soft, dry cloth. Avoid liquid cleaners.
- Do not attempt to disassemble or modify the monitor. Refer all servicing to qualified personnel.
- Keep the monitor away from strong magnetic fields.
3. Package Contents
Verify that all items are present in the package:
- LILLIPUT A11 10.1-inch 4K Camera Monitor
- Power Adapter (DC 12V)
- Sony L-series Type Battery Plate (pre-installed or included)
- Sunshade
- User Manual (this document)
4. Product Overview
4.1 Front and Side Views


4.2 Rear Panel and Connections

The rear panel of the A11 monitor features various input and output ports for connectivity:
- SDI IN/OUT: 3G-SDI input and loop output for professional video signals.
- VGA: Standard VGA input for legacy devices.
- Upgrade: USB port for firmware updates.
- HDMI IN/OUT: 4K HDMI input and loop output for high-definition video sources.
- EAR: 3.5mm headphone jack for audio monitoring.
- DC 12V: Power input for external DC power supply (7-24V).
- 1/4-inch screw holes: Multiple mounting points for accessories.
5. Setup
5.1 Powering the Monitor
The A11 monitor can be powered using either the included DC power adapter or a compatible battery.
- DC Power: Connect the supplied 12V DC power adapter to the 'DC 12V' port on the rear panel and plug it into a wall outlet.
- Battery Power: Attach a compatible Sony L-series type battery to the pre-installed battery plate. Ensure the battery is securely locked into place. Optional V-mount or Gold mount battery plates can be purchased separately for use with other battery types.

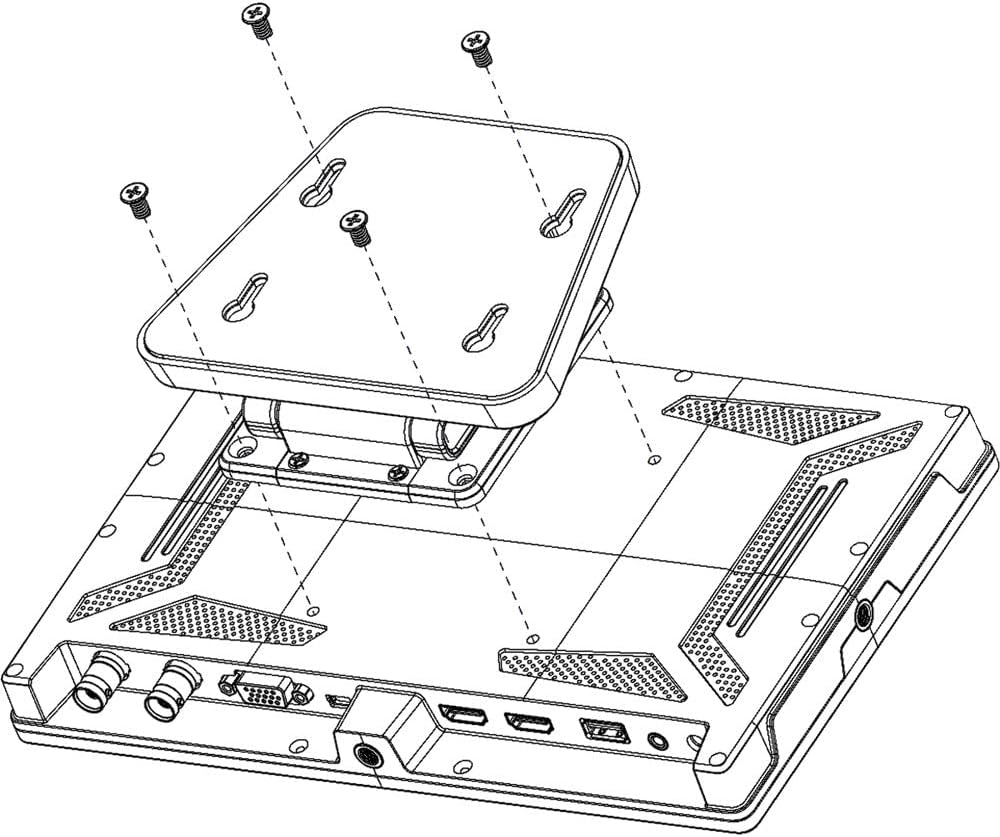
5.2 Mounting Options
The A11 monitor offers flexible mounting solutions:
- 1/4"-20 Thread: Use the multiple 1/4"-20 screw holes located on the sides and bottom of the monitor to attach it to camera rigs, magic arms, or tripods.
- VESA 75mm: The rear panel features a 75 x 75mm VESA mounting pattern for compatibility with standard VESA mounts and brackets.


5.3 Connecting Video Sources
Connect your camera or video source to the monitor using appropriate cables:
- HDMI: Use an HDMI cable to connect your camera's HDMI output to the 'HDMI IN' port on the monitor. The A11 supports 4K 30Hz HDMI signals.
- 3G-SDI: Use an SDI cable to connect your camera's SDI output to the 'SDI IN' port. The A11 supports 3G-SDI, HD-SDI, and SD-SDI signals.
- VGA: Connect a VGA cable from your source to the 'VGA' port.
6. Operating Instructions
6.1 Basic Operation
- Power On/Off: Press and hold the power button (usually located on the side or top) to turn the monitor on or off. A short press may activate/deactivate the screen.
- Menu Navigation: Use the control dial or dedicated menu buttons to navigate through the on-screen display (OSD) menu. Press the dial to confirm selections.
- Input Selection: The monitor will typically auto-detect the input signal. If not, use the menu to manually select the desired input (HDMI, SDI, VGA).
6.2 Auxiliary Functions
The A11 monitor includes several professional auxiliary functions to assist with accurate monitoring:

- Focus Peaking: Highlights sharp edges in the image, assisting with precise focus adjustment.
- False Color: Displays different exposure levels using a spectrum of colors, helping to identify overexposed or underexposed areas.
- Histogram: A graphical representation of the tonal distribution in your image, indicating brightness and contrast.
- Zoom: Magnifies a portion of the image for detailed inspection of focus or composition.
- Audio Level Meter: Displays the audio input levels, ensuring proper sound recording.
- Selectable Aspect Ratios: Allows viewing in various aspect ratios to match your production needs.
- Image Flip: Flips the image horizontally or vertically, useful for specific mounting configurations.
6.3 User-Assignable Buttons
The A11 monitor features two user-assignable function buttons. These buttons can be customized via the OSD menu to quickly access your most frequently used auxiliary functions, such as focus peaking, false color, or zoom.
7. Maintenance
- Cleaning the Screen: Gently wipe the screen with a soft, lint-free cloth. For stubborn smudges, slightly dampen the cloth with water or a screen-specific cleaning solution (avoid harsh chemicals).
- Cleaning the Body: Use a soft, dry cloth to wipe the monitor's casing.
- Storage: When not in use for extended periods, store the monitor in a cool, dry place, preferably in its original packaging or a protective case.
- Firmware Updates: Check the LILLIPUT official website periodically for firmware updates to ensure your monitor has the latest features and bug fixes. Use the 'Upgrade' USB port for this purpose.
8. Troubleshooting
| Problem | Possible Cause | Solution |
|---|---|---|
| Monitor does not power on. | No power, low battery, faulty power adapter. | Check power connection. Ensure battery is charged or replace with a charged one. Try a different power adapter if available. |
| No video signal. | Incorrect input selected, loose cable, incompatible signal. | Verify correct input source is selected in the menu. Check cable connections. Ensure camera output resolution/frame rate is supported by the monitor. |
| Image is distorted or flickering. | Faulty cable, signal interference. | Try a different HDMI/SDI cable. Ensure cables are not too long or near strong electromagnetic sources. |
| No audio. | Audio muted, volume too low, no audio in signal. | Check monitor's volume settings. Ensure the input signal contains audio. Check headphone connection. |
| Monitor runs hot. | Normal operation, poor ventilation. | Some heat generation is normal. Ensure adequate ventilation around the monitor. Avoid covering vents. If excessively hot, discontinue use and contact support. |
9. Technical Specifications
- Display Panel: 10.1-inch LCD
- Resolution: 1920 x 1200 (Full HD)
- Brightness: 320 cd/m²
- Contrast Ratio: 1000:1
- Viewing Angle: 175° (Horizontal/Vertical)
- Color Depth: 8-bit
- Video Inputs: 1x 4K HDMI (up to 4K30Hz), 1x 3G-SDI, 1x VGA
- Video Outputs: 1x 4K HDMI Loop Out, 1x 3G-SDI Loop Out
- Audio Output: 3.5mm Headphone Jack
- Power Input: DC 7-24V
- Battery Plate: Sony L-series type (V-mount/Gold mount optional)
- Mounting: 1/4"-20 Thread, VESA 75mm
- Product Dimensions: 9.92 x 0.98 x 6.18 inches (252 x 25 x 157 mm)
- Item Weight: 1.21 pounds (0.55 kg)
10. Warranty and Customer Support
LILLIPUT products are designed and manufactured to the highest quality standards. This product is covered by a limited warranty against defects in materials and workmanship. Please refer to the warranty card included with your product for specific terms and conditions.
For technical support, service, or warranty inquiries, please contact LILLIPUT customer service through their official website or the retailer from whom you purchased the product. Please have your model number (A11-10.1) and purchase date available when contacting support.