VEVOR SBJ003
VEVOR Electric Shaved Ice Machine User Manual
Model: SBJ003
1. Introduction
Thank you for choosing the VEVOR Electric Shaved Ice Machine. This manual provides important information regarding the safe operation, maintenance, and troubleshooting of your new appliance. Please read this manual thoroughly before use and retain it for future reference.
This electric shaved ice machine is designed for both home and commercial use, capable of producing snow cones, slush, milkshakes, yogurt refrigerants, and other delicious frozen beverages.

Figure 1.1: VEVOR Electric Shaved Ice Machine
2. Safety Instructions
To ensure safe operation and prevent damage, please adhere to the following safety guidelines:
- Always ensure the machine is placed on a stable, level surface before operation.
- Do not operate the machine with wet hands or near water to prevent electric shock.
- Keep hands and foreign objects away from the ice inlet and outlet during operation.
- Unplug the machine from the power outlet before cleaning, maintenance, or when not in use.
- Ensure the top cover is securely closed before starting the machine. The motor will stop if the lid is opened during operation.
- Break large ice lumps into smaller pieces before feeding them into the machine to prevent jamming and motor damage.
- Use only the specified voltage (110 Volts) for this appliance.
- Keep out of reach of children.
3. Product Overview
Familiarize yourself with the components and controls of your VEVOR Electric Shaved Ice Machine.

Figure 3.1: Key Features and Components
Components:
- Dust-proof Cover: Protects the ice chamber from contaminants.
- Portable Handle: For easy transportation of the machine.
- Power Switch (ON/OFF): To turn the machine on or off.
- Reverse Switch: Used to clear ice jams.
- Fineness Adjustment Knob: Allows adjustment of ice texture from rough to fine.
- Outlet for Shaved Ice: Where the shaved ice is dispensed.
- Drip Tray: Collects melted ice and water. Removable for cleaning.
- Drainage Outlet: For draining water from the drip tray.
- 420 Stainless Steel Blade: Durable blade for efficient ice shaving. (One spare blade included)
- PC Stirring Paddles: Food-grade material for efficient ice processing.
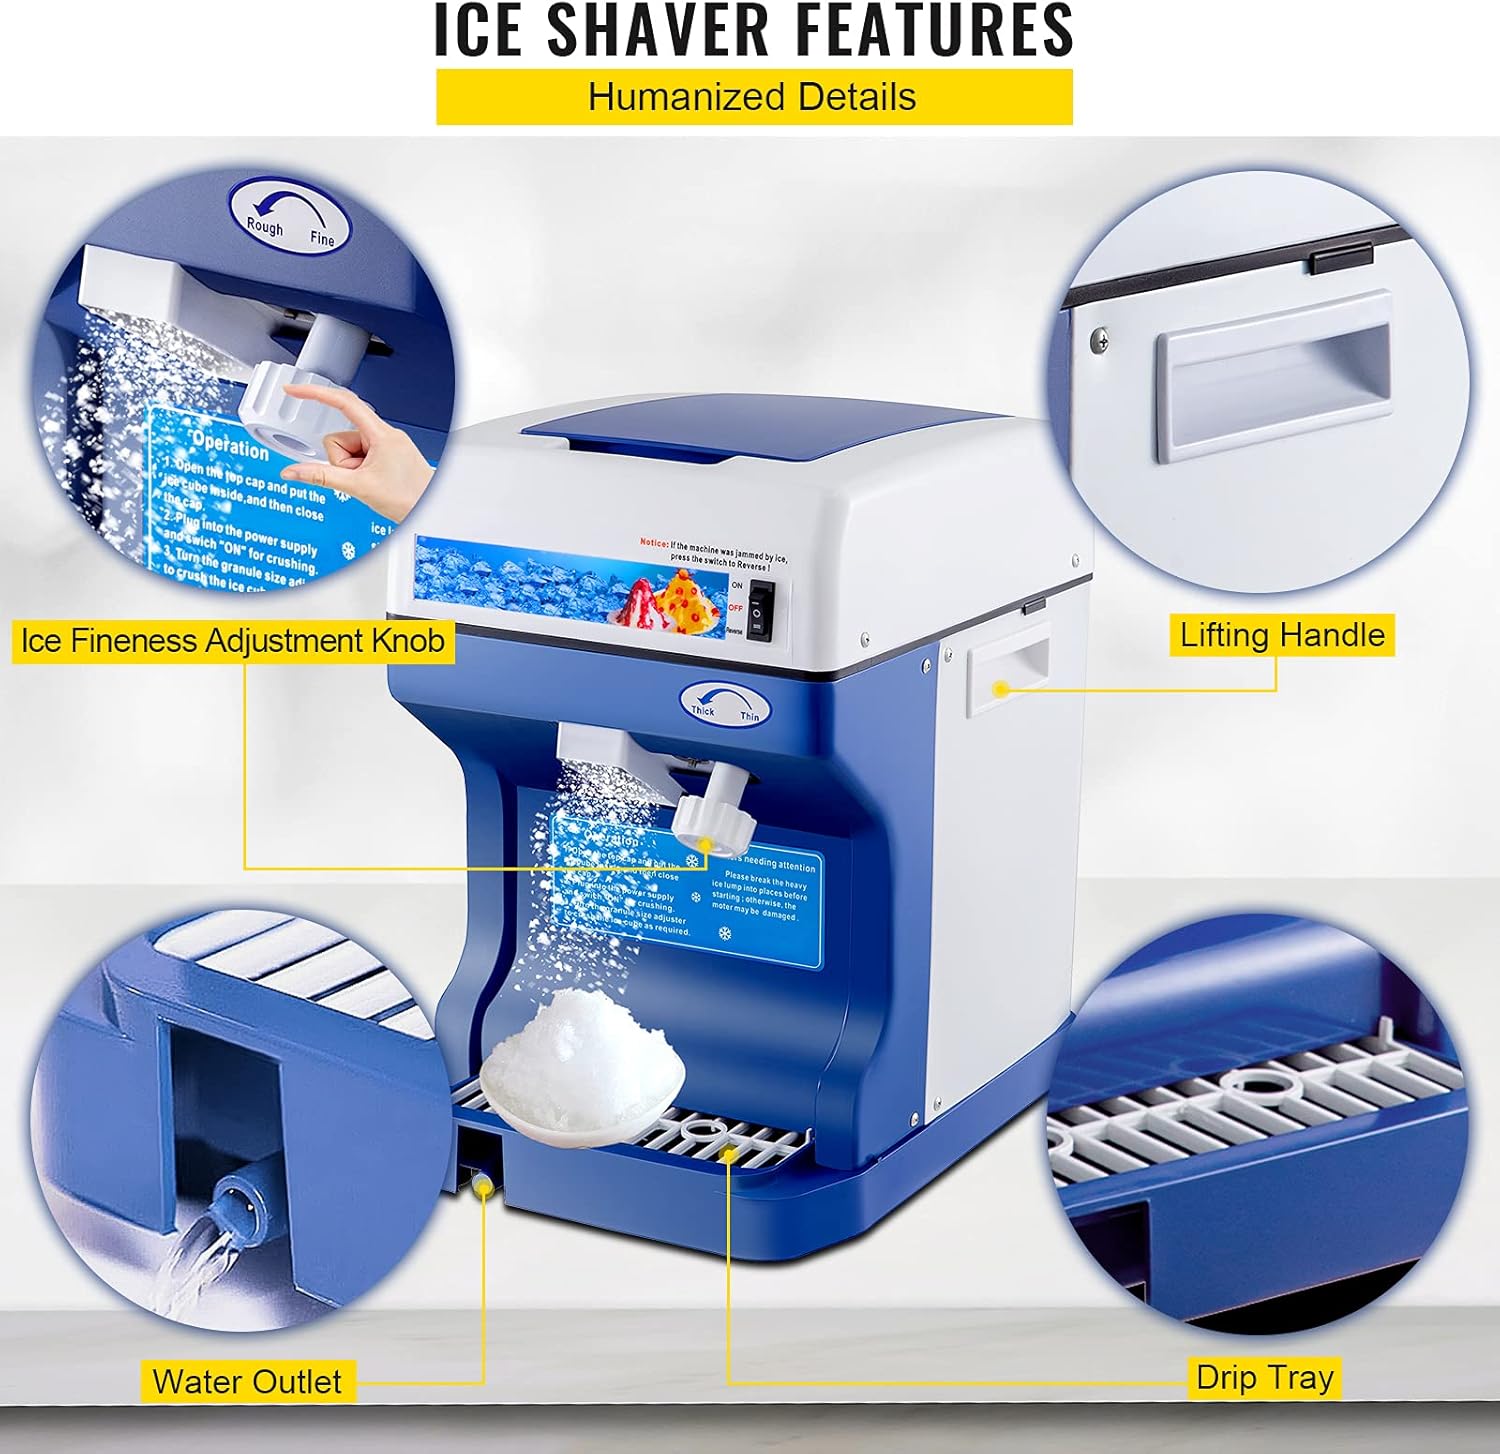
Figure 3.2: Humanized Details

Figure 3.3: Powerful Inner Structure
4. Setup
- Unpacking: Carefully remove all packaging materials and inspect the machine for any damage. Retain packaging for future storage or transport.
- Placement: Place the shaved ice machine on a stable, flat, and dry surface. Ensure there is adequate ventilation around the machine.
- Initial Cleaning: Before first use, clean all parts that will come into contact with ice or water. Refer to the "Maintenance and Cleaning" section for detailed instructions.
- Power Connection: Ensure the power switch is in the "OFF" position before plugging the machine into a standard 110V electrical outlet.
5. Operating Instructions
Follow these steps to operate your VEVOR Electric Shaved Ice Machine:

Figure 5.1: Shaved-Ice Making Steps
- Prepare Ice: Use clean, solid ice cubes. For best results and to prevent jamming, break any large ice lumps into smaller, manageable pieces.
- Open Cover: Open the upper cover of the machine.
- Add Ice: Place the prepared ice cubes into the ice barrel (the circular opening under the cover). Do not overfill.
- Close Cover: Securely close the upper cover. The machine will not operate if the cover is not properly closed.
- Adjust Fineness: Turn the Fineness Adjustment Knob (located on the front) to select your desired ice texture. Turn towards "Rough" for coarser ice or "Fine" for finer, snow-like ice.
- Start Machine: Place a cup or container under the shaved ice outlet. Flip the Power Switch to the "ON" position to start shaving ice.
- Clear Jams (if necessary): If the machine becomes jammed by ice, immediately switch to "OFF", then briefly switch to "Reverse" to clear the jam. Once cleared, return to "OFF" and then "ON" to resume shaving.
- Stop Machine: Once the desired amount of shaved ice is produced, flip the Power Switch to the "OFF" position.
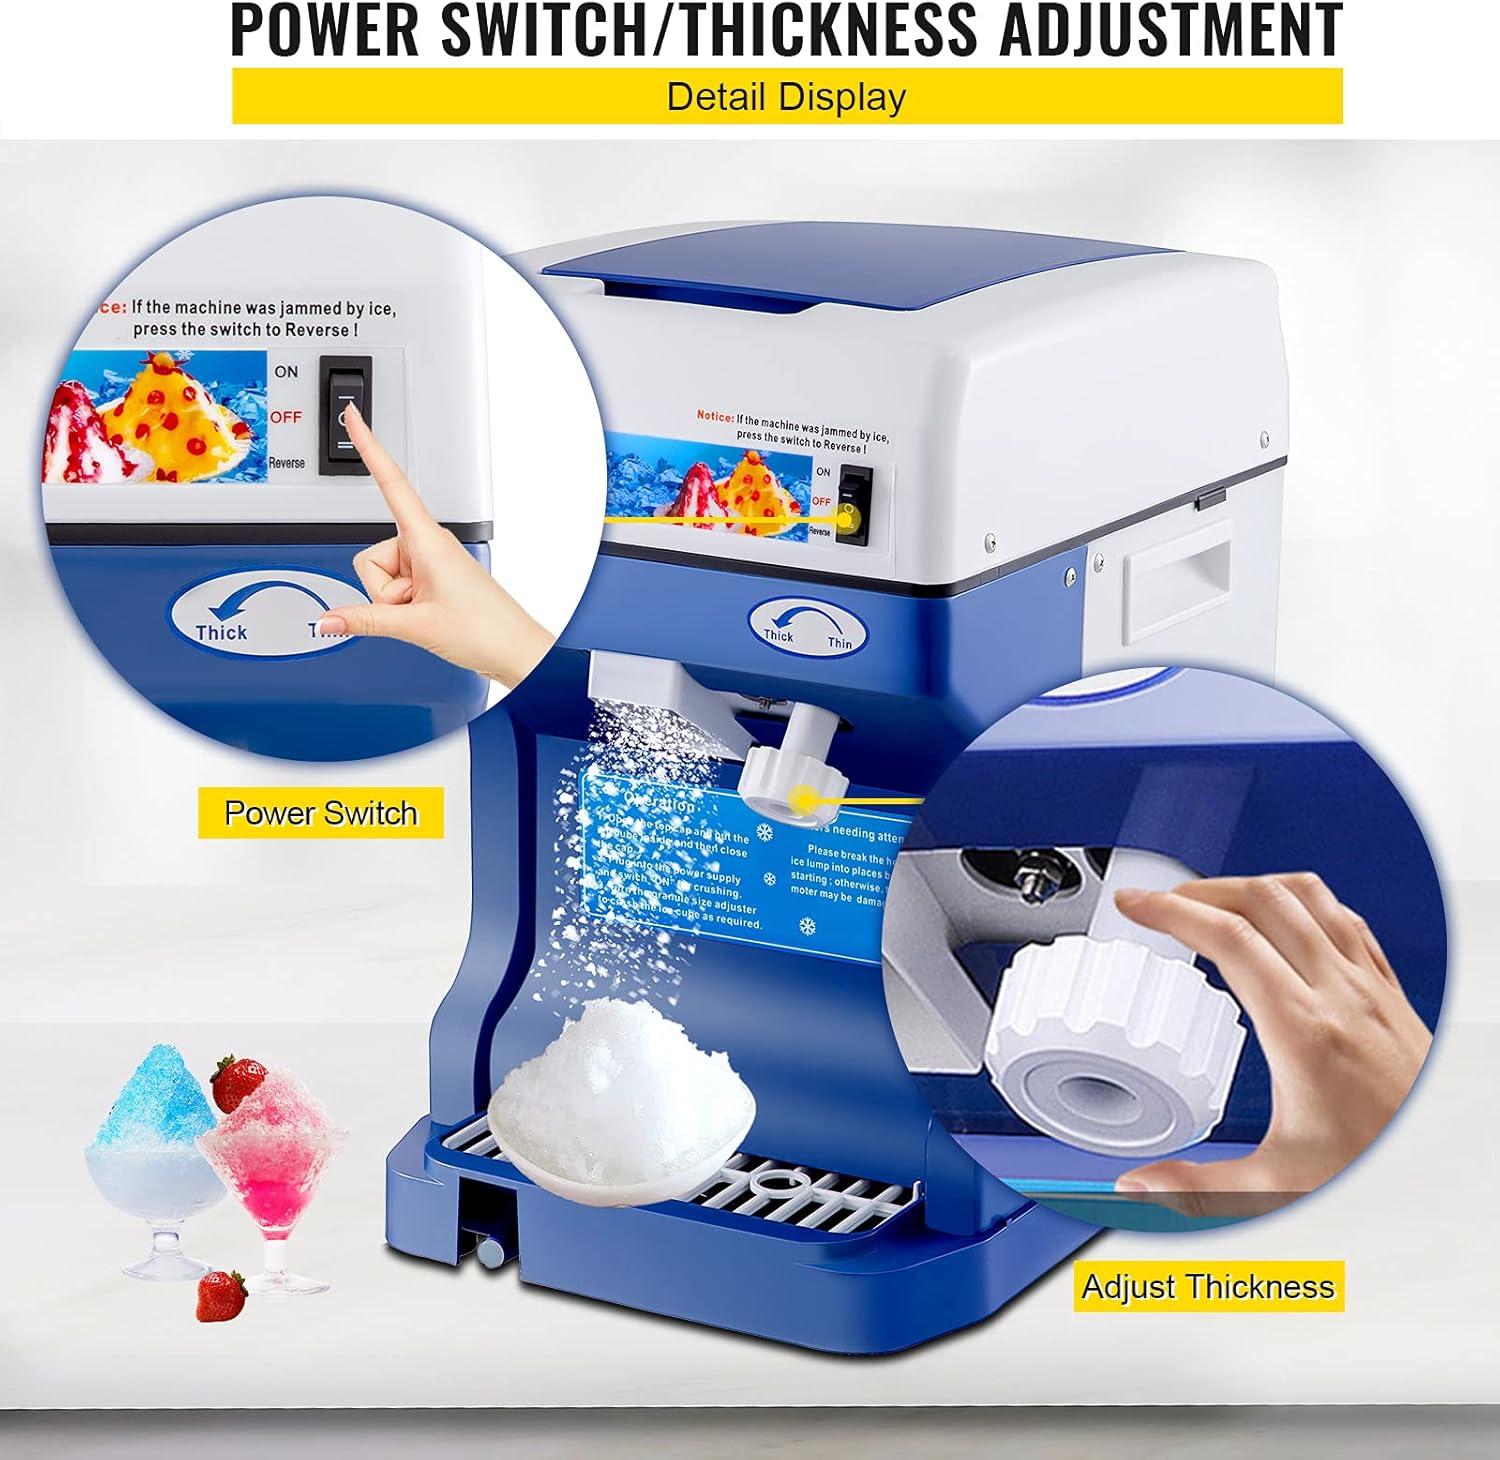
Figure 5.2: Power Switch and Thickness Adjustment
6. Maintenance and Cleaning
Regular cleaning and maintenance will prolong the life of your machine and ensure hygienic operation.
- Unplug: Always unplug the machine from the power outlet before cleaning.
- Drip Tray: Remove the drip tray and empty any melted water. The drainage outlet can be used to drain water if a hose is attached. Clean the drip tray with mild soap and water, then rinse thoroughly.
- Ice Chamber and Blade: Wipe the inside of the ice chamber and the blade area with a damp cloth. For thorough cleaning, the blade can be carefully removed (refer to the instruction manual for blade replacement if needed). Be extremely cautious as the blade is very sharp.
- Exterior: Wipe the exterior of the machine with a soft, damp cloth. Do not immerse the main unit in water.
- Drying: Ensure all parts are completely dry before reassembling or storing the machine.
- Storage: Store the machine in a cool, dry place away from direct sunlight and extreme temperatures.
7. Troubleshooting
If you encounter issues with your VEVOR Electric Shaved Ice Machine, refer to the following common problems and solutions:
| Problem | Possible Cause | Solution |
|---|---|---|
| Machine does not turn on. | Not plugged in; Power switch off; Lid not closed properly. | Ensure machine is plugged in; Turn power switch to "ON"; Close lid securely. |
| Ice is not shaving or machine is jammed. | Ice lumps are too large; Ice chamber is overfilled; Blade is dull or obstructed. | Break ice into smaller pieces; Do not overfill; Use "Reverse" switch to clear jam; Check/replace blade if dull. |
| Shaved ice texture is inconsistent. | Fineness adjustment knob not set correctly; Ice quality. | Adjust the Fineness Adjustment Knob; Use solid, consistent ice cubes. |
| Water leaks from the machine. | Drip tray is full or not properly seated; Drainage outlet stopper is loose. | Empty and re-seat drip tray; Ensure drainage outlet stopper is secure. |
8. Specifications
| Feature | Detail |
|---|---|
| Brand | VEVOR |
| Model Name | SBJ003 |
| Voltage | 110 Volts |
| Wattage | 250 watts |
| Ice Crushing Capacity | 265 lbs (120 kg) per hour |
| Material | ABS Plastic, Stainless Steel (420 Stainless Steel Blade) |
| Product Dimensions | 19.9 x 17.3 x 13.3 inches |
| Item Weight | 27.9 pounds |
| Rotary Speed | 320 RPM |

Figure 8.1: Product Dimensions and Included Blade
9. Warranty and Support
For warranty information and customer support, please refer to the official VEVOR website or contact their customer service directly. Keep your purchase receipt as proof of purchase for any warranty claims.
VEVOR aims to provide cost-effective products and has satisfied over 10 million users in 195 countries. For further assistance, visit the VEVOR Store on Amazon.
Ask a question about this manual
Ask about setup, troubleshooting, compatibility, parts, safety, or missing instructions. Manuals+ will review the question and use this page’s manual context to help answer it.