

Introduction
This manual provides essential information for the installation, operation, and maintenance of your COMAP Thermostatic Head Senso S631252. Please read these instructions carefully before using the product to ensure safe and efficient operation.
Product Overview
The COMAP Thermostatic Head Senso S631252 is designed to regulate the temperature of individual rooms by controlling the flow of hot water through a radiator. It features a liquid sensor for reliable and responsive temperature control.

Image: The COMAP Thermostatic Head Senso S631252, shown in its retail packaging. The packaging highlights features such as energy efficiency and French manufacturing.
Key Features:
- Thermostatic Head Senso: Provides precise temperature control for your heating system.
- Liquid Sensor: Ensures high reliability, longevity, sensitivity, and quick response time for optimal performance.
- Contemporary Design: Features a discreet and modern aesthetic with stylized openings.
- Tool-Free Installation: Designed for easy mounting and temperature limitation adjustment without the need for special tools, making it ideal for renovation projects.
- Captive Stop System: Includes a limitation ring and a captive stop system on the front, a patented COMAP exclusivity.
Safety Information
Please observe the following safety guidelines:
- Ensure the heating system is depressurized and cooled down before attempting installation or maintenance.
- Do not attempt to modify the thermostatic head.
- Keep out of reach of children.
- If you are unsure about any installation steps, consult a qualified heating engineer.
Setup and Installation
The COMAP Thermostatic Head Senso S631252 is designed for straightforward installation on M30 radiator valves.
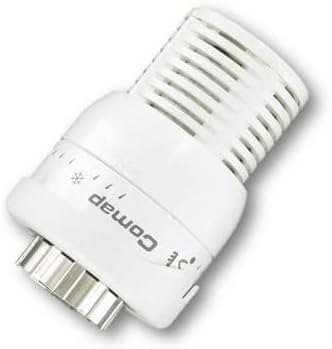
Image: A side view of the COMAP Thermostatic Head Senso, clearly showing the threaded M30 connection point at the base, which attaches to the radiator valve.
- Preparation: Ensure the radiator valve is clean and free from debris. If replacing an old head, remove it carefully.
- Mounting: Align the thermostatic head with the M30 threaded connection on your radiator valve.
- Tightening: Screw the head onto the valve by hand until it is firmly seated. No tools are typically required for this step. Do not overtighten.
- Temperature Limitation (Optional): The head features a limitation ring and captive stop system. Refer to the markings on the head to set minimum and maximum temperature limits if desired. This can be done without tools.
Once installed, the heating system can be repressurized if necessary.
Operating Instructions
The COMAP Thermostatic Head allows for manual temperature control within the room.
- Adjusting Temperature: Rotate the ring on the thermostatic head to select your desired temperature setting. The head typically has numerical markings (e.g., 1 to 5 or specific temperature indicators) corresponding to different heat levels.
- Setting Levels:
- The snowflake symbol (*) usually indicates a frost protection setting (around 6-7°C).
- Lower numbers (e.g., 1, 2) correspond to lower temperatures.
- Higher numbers (e.g., 3, 4, 5) correspond to higher temperatures.
- Automatic Regulation: The liquid sensor inside the head will automatically open or close the valve to maintain the selected room temperature.
For optimal energy efficiency, avoid setting the head to maximum when a lower comfortable temperature is sufficient.
Maintenance
The COMAP Thermostatic Head requires minimal maintenance to ensure long-term performance.
- Cleaning: Wipe the head periodically with a soft, damp cloth. Do not use abrasive cleaners or solvents.
- Dust Removal: Ensure the stylized openings are free from dust or obstructions, as these are crucial for the sensor's accurate temperature detection.
- Function Check: Occasionally rotate the head through its full range of settings to ensure the valve pin moves freely. If the pin appears stuck, gently press it a few times.
Troubleshooting
| Problem | Possible Cause | Solution |
|---|---|---|
| Radiator not heating up. | Thermostatic head set too low, valve pin stuck, air in radiator, central heating system off. | Increase setting on head. Gently press valve pin to free it. Bleed the radiator. Check central heating system. |
| Room is too hot despite low setting. | Thermostatic head faulty, external heat source influencing sensor, valve pin stuck open. | Ensure no direct sunlight or other heat sources are affecting the head. Check valve pin. Consider replacing the head if problem persists. |
| Head is loose on the valve. | Not tightened sufficiently during installation. | Gently re-tighten the head by hand onto the valve. |
If troubleshooting steps do not resolve the issue, please contact a qualified technician or COMAP support.
Specifications
| Attribute | Detail |
|---|---|
| Brand | Comap |
| Model Number | S631252 |
| Model Name | Radiator Head |
| Color | White |
| Item Weight | 140 grams |
| Package Dimensions | 14.5 x 9.7 x 5 cm |
| Voltage | 230 Volts (System dependent) |
| Controller Type | Ring |
| Temperature Control Type | Manual |
| Specific Uses | Heating |
| Included Components | 1 Thermostatic Head |
| Power Source | Operated by hydraulic force (within the heating system) |
| Shape | Round |
| Country of Origin | France |
Warranty Information
Specific warranty details for the COMAP Thermostatic Head Senso S631252 are not provided in the product information. Please refer to the retailer's purchase terms or contact COMAP directly for warranty information.
Support
For further assistance, technical support, or inquiries regarding your COMAP Thermostatic Head, please contact:
- Your product retailer.
- The official COMAP website for contact information: www.comap.com.
When contacting support, please have your product model number (S631252) and purchase details ready.