1. Product Overview
The RIJER RJ-UD12 is a high-performance 4K video wall controller designed for 1x2 TV wall configurations. It processes ultra-high-definition 4K input signals and distributes them across two displays, each outputting 1920x1080@60HZ, resulting in a combined 3840x1080@60HZ super high-definition image. This device utilizes advanced image processing technology to ensure smooth, delay-free, and frame-accurate video playback, even with fast-moving content. It supports various input signals including HDMI2.0, HDMI1.4, and DP1.2, making it compatible with a wide range of source devices such as laptops, computers, players, and Blu-ray DVDs.

Figure 1: RIJER RJ-UD12 4K Video Wall Controller and included remote control.
2. Key Features
- 4K Ultra HD Input Support: Accepts HDMI2.0 (3840x2160@60HZ), HDMI1.4 (3840x2160@30HZ), and DP1.2 (3840x2160@60HZ) signals.
- 1x2 Video Wall Configuration: Specifically designed to split a single input signal across two displays, creating a seamless 3840x1080@60HZ video wall.
- Full HD Output: Each output port delivers 1920x1080@60HZ resolution, ensuring clear and crisp images on individual displays.
- Advanced Image Processing: Incorporates DSP technology for DCDI edge smoothing, ACM adaptive color management, CCS color crosstalk suppression, sharpness enhancement, dynamic contrast enhancement, and 3D noise reduction.
- Pure Hardware Frame: Operates on a dedicated hardware platform, ensuring high stability, fast boot-up (3-5 seconds), and immunity to software crashes or virus infections. Designed for 24/7 uninterrupted operation.
- Data Parallel Processing: Enables high-speed dynamic picture processing without tailing, delay, tearing, or dropped frames.
- Low Power Consumption: Energy-efficient design with no fan, resulting in silent operation suitable for various environments.
- Wide Compatibility: Connects to laptops, desktop computers, media players, and Blu-ray DVD players with HDMI or DisplayPort outputs.
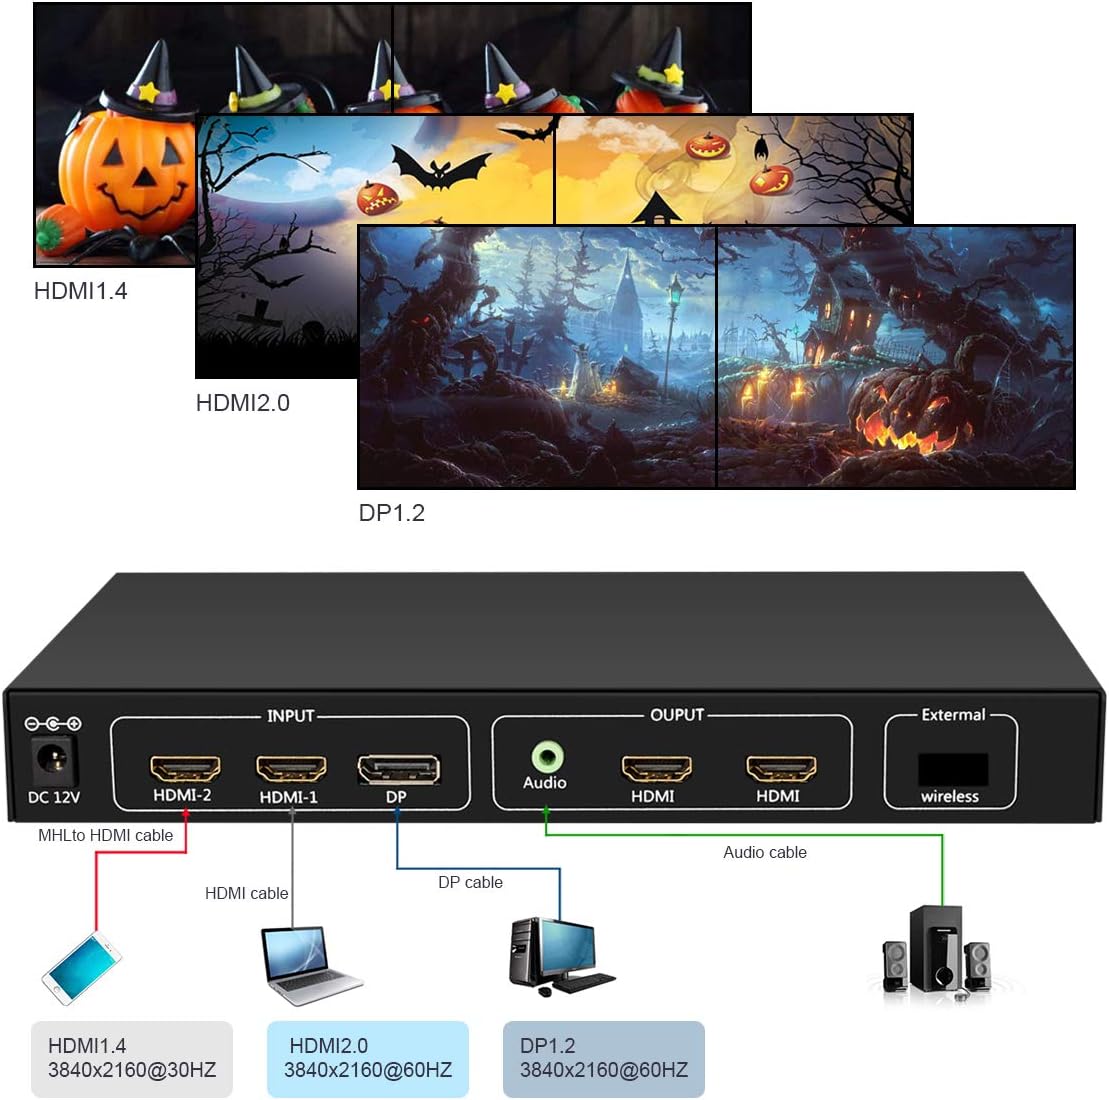
Figure 2: Supported input signal types and resolutions.
3. Package Contents
Please check the package contents upon unboxing to ensure all items are present and undamaged.
- 1x RIJER RJ-UD12 4K Video Wall Controller
- 1x DC 12V Power Adapter
- 1x IR Remote Control
- 1x IR Receiver Cable
- 2x Mounting Brackets
- 1x User Manual (this document)

Figure 3: Contents of the RIJER RJ-UD12 package.
4. Setup Instructions
Follow these steps to set up your RIJER RJ-UD12 Video Wall Controller.
- Prepare Displays: Position your two displays (TVs or monitors) side-by-side to form the desired 1x2 video wall configuration. Ensure they are powered off.
- Connect Input Source:
- Connect your source device (e.g., laptop, PC, media player) to one of the input ports on the RJ-UD12 (HDMI-1, HDMI-2, or DP) using a high-quality HDMI or DisplayPort cable. For optimal performance with 4K signals, fiber optic HDMI cables are recommended.
- Note: HDMI-1 supports HDMI2.0 (3840x2160@60HZ), HDMI-2 supports HDMI1.4 (3840x2160@30HZ), and DP supports DP1.2 (3840x2160@60HZ).
- Connect Output Displays:
- Connect the two HDMI output ports of the RJ-UD12 to the HDMI input ports of your two displays using high-quality HDMI cables.
- Connect Audio (Optional): If you require separate audio output, connect speakers or an audio system to the 3.5mm Audio Out jack on the RJ-UD12.
- Connect IR Receiver: Plug the IR Receiver Cable into the "External" port on the RJ-UD12. Position the IR receiver in a location where it can receive signals from the remote control.
- Power On: Connect the DC 12V Power Adapter to the "DC 12V" port on the RJ-UD12, then plug the adapter into a power outlet. The device will power on automatically.
- Power On Displays: Turn on your two connected displays.
- Select Input: Use the buttons on the front panel or the remote control to select the appropriate input source (HDMI1, HDMI2, or DP).

Figure 4: Typical setup for a laptop connected to a 1x2 video wall.

Figure 5: Setup example for a laptop connected to two projectors.
5. Operating Instructions
5.1 Front Panel Controls

Figure 6: Front panel controls and indicators.
- IR: Infrared receiver for the remote control.
- LED Light: Indicates power and operational status.
- Save/Exit: Saves current settings and exits the menu.
- Menu/↓: Enters the menu or navigates down within menu options.
- Select/→: Selects an option or navigates right within menu options.
- HDMI1: Selects HDMI-1 input.
- HDMI2: Selects HDMI-2 input.
- DP: Selects DisplayPort input.
5.2 Remote Control
The included IR remote control provides full functionality for input selection and menu navigation. Ensure the IR receiver cable is connected and positioned correctly for optimal remote performance.
5.3 On-Screen Display (OSD) Menu
To access the OSD menu, press the Menu/↓ button on the front panel or remote. Use the navigation buttons to adjust settings such as:
- Input Source: Selects the active input.
- Split Row: Configures the number of rows in the video wall (for 1x2, this is typically 1).
- Split Column: Configures the number of columns in the video wall (for 1x2, this is typically 2).
- Board ID: Identifies the unit in multi-controller setups (not typically used for a single 1x2 unit).
- Flip: Adjusts image orientation if needed.
- Language: Selects the OSD language.
Press Save/Exit to apply changes and exit the menu.
6. Specifications
| Feature | Description |
|---|---|
| Model | RJ-UD12 |
| Input Ports | 1x HDMI2.0, 1x HDMI1.4, 1x DP1.2 |
| Output Ports | 2x HDMI 1.3, 1x 3.5mm Audio Out |
| Max Input Resolution | 3840x2160@60HZ (HDMI2.0, DP1.2), 3840x2160@30HZ (HDMI1.4) |
| Output Resolution (Each) | 1920x1080@60HZ |
| Total Output Resolution (1x2 Mode) | 3840x1080@60HZ |
| Video Wall Mode | 1x2 Horizontal |
| Control Method | Front Panel Buttons, IR Remote Control |
| Power Supply | DC 12V |
| Product Dimensions | 9 x 5.5 x 1.18 inches (23.6 x 14 x 3 cm) |
| Item Weight | 2.88 pounds |
| Color | Black |
| Manufacturer | RIJER |
| ASIN | B07WVP9SGL |

Figure 7: Product dimensions.
7. Troubleshooting
If you encounter issues with your RIJER RJ-UD12, please refer to the following common problems and solutions:
- No Signal on Displays:
- Ensure all HDMI/DP cables are securely connected to both the source device, the RJ-UD12, and the displays.
- Verify that the correct input source is selected on the RJ-UD12 (HDMI1, HDMI2, or DP) and on your displays.
- Check if the source device is powered on and outputting a signal.
- Try using different, high-quality HDMI/DP cables, especially for 4K signals.
- Restart the source device, the RJ-UD12, and the displays.
- Image Flickering or Instability:
- Ensure all cables are high-quality and properly shielded. Inferior cables can cause signal degradation.
- Check the resolution and refresh rate settings of your source device. Ensure they are within the supported range of the RJ-UD12 and your displays.
- Verify that the power adapter is securely connected and providing stable power.
- No Audio Output:
- Confirm that your source device is outputting audio.
- If using the 3.5mm Audio Out jack, ensure your speakers or audio system are properly connected and powered on.
- Check the audio settings on your source device and displays to ensure audio is routed correctly.
- The RJ-UD12 provides a dedicated 3.5mm audio output. If you expect audio through the HDMI outputs, ensure your displays support audio passthrough from the HDMI input.
- Remote Control Not Responding:
- Ensure the IR Receiver Cable is securely plugged into the "External" port and positioned to receive signals from the remote.
- Check the batteries in the remote control and replace them if necessary.
- Ensure there are no obstructions between the remote and the IR receiver.
- Image is Stretched or Distorted:
- Ensure your source device is outputting a resolution of 3840x1080@60HZ when in 1x2 mode to avoid stretching.
- Check the display settings on your monitors/TVs to ensure they are set to "Just Scan" or "1:1 Pixel Mapping" to prevent overscan or scaling by the display itself.
8. Warranty & Support
RIJER products are designed for reliability and performance. For specific warranty information, please refer to the warranty card included with your product or contact your point of purchase. If you require technical assistance or have questions not covered in this manual, please contact RIJER customer support through the retailer's platform or the official RIJER website.
For the latest product information and support resources, please visit the RIJER Brand Store on Amazon.