Teltonika RUTX11
Teltonika RUTX11 Industrial Cellular Router User Manual
Model: RUTX11100400 (RUTX11) | Brand: Teltonika
1. Introduction and Overview
The Teltonika RUTX11 is a powerful and versatile industrial cellular router designed for robust and reliable connectivity in demanding environments. It features dual SIM card slots for enhanced network redundancy and auto-failover capabilities, ensuring continuous internet access. This router supports 4G LTE Cat6 with download speeds up to 300Mbps and 3G up to 42 Mbps. Equipped with four 1 Gigabit Ethernet ports, dual-band AC Wi-Fi, Bluetooth LE, and USB interfaces, the RUTX11 provides comprehensive connectivity options. Its durable aluminum housing makes it suitable for various industrial applications. This manual provides essential information for setting up, operating, and maintaining your RUTX11 router.
2. Package Contents
Upon opening the package, please verify that all components are present and in good condition. The standard package for the Teltonika RUTX11 includes:
- Teltonika RUTX11 Industrial Cellular Router
- US Power Supply Unit (PSU)
- 2 x LTE Antennas (SMA male)
- 2 x Wi-Fi Antennas (RP-SMA male)
- 1 x GNSS Antenna (SMA male)
- 1 x Bluetooth Antenna (RP-SMA male)
- Ethernet Cable
- Quick Start Guide
3. Product Overview
Familiarize yourself with the physical components and interfaces of the RUTX11 router.

Figure 3.1: Front view of the Teltonika RUTX11 router, showing the brand logo, model name, power input, and default IP address.

Figure 3.2: Angled view of the RUTX11, highlighting the front panel with SIM slots, Ethernet ports (LAN1-3, WAN), Wi-Fi LEDs, Power, and Reset buttons, along with the side antenna connectors.

Figure 3.3: Another angled view of the RUTX11, showing the rear panel with additional antenna connectors (Mobile Main, GPS, Bluetooth, Wi-Fi), USB port, and grounding screw.

Figure 3.4: Detailed view of the RUTX11's front panel. This includes the WAN, SIM1, SIM2, Wi-Fi, and ETH status LEDs, the two SIM card slots (SIM1 and SIM2), four Gigabit Ethernet ports (LAN1, LAN2, LAN3, WAN), Wi-Fi 2.4GHz and 5GHz LEDs, Power input, and Reset button.
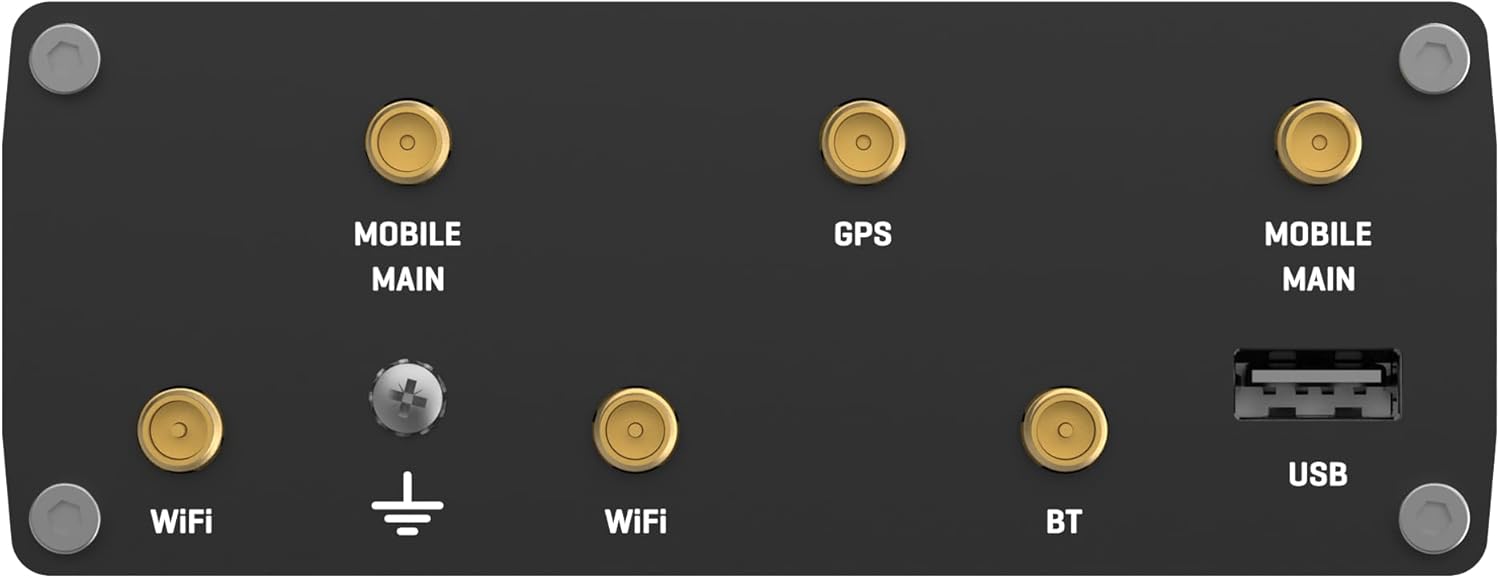
Figure 3.5: Detailed view of the RUTX11's rear panel. This shows the antenna connectors for Wi-Fi, Mobile Main (cellular), GPS, and Bluetooth, along with the USB port and grounding screw.
Port and Indicator Descriptions:
- Power Input (9-50 VDC): Connects to the included power supply unit.
- Ethernet Ports (LAN1, LAN2, LAN3, WAN): Four Gigabit Ethernet ports for wired network connections. The WAN port can be configured as an additional LAN port.
- SIM Card Slots (SIM1, SIM2): Two slots for inserting Mini-SIM (2FF) cards, allowing for dual cellular connectivity and failover.
- Antenna Connectors: Multiple SMA/RP-SMA connectors for external cellular (MOBILE MAIN), Wi-Fi, GPS, and Bluetooth antennas.
- USB Port: For connecting external devices such as USB storage or modems.
- Reset Button: Used to restore the device to factory default settings or reboot.
- LED Indicators: Provide status information for WAN, SIM activity, Wi-Fi, Ethernet, and cellular signal strength.
4. Setup
Follow these steps to set up your Teltonika RUTX11 router for initial operation.
4.1. SIM Card Installation
- Ensure the router is powered off.
- Locate the SIM card slots on the front panel (SIM1 and SIM2).
- Insert your Mini-SIM (2FF) card(s) into the designated slot(s) with the gold contacts facing down and the notched corner oriented correctly. Push until it clicks into place.
4.2. Antenna Connection
Connect the included antennas to their respective connectors on the router. Ensure they are securely tightened by hand.
- Connect the two LTE antennas to the 'MOBILE MAIN' connectors.
- Connect the two Wi-Fi antennas to the 'Wi-Fi' connectors.
- Connect the GNSS antenna to the 'GPS' connector.
- Connect the Bluetooth antenna to the 'BT' connector.
4.3. Power Connection
- Connect the included US Power Supply Unit (PSU) to the power input connector on the router.
- Plug the PSU into a suitable power outlet. The router will begin to power on.
4.4. Initial Access
To access the router's Web User Interface (WebUI) for configuration:
- Via Ethernet: Connect an Ethernet cable from your computer to any of the LAN ports (LAN1, LAN2, or LAN3) on the RUTX11.
- Via Wi-Fi: Connect your device to the router's default Wi-Fi network. The default SSID and password are typically found on a label on the router itself or in the Quick Start Guide.
- Open a web browser and navigate to the default IP address: 192.168.1.1
- Enter the default username and password when prompted. These credentials are usually printed on the device label. It is highly recommended to change the default password immediately after the first login for security purposes.
5. Operating
Once the router is set up, you can configure and manage its various functions through the WebUI.
5.1. Web User Interface (WebUI) Navigation
The WebUI provides a comprehensive interface for managing all router settings. Key sections typically include:
- Status: Overview of device status, network connections, and system information.
- Network: Configuration for WAN, LAN, Mobile, Wi-Fi, VLANs, and VPN.
- Services: Settings for various network services like DHCP, DNS, Firewall, SMS utilities, and more.
- System: Device administration, firmware updates, backup/restore, and user management.
5.2. Network Configuration
- Mobile (Cellular): Configure APN settings for your SIM cards. Set up primary and secondary SIMs, and define failover conditions based on signal strength, data usage, or network availability.
- Wi-Fi: Configure Wi-Fi SSIDs, passwords, security protocols (WPA2/WPA3), and channel settings for both 2.4GHz and 5GHz bands.
- WAN/LAN: Configure the WAN (Internet) connection type (e.g., DHCP, Static IP, Mobile) and LAN network settings (IP address, subnet mask, DHCP server).
5.3. Advanced Features
The RUTX11 offers a wide range of advanced features for professional use:
- VPN: Support for various VPN protocols including OpenVPN, IPsec, L2TP, PPTP, and GRE.
- Firewall: Robust firewall rules, port forwarding, and NAT configuration.
- RMS (Remote Management System): Teltonika's centralized cloud platform for managing multiple devices remotely.
- SMS Utilities: Send and receive SMS messages, and configure SMS-based controls.
- Load Balancing: Distribute traffic across multiple WAN connections (e.g., cellular and wired WAN).
6. Maintenance
Regular maintenance ensures optimal performance and security of your RUTX11 router.
6.1. Firmware Updates
Keeping your router's firmware updated is crucial for security, stability, and access to new features. Firmware updates can be performed via the WebUI under the 'System' section. Always download firmware from the official Teltonika Networks website.
6.2. Factory Reset
A factory reset restores the router to its original default settings. This can be useful for troubleshooting or preparing the device for redeployment. To perform a hard factory reset:
- Ensure the router is powered on.
- Locate the Reset button on the front panel.
- Press and hold the Reset button until all five LEDs above the SIM2 slot illuminate. This typically takes about 10-15 seconds.
- Release the button. The router will reboot with factory default settings.
6.3. Cleaning
Clean the router's exterior with a soft, dry cloth. Do not use liquid cleaners or aerosols. Ensure proper ventilation around the device to prevent overheating.
7. Troubleshooting
This section addresses common issues you might encounter with your RUTX11 router.
7.1. No Internet Connection
- Check SIM Card: Ensure the SIM card is correctly inserted and active with your mobile carrier. Verify APN settings in the WebUI.
- Signal Strength: Check the cellular signal strength LEDs on the router. If low, try repositioning the router or external antennas.
- WAN Connection: If using a wired WAN, ensure the Ethernet cable is connected and the WAN port is configured correctly in the WebUI.
- Reboot: Power cycle the router by disconnecting and reconnecting the power supply.
7.2. Wi-Fi Not Working
- Wi-Fi LEDs: Check if the Wi-Fi LEDs on the router are illuminated.
- WebUI Settings: Verify that Wi-Fi is enabled and configured correctly (SSID, password, security) in the WebUI.
- Antennas: Ensure Wi-Fi antennas are securely connected.
7.3. Cannot Access WebUI
- IP Address: Confirm you are using the correct default IP address (192.168.1.1) or the custom IP if changed.
- Network Connection: Ensure your device is connected to the router via Ethernet or Wi-Fi.
- Browser Cache: Clear your browser's cache and cookies, or try a different browser.
- Factory Reset: If all else fails, perform a factory reset as described in Section 6.2. Note that this will erase all custom configurations.
For more detailed troubleshooting, refer to the official Teltonika Networks Wiki and support forums.
8. Specifications
Key technical specifications for the Teltonika RUTX11 router:
| Feature | Specification |
|---|---|
| Model Name | RUTX11 |
| Wireless Type | 802.11n, 802.11b, 802.11ac, 802.11g (Dual-Band) |
| Cellular Connectivity | 4G LTE Cat6 (up to 300Mbps DL), 3G (up to 42 Mbps) |
| SIM Slots | Dual SIM (Mini-SIM 2FF) |
| Ethernet Ports | 4 x 1 Gigabit Ethernet Ports (LAN1, LAN2, LAN3, WAN) |
| USB Ports | 1 x USB 2.0 Port |
| Bluetooth | Bluetooth LE |
| GPS | Integrated GNSS (GPS, GLONASS, BeiDou, Galileo, QZSS) |
| Operating System | RutOS |
| Power Input | 9-50 VDC |
| Dimensions (LxWxH) | 4.53 x 3.74 x 1.74 inches (115 x 95 x 44 mm) |
| Item Weight | 1.01 pounds (458 g) |
| Housing Material | Aluminum |
| Operating Temperature | -40 °C to 75 °C (-40 °F to 167 °F) |
9. Warranty and Support
For information regarding the warranty period and terms for your Teltonika RUTX11 router, please refer to the warranty card included with your product or consult the official Teltonika Networks website. Warranty terms may vary based on region and reseller.
For technical support, detailed documentation, firmware downloads, and community forums, please visit the official Teltonika Networks support resources:
- Teltonika Networks Wiki (Comprehensive documentation)
- Teltonika Networks Community Forum (Peer and expert support)
- Teltonika Networks Contact Us (Official support channels)
Always ensure you are obtaining support and resources from official Teltonika Networks channels to ensure authenticity and accuracy.