1. Introduction
This instruction manual provides detailed guidance for the assembly, operation, and maintenance of the SMALLRIG Camera Cage Kit (Model KCVB2419). This kit is specifically designed to enhance the functionality and protection of your Blackmagic Design Pocket Cinema Camera 4K or 6K, offering multiple mounting points for accessories and improved handling.
2. Package Contents
The SMALLRIG Camera Cage Kit KCVB2419 includes the following components:
- Integrated Full Camera Cage
- Top Handle
- SSD Holder (for Samsung T5 SSD)
- Necessary mounting screws and Allen wrench

Figure 2.1: Exploded view of the SMALLRIG Camera Cage Kit components, illustrating the full cage, top handle, and SSD holder.
3. Setup and Installation
Follow these steps to properly install the camera cage and its accessories:
3.1 Attaching the Camera Cage
- Carefully place your Blackmagic Design Pocket Cinema Camera 4K or 6K into the cage.
- Secure the camera by tightening the 1/4"-20 screws located on both the top and bottom of the cage. Ensure the camera is firmly seated against the rubber pads and locating pins on the base plate to prevent movement and scratches.
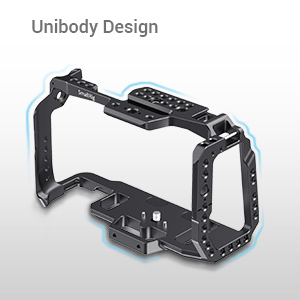
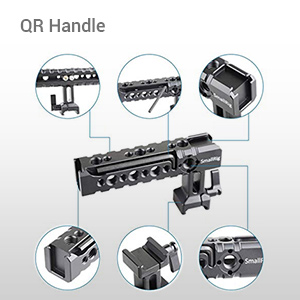
Figure 3.1: Detail of the cage's base plate with rubber pads and locating pins, and a side view showing the securing screw.
3.2 Attaching the Top Handle
- Align the top handle with the NATO rail located on the top of the camera cage.
- Slide the handle onto the NATO rail and secure it by tightening the locking mechanism. The handle can be adjusted fore and aft for optimal balance.

Figure 3.2: The top handle attached to the camera cage via the NATO rail.
3.3 Attaching the SSD Holder
- Mount the SSD holder to the cage using the two provided screws.
- Insert your Samsung T5 SSD into the holder and secure the USB-C cable to prevent accidental disconnection.
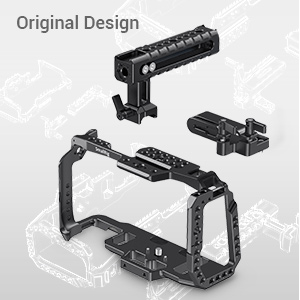
Figure 3.3: The SSD holder mounted on the cage, securing a Samsung T5 SSD.
3.4 Installation Video Guide
Video 3.1: Official SmallRig installation guide for the BMPCC 4K & 6K cage kit (KCVB2419). This video demonstrates the assembly process and key features of the cage.
4. Features and Usage
The SMALLRIG Camera Cage Kit KCVB2419 offers extensive features for professional video production:
- Multiple Mounting Points: The cage features numerous 1/4"-20 and 3/8"-16 threaded holes, ARRI locating holes, NATO rails, and cold shoe mounts. These allow for the attachment of various accessories such as external monitors, microphones, LED lights, and more.
- Unobstructed Access: The cage design ensures full access to all camera buttons, ports (HDMI, USB-C, audio in), and the battery compartment, allowing for seamless operation without removing the camera from the cage.
- Enhanced Handheld Shooting: The included top handle provides a comfortable grip for handheld shooting, especially useful for low-angle shots. It can support the weight of a fully rigged camera setup.
- SSD Integration: The dedicated SSD holder securely mounts a Samsung T5 SSD, facilitating direct recording to external storage and protecting the USB-C cable connection.
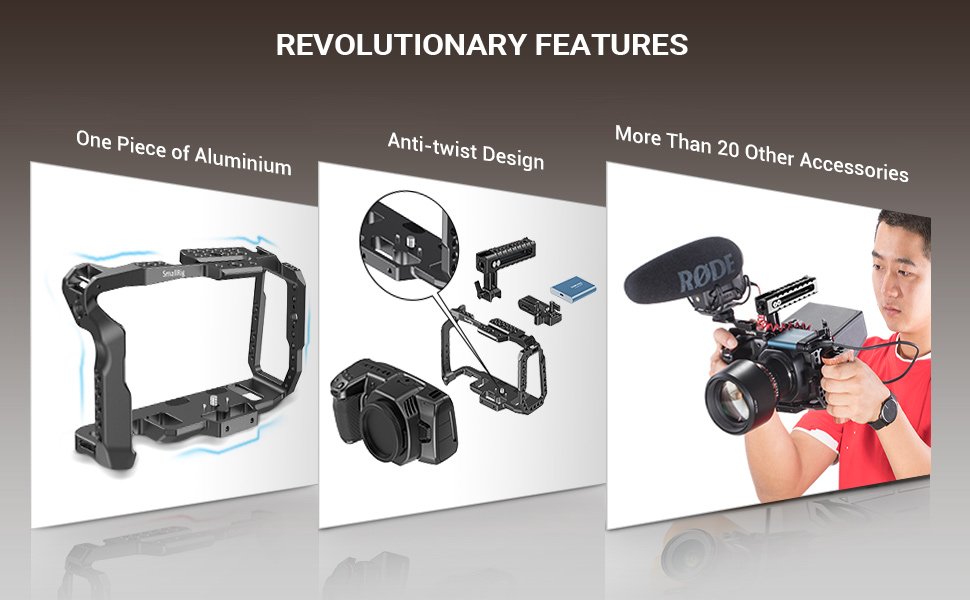
Figure 4.1: The camera cage provides full access to all camera controls and ports.

Figure 4.2: Example of a fully rigged camera setup using the SmallRig cage, demonstrating various accessory attachments.

Figure 4.3: The camera cage with top handle and SSD holder attached, ready for use.
5. Specifications
| Feature | Detail |
|---|---|
| Model Number | KCVB2419 |
| Brand | SMALLRIG |
| Color | Black |
| Compatible Devices | Blackmagic Design Pocket Cinema Camera 4K & 6K, Monitor |
| Product Dimensions (D x W x H) | 4.6"D x 7.6"W x 4.5"H |
| Item Weight | 500 Grams |
| Maximum Weight Recommendation | 600 Grams |
| Mounting Points | 1/4"-20 & 3/8"-16 threaded holes, ARRI locating holes, NATO Rail, Cold Shoe Mount |

Figure 5.1: Dimensional drawing of the SmallRig camera cage and top handle.
6. Maintenance
To ensure the longevity and optimal performance of your SMALLRIG Camera Cage Kit, follow these maintenance guidelines:
- Cleaning: Wipe the cage and accessories with a soft, dry cloth to remove dust and debris. For stubborn dirt, use a slightly damp cloth and dry thoroughly. Avoid harsh chemicals or abrasive cleaners.
- Inspection: Regularly inspect all screws and mounting points for tightness. Re-tighten any loose connections to prevent accidental equipment damage.
- Storage: Store the cage kit in a clean, dry environment when not in use. If disassembled, keep all components together to avoid loss.
7. Troubleshooting
If you encounter any issues with your SMALLRIG Camera Cage Kit, consider the following common solutions:
- Camera Movement within Cage: Ensure all 1/4"-20 screws securing the camera are fully tightened. Verify that the camera is correctly aligned with the locating pins and resting on the rubber pads.
- Loose Accessories: Check that all accessories attached to the cage (e.g., top handle, SSD holder, monitors, lights) are securely fastened to their respective mounting points (NATO rail, cold shoe, threaded holes).
- Difficulty Attaching/Detaching Components: Ensure no debris is obstructing the mounting interfaces. Apply gentle, even pressure during assembly or disassembly. Do not force components.
For persistent issues, please refer to the support information provided in Section 8.
8. Warranty and Support
SMALLRIG products are manufactured to high-quality standards. For warranty information, product support, or to report any issues, please contact SMALLRIG customer service directly. Keep your purchase receipt as proof of purchase for warranty claims.
For further assistance, visit the official SMALLRIG website or contact their support team through the contact information provided with your product packaging.