SCYAN X3SN
SCYAN X3 Smart Door Lock User Manual
Model: X3SN
Introduction
Thank you for choosing the SCYAN X3 Smart Door Lock. This manual provides detailed instructions for installation, operation, and maintenance of your new keyless entry door lock. Please read this manual thoroughly before installation and use to ensure proper function and longevity of the product.
Product Overview
The SCYAN X3 is a state-of-the-art smart door lock designed for convenient and secure access. It features a touchscreen keypad and traditional key access, offering flexibility for various users.
Key Features:
- Touchscreen Keypad: Backlit for easy visibility in low light conditions.
- Multiple Access Methods: Unlock using a personalized user code or a traditional key.
- Code Capacity: Stores up to 99 personalized 4-8 digit PIN codes.
- Anti-Peep Function: Supports prefix and suffix input (random digits + user code + random digits) to prevent code exposure.
- Passage Mode: Allows the lock to remain unlocked for continuous access when enabled.
- Low Battery Alert: Notifies you when batteries are running low.
- Override Key: Includes a Schlage C key for manual override.
- Durable Construction: Double-shell heavy-duty design for enhanced security.
- Reversible Lever: The lever is fully reversible, allowing installation on both left-handed and right-handed doors.
- Emergency Power: A 9V battery can be attached to the external terminals for temporary power if internal batteries are depleted.

Image: Front view of the SCYAN X3 Smart Door Lock, showcasing the touchscreen keypad and lever handle.

Image: Separate views of the front exterior unit (with keypad) and the back interior unit of the SCYAN X3 Smart Door Lock.
Setup and Installation
Before you begin, ensure your door meets the following specifications:
- Face Bore Hole: Requires a 2 ⅛" (54mm) diameter hole.
- Backset: Compatible with 2 ⅜” (60mm) or 2 ¾” (70mm) backsets.
- Door Thickness: Fits doors between 1 ¼” (32mm) and 2 ¼” (57mm) thick.

Image: Diagram illustrating the required door dimensions for installation, including bore hole diameter, backset, and door thickness.
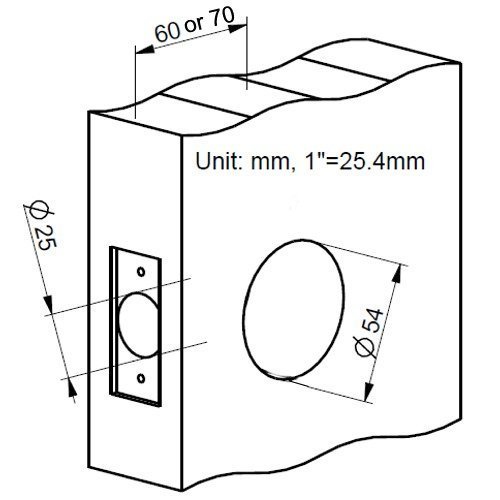
Image: Diagram showing the single bore hole requirement for the lock installation, indicating it is not a deadbolt.
Installation Steps:
- Prepare the Door: Ensure the door has the correct bore hole and backset. This lock is designed for a single bore hole, not a deadbolt.
- Install the Latch: Insert the tubular latch into the door edge. Ensure the latch bolt faces the correct direction for your door swing.
- Install the Exterior Unit: Place the exterior keypad unit through the bore hole, aligning it with the latch.
- Install the Interior Mounting Plate: Secure the interior mounting plate to the door using the provided screws, ensuring the spindle and cable pass through the plate.
- Connect Cables: Connect the cable from the exterior unit to the interior unit.
- Install the Interior Unit: Attach the interior unit to the mounting plate, securing it with screws.
- Install Levers:

Image: Detailed instructions for setting up the lever for both left-handed and right-handed doors, including spindle rotation and cylinder insertion.
- Rotate the inner spindle using a screwdriver to align the cylindrical protrusions horizontally.
- Insert the cylinder into the lever spindle.
- Insert the lever catch (the big end first) into the hole completely.
- Push the lever onto the lever spindle. It will stop halfway when you push the lever in.
- Insert the key into the cylinder and rotate it CLOCKWISE 90°.
- Push the lever towards the lock. If the lever cannot be pushed in, rotate the key between 80° to 120° while pushing the lever until it is pushed in completely.
- Rotate the key COUNTER-CLOCKWISE 90° and remove the key.
- Insert Batteries: Open the battery cover on the interior unit and insert 4 AA Alkaline batteries (not included), ensuring correct polarity.
- Test Operation: Test the lock with the default programming code (1234) and the physical key to ensure it functions correctly.

Image: Exploded view diagram of the SCYAN X3 Smart Door Lock, showing all components for assembly.
Operating Instructions
Unlocking the Door:
- Using a User Code:
- Touch the keypad to activate it.
- Enter your 4-8 digit user code followed by the '#' key.
- The lock will emit a beep and unlock. Turn the lever to open the door.
- Using the Physical Key:
- Insert the physical key into the keyhole.
- Turn the key to unlock the mechanism.
- Turn the lever to open the door.
Locking the Door:
- Automatic Locking: The lock is designed to automatically re-lock after a few seconds (default setting).
- Manual Locking: Press any key on the keypad or turn the interior lever to engage the lock.
Programming Codes:
Refer to the detailed programming instructions provided in the separate programming guide for changing the default programming code, adding new user codes, or enabling passage mode. The default programming code is 1234.
Maintenance
- Battery Replacement: Replace all four AA Alkaline batteries when the low battery alert is activated. Do not mix old and new batteries or different battery types.
- Cleaning: Clean the keypad and lock body with a soft, dry cloth. Avoid abrasive cleaners or solvents that may damage the finish or electronic components.
- Lubrication: Periodically lubricate the latch bolt and cylinder with a silicone-based lubricant to ensure smooth operation.
- Environment: This lock is designed for interior use and is not weatherproof. Avoid exposure to extreme temperatures or moisture.
Troubleshooting
| Problem | Possible Cause | Solution |
|---|---|---|
| Keypad does not light up or respond. | Dead batteries. | Replace all 4 AA Alkaline batteries. If still unresponsive, use a 9V battery on the external terminals for temporary power. |
| Lock does not unlock with valid code. | Incorrect code entered; lock in a different mode; mechanical issue. | Ensure correct code is entered followed by '#'. Check if passage mode is enabled. Try using the physical key. Re-check installation. |
| Lever spins freely without engaging latch. | Improper lever installation; internal mechanism issue. | Refer to the "Install Levers" section in Setup and Installation to ensure correct lever and spindle alignment. If issue persists, contact support. |
| Lock beeps continuously. | Low battery warning. | Replace all 4 AA Alkaline batteries immediately. |
Specifications
| Attribute | Detail |
|---|---|
| Model Number | X3SN |
| Lock Type | Keypad, Tubular Latch |
| Keypad Type | Standard 12-key touchscreen, backlit |
| User Code Capacity | Up to 99 codes (4-8 digits) |
| Power Source | 4 AA Alkaline batteries (not included) |
| Emergency Power | External 9V battery terminals |
| Door Thickness Compatibility | 1 ¼” (32mm) to 2 ¼” (57mm) |
| Face Bore Hole Diameter | 2 ⅛" (54mm) |
| Backset Compatibility | 2 ⅜” (60mm) or 2 ¾” (70mm) |
| Operating Temperature | -4°F to 150°F (-20°C to 65°C) |
| Product Dimensions (L x W x H) | 6 x 4 x 6 inches |
| Product Weight | 4.21 Pounds |
| Material | Metal, Plastic |
| Intended Use | Interior doors only (non-weatherproof) |
Warranty & Support
The SCYAN X3 Smart Door Lock comes with a one-year limited manufacturer's warranty. For warranty claims, technical support, or any questions regarding your product, please contact Scyan Electronics LLC customer service.
As a US-based company, SCYAN offers customer service from Washington, USA.
For additional resources, you may refer to the official User Manual (PDF).
Ask a question about this manual
Ask about setup, troubleshooting, compatibility, parts, safety, or missing instructions. Manuals+ will review the question and use this page’s manual context to help answer it.