1. Introduction
This manual provides essential information for the proper installation, operation, and maintenance of your JDLLONG Carburetor and Fuel Pump Kit. Please read these instructions thoroughly before attempting any installation or service to ensure safety and optimal performance of your Kawasaki Mule.
This kit is designed as a direct replacement for the original carburetor and fuel pump in compatible Kawasaki Mule models, aiming to restore efficient fuel delivery and engine performance.
2. Package Contents
Verify that all components listed below are present in your package. If any items are missing or damaged, please contact customer support.
- 1 x Carburetor
- 2 x Gaskets
- 1 x Fuel Pump
- 1 x Air Filter (OEM Part Number: 11029-1004)
- 2 x Spark Plugs
- 1 x Shut-off Valve
- 1 x Fuel Line
- 1 x Fuel Filter
- 1 x Oil Filter
- 4 x Clamps
- 1 x Carbon Dirt Jet Cleaner Tool Kit
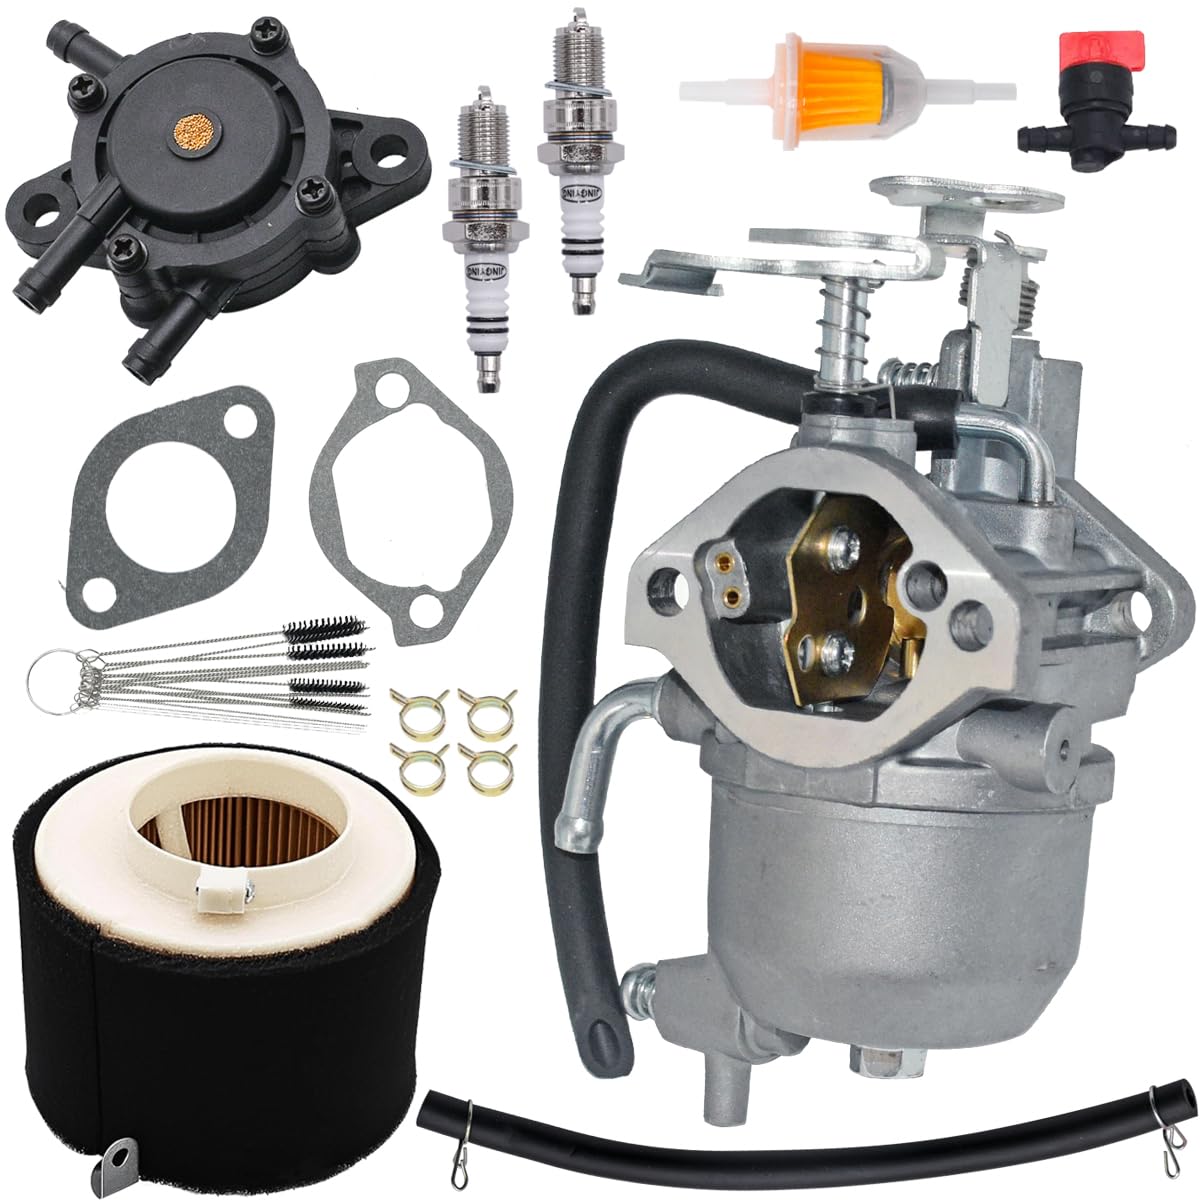
Image 2.1: Main Carburetor Unit

Image 2.2: Fuel Pump Unit
Video 2.1: Overview of the kit components. This video displays the various parts included in the JDLLONG Carburetor and Fuel Pump Kit, providing a visual confirmation of the contents.
3. Compatibility
This JDLLONG Carburetor and Fuel Pump Kit is compatible with the following Kawasaki Mule models and years:
- Kawasaki Mule 600: 2005-2016
- Kawasaki Mule 610: 2005-2016
- Kawasaki Mule 610 KAF400, KAF400A, KAF400B, KAF400C, KAF400D, KAF400E 4X4 XC SE: 2006-2016
- Kawasaki Mule SX: 2017-2020
Interchange Part Numbers: 15004-0953, 15003-2943, 11061-7026
4. Specifications
| Feature | Specification |
|---|---|
| Brand | JDLLONG |
| Vehicle Service Type | ATV |
| Fuel Type | Gasoline |
| OEM Part Numbers | 15003-2943, 15004-0953 |
| Item Weight | 1.08 pounds |
| Package Dimensions | 6.46 x 5.04 x 3.31 inches |

Image 4.1: Carburetor front view with intake dimensions (1.10in height, 1.77in width).
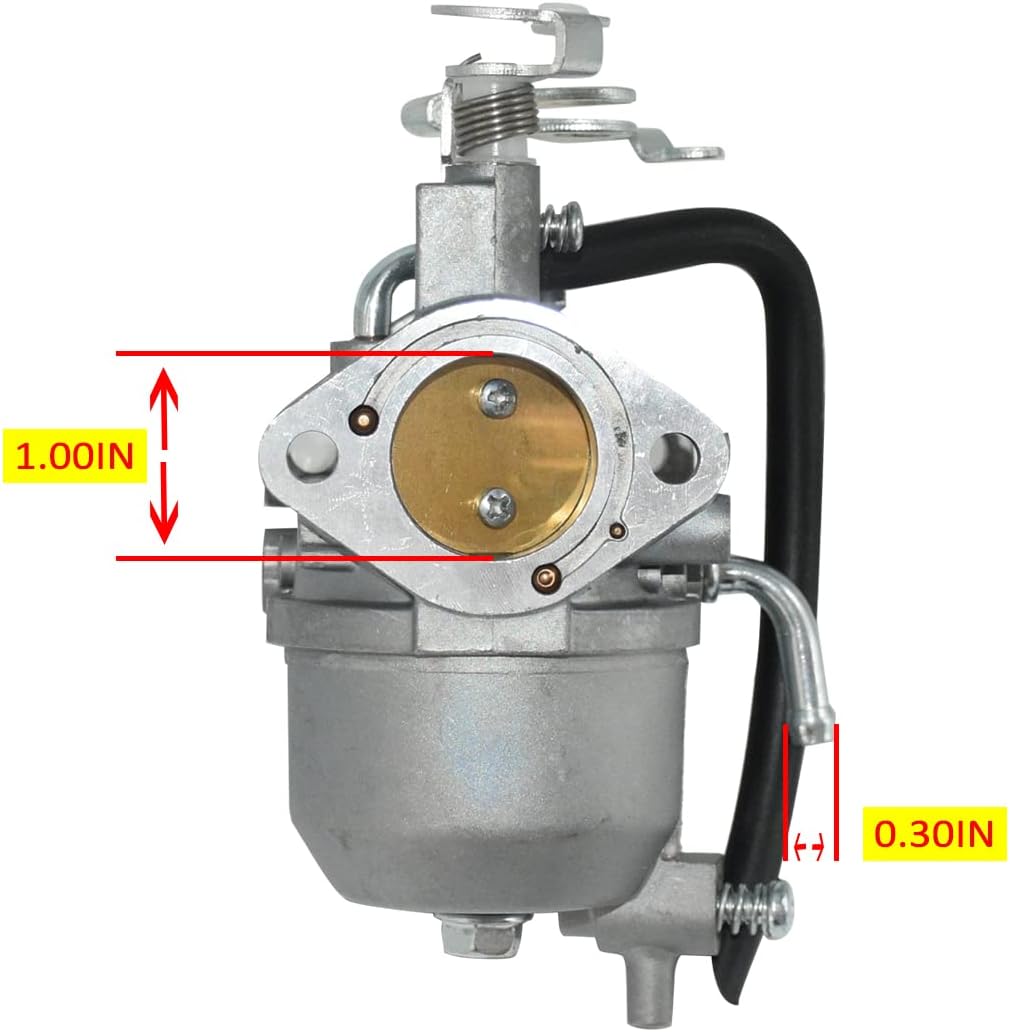
Image 4.2: Carburetor top view with mounting dimensions (1.00in height, 0.30in offset).
Video 4.1: Detailed measurements of the carburetor and air filter. This video provides precise dimensional information for key components, useful for fitment verification.
5. Installation (Setup)
Safety First: Before beginning any work, ensure the vehicle is turned off, the engine is cool, and the battery is disconnected. Wear appropriate personal protective equipment, including gloves and eye protection. Work in a well-ventilated area.
- Prepare the Vehicle: Park the Kawasaki Mule on a level surface. Ensure the engine is cool to the touch.
- Disconnect Fuel Lines: Locate the fuel lines connected to the existing carburetor and fuel pump. Use the shut-off valve to stop fuel flow, then carefully disconnect the lines. Be prepared for residual fuel spillage and have rags ready.
- Remove Old Components: Disconnect any throttle cables, choke cables, and vacuum lines from the old carburetor. Unbolt and remove the old carburetor and fuel pump from their mounting points.
- Install New Fuel Pump: Mount the new JDLLONG fuel pump in the original location, ensuring a secure fit. Connect the fuel lines to the new pump according to the vehicle's service manual or the original configuration.
- Install New Carburetor: Place the new gaskets onto the intake manifold studs. Carefully position the new JDLLONG carburetor onto the studs, ensuring it seats correctly. Secure it with the original nuts, tightening them evenly to prevent air leaks.
- Connect Cables and Lines: Reattach the throttle cable, choke cable, and all vacuum lines to the new carburetor. Ensure smooth operation of the throttle and choke mechanisms.
- Install New Filters: Replace the old air filter, fuel filter, and oil filter with the new ones provided in the kit. Ensure the air filter is properly seated in its housing.
- Install New Spark Plugs: Carefully remove the old spark plugs and install the new ones, ensuring they are torqued to the manufacturer's specifications.
- Reconnect Fuel and Battery: Reconnect the main fuel line and open the shut-off valve. Reconnect the vehicle's battery.
- Initial Start-up and Adjustment: Start the engine. It may take a few cranks for fuel to reach the carburetor. Once running, allow the engine to warm up. Adjust the idle speed and air/fuel mixture as needed for smooth operation. Refer to your vehicle's service manual for specific adjustment procedures.
Note: Professional installation is recommended if you are unfamiliar with carburetor and fuel system replacement.
6. Operation
Once installed and properly adjusted, the JDLLONG Carburetor and Fuel Pump Kit will function automatically to deliver the correct fuel-air mixture to your engine. No special operational steps are required beyond the normal use of your Kawasaki Mule.
- Choke Usage: For cold starts, use the choke as per your vehicle's manufacturer guidelines. Ensure the choke returns to the off position once the engine is warm to prevent rich running conditions.
- Fuel Quality: Always use fresh, clean gasoline of the recommended octane for your Kawasaki Mule. Poor fuel quality can lead to carburetor clogging and performance issues.
7. Maintenance
Regular maintenance is crucial for the longevity and performance of your carburetor and fuel system. Follow these guidelines:
- Air Filter: Inspect the air filter regularly (e.g., every 25-50 operating hours or seasonally) and clean or replace it as needed. A clogged air filter restricts airflow and can cause a rich fuel mixture.
- Fuel Filter: Replace the fuel filter annually or if signs of clogging (e.g., reduced fuel flow, engine sputtering) appear. This prevents contaminants from reaching the carburetor.
- Spark Plugs: Inspect spark plugs periodically. Replace them if they are fouled, worn, or if engine performance degrades. The kit includes new spark plugs for replacement.
- Fuel System Cleaning: If the vehicle is stored for an extended period, drain the fuel system or use a fuel stabilizer to prevent gum and varnish buildup in the carburetor. For persistent issues, a carburetor cleaning may be necessary using the provided jet cleaner tool kit.
- Fuel Lines and Clamps: Periodically check fuel lines for cracks, leaks, or deterioration. Ensure all clamps are secure.
8. Troubleshooting
If you encounter issues after installation, refer to the following common problems and solutions:
| Problem | Possible Cause | Solution |
|---|---|---|
| Engine will not start | No fuel, clogged fuel filter, faulty fuel pump, incorrect choke setting, spark plug issue. | Check fuel level, replace fuel filter, verify fuel pump operation, adjust choke, inspect/replace spark plugs. |
| Rough idle or stalling | Incorrect idle adjustment, air leak, clogged carburetor jet, dirty air filter. | Adjust idle screw, check for loose connections/gaskets, clean carburetor jets with tool kit, clean/replace air filter. |
| Loss of power or sputtering | Clogged fuel filter, dirty air filter, restricted fuel flow, carburetor issues. | Replace fuel filter, clean/replace air filter, check fuel lines for kinks, clean carburetor. |
| Fuel leak | Loose fuel line connection, damaged gasket, cracked fuel line. | Tighten clamps, replace gaskets, replace damaged fuel lines. |
| Choke arm not functioning correctly | Improper installation of choke cable or arm. | Verify correct attachment and alignment of the choke cable and arm. Ensure full range of motion. |
If problems persist after attempting these solutions, it is recommended to consult a qualified mechanic or contact JDLLONG customer support.
9. Warranty and Support
JDLLONG stands behind the quality of its products. If you have any questions related to product quality or require assistance, please send us an email. We are committed to providing prompt support and resolving any issues properly for you.
For specific warranty details, please refer to the product listing or contact JDLLONG customer service directly.