
1. Product Overview
The Feeltek 8-in-1 USB C Hub is a compact and versatile solution designed to expand the connectivity of your USB-C enabled devices such as laptops, tablets, and smartphones. It provides a comprehensive set of ports to enhance your productivity and multimedia experience.
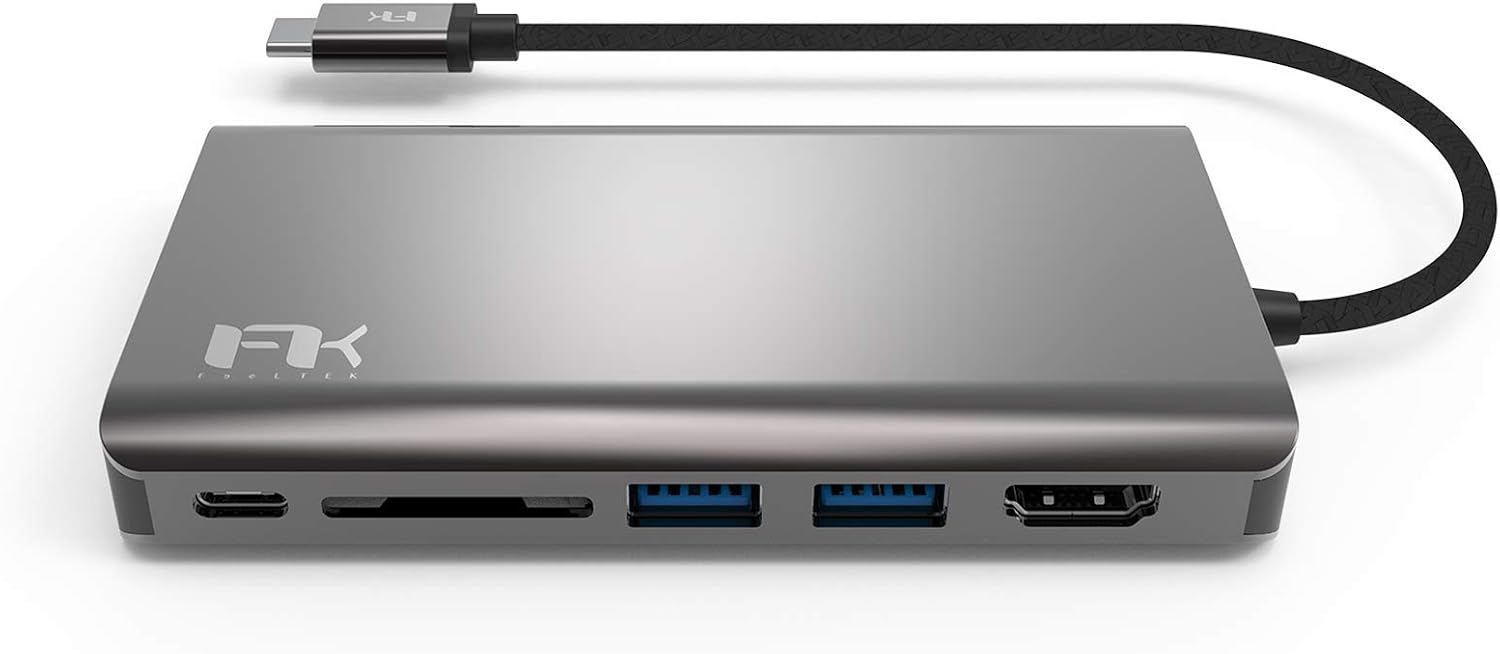
Figure 1.1: The Feeltek 8-in-1 USB C Hub, showcasing its sleek design and compact form factor. This hub connects to your device via a single USB-C cable, providing multiple expansion ports.
2. Key Features
- Common Ports: Equipped with HDMI x 1, VGA x 1, USB 3.0 x 2, USB-C PD x 1, RJ45 Ethernet, SD & TF Card Readers, and a 3.5mm Audio Jack.
- Dual-Monitor Streaming: Capable of duplicating or extending your desktop to two external monitors on Windows/Mac OS (4K in HDMI mode / 1080P in dual mode).
- Smart IC Protection: Features a built-in Smart IC for over-current, over-voltage, over-heat, short-circuit, and overload protection, ensuring device safety.
- Anodized Aluminum Alloy Casing: High-precision aluminum alloy construction provides rigidity, efficient heat dissipation, and reduces electromagnetic interference.
- 60W PD Supported: Automatic power detection distributes correct power to charge laptops with USB-C Power Delivery.

Figure 2.1: The hub connected to various peripherals, illustrating its comprehensive port selection including HDMI, VGA, USB 3.0, USB-C PD, RJ45, and card readers.

Figure 2.2: Visual representation of the hub's dual-monitor streaming capability, allowing users to extend or duplicate their display across two external monitors.

Figure 2.3: The USB-C Power Delivery (PD) port, which supports up to 60W power input to charge your host device while using the hub.

Figure 2.4: An internal view highlighting the Smart IC, which provides multiple layers of protection against electrical hazards.

Figure 2.5: Detail of the anodized aluminum alloy chassis, emphasizing its robust construction and heat dissipation properties.
3. Product Layout and Ports
Familiarize yourself with the various ports and their locations on the Feeltek 8-in-1 USB C Hub:

Figure 3.1: A detailed diagram illustrating the placement and labeling of each port on the hub.

Figure 3.2: An angled view of the hub, clearly showing the VGA, RJ45, USB-C PD, SD/TF card slots, USB 3.0 ports, and HDMI port.
- USB-C Host Connector: Connects to your laptop, tablet, or smartphone's USB-C port.
- HDMI Port: Connects to an HDMI-enabled display for video and audio output (up to 4K resolution).
- VGA Port: Connects to a VGA-enabled display for video output (up to 1080P resolution).
- USB 3.0 Ports (x2): For connecting USB peripherals like keyboards, mice, external hard drives, or USB flash drives.
- USB-C PD Port: For connecting a USB-C power adapter to charge your host device (up to 60W).
- SD Card Reader: For reading data from SD, SDHC, SDXC cards.
- TF (Micro SD) Card Reader: For reading data from Micro SD, Micro SDHC, Micro SDXC cards.
- RJ45 Ethernet Port: Provides a stable wired network connection (10/100/1000Mbps).
- 3.5mm Audio Jack: For connecting headphones, speakers, or microphones.

Figure 3.3: The 3.5mm audio jack, allowing connection of standard audio devices.

Figure 3.4: The RJ45 Ethernet port in use, providing a reliable wired internet connection for your device.
4. Setup Guide
- Connect the Hub: Plug the USB-C host connector cable of the Feeltek 8-in-1 USB C Hub into the USB-C port of your laptop, tablet, or smartphone.
- Connect Power (Optional): If your host device requires charging or if you are connecting power-intensive peripherals, connect your original USB-C power adapter to the USB-C PD port on the hub.
- Connect Peripherals: Connect your desired peripherals (e.g., monitor via HDMI/VGA, USB devices, SD/TF cards, Ethernet cable, audio devices) to the corresponding ports on the hub.
- Driver Installation: The hub is generally plug-and-play and does not require additional drivers for most operating systems (Windows, macOS, Chrome OS, Android). If prompted, allow your system to install any necessary drivers automatically.
5. Operating Instructions
5.1. Display Output (HDMI & VGA)
- Connect your monitor to the HDMI or VGA port.
- For dual display, connect one monitor to HDMI and another to VGA.
- On Windows, press Windows Key + P to select display mode (Duplicate, Extend, Second screen only).
- On macOS, go to System Preferences > Displays to configure display settings.
- HDMI supports up to 4K@30Hz. VGA supports up to 1080P@60Hz. When both are used simultaneously, the maximum resolution for both displays will be 1080P.
5.2. USB 3.0 Ports
- Plug your USB devices (e.g., flash drives, external hard drives, keyboards, mice) into the USB 3.0 ports.
- These ports support data transfer speeds up to 5Gbps.
5.3. SD & TF Card Readers
- Insert your SD or TF (Micro SD) card into the corresponding slot.
- The card will appear as a removable drive on your computer.
- Only one card can be read at a time.
5.4. RJ45 Gigabit Ethernet
- Connect an Ethernet cable from your router or modem to the RJ45 port on the hub.
- Your device will automatically detect the wired network connection.
5.5. 3.5mm Audio Jack
- Plug your headphones, speakers, or microphone into the 3.5mm audio jack.
- Ensure your operating system's audio output/input settings are configured to use the hub's audio device.
6. Maintenance and Care
- Cleaning: Use a soft, dry cloth to clean the hub. Avoid using liquid cleaners or aerosols.
- Storage: Store the hub in a cool, dry place away from direct sunlight and extreme temperatures.
- Handling: Avoid dropping or subjecting the hub to strong impacts. Do not attempt to disassemble the device.
- Connectivity: Always ensure cables are inserted and removed gently to prevent damage to the ports.
7. Troubleshooting
7.1. No Display Output
- Ensure the USB-C connection to your host device is secure.
- Check the HDMI/VGA cable connection to both the hub and the monitor.
- Verify that your monitor is set to the correct input source (HDMI/VGA).
- Try restarting your host device.
- Ensure your host device's graphics drivers are up to date.
7.2. USB Devices Not Recognized
- Ensure the USB device is properly inserted into the hub's USB 3.0 port.
- Try connecting the USB device directly to your host device to confirm it functions.
- If it's a high-power USB device (e.g., external HDD), ensure the hub is connected to a power source via its USB-C PD port.
7.3. Network Connection Issues
- Verify the Ethernet cable is securely connected to both the hub and your router/modem.
- Check your network settings on your host device.
- Ensure your router/modem is functioning correctly.
7.4. Charging Not Working via PD Port
- Ensure your USB-C power adapter is connected to the hub's USB-C PD port.
- Verify that your power adapter is functional and provides sufficient wattage for your host device.
- Some devices may require specific power profiles; ensure compatibility.
8. Technical Specifications
| Specification | Value |
|---|---|
| Model Number | UCH008AP2 |
| Product Dimensions | 11.02 x 2.36 x 0.63 inches |
| Item Weight | 3.92 ounces |
| Hardware Interface | USB 3.0, HDMI, VGA, RJ45, USB-C |
| HDMI Resolution | Up to 4K@30Hz |
| VGA Resolution | Up to 1080P@60Hz |
| USB-C PD Input | Up to 60W |
| Ethernet Speed | 10/100/1000Mbps |
| Card Reader Support | SD, SDHC, SDXC, Micro SD, Micro SDHC, Micro SDXC |
| Compatible Devices | Laptops, Monitors, Tablets with USB-C port |
| Color | Gray |
9. Warranty and Support
For warranty information and technical support, please refer to the documentation included with your product or visit the official Feeltek website. Keep your purchase receipt for warranty claims.