1. Introduction
The Falcon Eyes P12 is a professional 120W Daylight LED Fresnel video light designed for various photographic and videographic applications. It features a high-quality LED chip, durable CNC aluminum housing, and a versatile control box with an LCD touch screen. This manual provides essential information for the safe and effective setup, operation, and maintenance of your P12 video light.
2. Package Contents
Please verify that all items listed below are included in your package. If any items are missing or damaged, contact your retailer immediately.
- 1x P12 LED Light Unit
- 1x Lighting Cover (Reflector)
- 1x Controller Box
- 1x Power Cable
- 1x Safety Rope
- 1x 2.4G Signal Enhancement Antenna
- 1x Carrying Bag

Image 2.1: All components of the Falcon Eyes P12 LED Light system, including the light unit, control box, cables, and carrying bag.
3. Product Features
- Output Power: 120W Daylight LED.
- Color Temperature: Fixed at 5600K.
- Color Accuracy: High CRI (Ra >95) and TLCI (>98) for accurate color reproduction.
- Beam Angle Adjustment: Adjustable from 15° (spot) to 60° (flood) via a focusing ring.
- Mounting System: Standard Bowens mount for compatibility with various light modifiers.
- Control: LCD touch screen on the control box, DMX512 support.
- Brightness Control: 0-100% stepless dimming.
- Special Effects: 9 pre-programmed lighting effects (Lightning 1, Lightning 2, TV, Candle, Reporter, Rapid Stroboscopic, Low/High Beam Switch, Light Strobe, Heartbeat).
- Power Supply: Dual power options with AC adapter or V-mount battery (not included).
- Construction: Durable CNC aluminum housing.
- Cooling: Efficient heat dissipation design with low fan noise.
4. Setup
Follow these steps to set up your Falcon Eyes P12 video light:
- Mounting the Light Unit: Attach the P12 LED light unit to a compatible light stand using the integrated mounting bracket. Secure it firmly with the locking knob.
- Attaching the Control Box: Connect the control box to the P12 LED light unit using the provided cable. Ensure the connection is secure.
- Power Connection:
- AC Power: Connect the power cable to the control box and then to a suitable AC power outlet.
- V-Mount Battery: For portable operation, attach a fully charged V-mount battery (sold separately) to the V-mount plate on the control box.
- Attaching Light Modifiers: Align your desired Bowens mount light modifier (e.g., reflector, softbox) with the Bowens mount on the front of the P12 light unit. Rotate until it locks into place.

Image 4.1: The Falcon Eyes P12 LED Light with a standard reflector attached to its Bowens mount.
5. Operating Instructions
5.1 Control Box Overview
The control box provides all necessary adjustments for the P12 light. Familiarize yourself with its interface:

Image 5.1: Detailed view of the P12 control box, highlighting the Option Button, Special Effects Selection, Brightness Adjustment knob, Liquid Crystal Display, and V-Mount Battery Interface.
- Liquid Crystal Display (LCD): Shows current settings such as brightness, DMX channel, and special effect mode.
- Option Button: Used to navigate through menu options.
- Special Effects Selection Knob: Rotates to select different pre-programmed lighting effects.
- Brightness Adjustable Knob: Rotates to adjust the light intensity from 0% to 100%. Pressing this knob may confirm selections or switch modes.
- V-Mount Battery Interface: For attaching a V-mount battery for portable power.
5.2 Powering On/Off
Press the power button on the control box to turn the light on or off. The LCD will illuminate upon power-on.
5.3 Brightness Adjustment
Rotate the Brightness Adjustable Knob on the control box to increase or decrease the light output. The brightness level (0-100%) will be displayed on the LCD.
5.4 Adjusting Lighting Angle
The P12 features an adjustable beam angle. Turn the yellow focusing ring located on the front of the light unit to adjust the beam angle from a narrow 15° spot to a wider 60° flood.
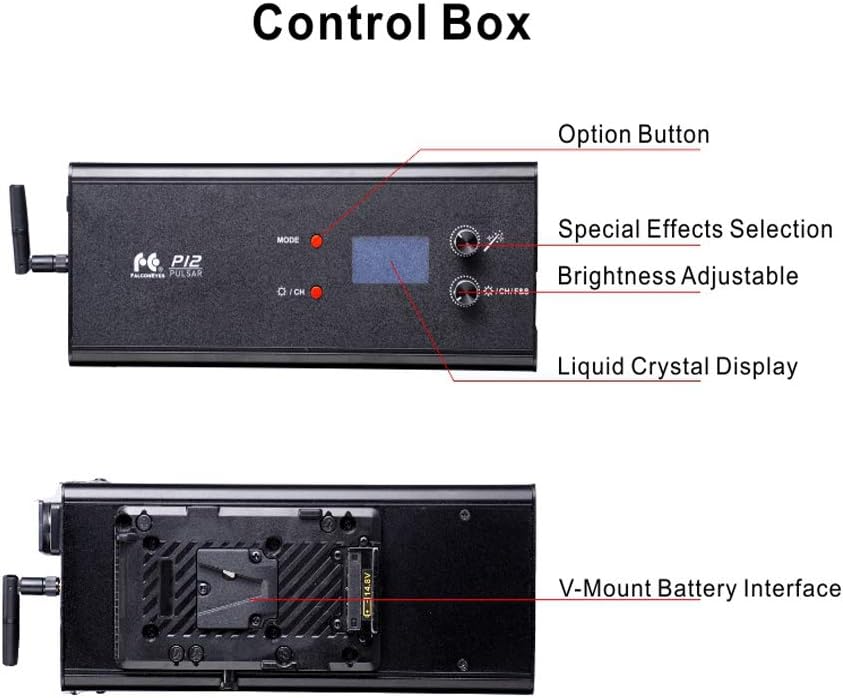
Image 5.2: The P12 light unit, illustrating the yellow ring used for adjusting the beam angle.
5.5 Special Effects Mode
The P12 includes 9 pre-programmed special lighting effects. To activate and select an effect:
- Press the Option Button to navigate to the effects menu.
- Rotate the Special Effects Selection Knob to cycle through the available effects.
- Press the knob to confirm your selection.
Available effects include:
- Lightning 1
- Lightning 2
- TV
- Candle
- Reporter
- Rapid Stroboscopic
- Low/High Beam Switch
- Light Strobe
- Heartbeat

Image 5.3: Visual representation of the 9 pre-programmed special effects available on the P12 light.
5.6 DMX Control
The P12 supports DMX512 protocol for remote control. Connect a DMX controller to the DMX input/output ports on the control box. Refer to your DMX controller's manual for specific setup and channel assignment instructions. The DMX channel can be set via the control box's menu.
6. Maintenance
- Cleaning: Use a soft, dry cloth to clean the light unit and control box. Do not use abrasive cleaners or solvents. Ensure the light is powered off and disconnected from power before cleaning.
- Storage: When not in use, store the P12 light and its accessories in the provided carrying bag in a cool, dry place, away from direct sunlight and excessive dust.
- Ventilation: Ensure the fan vents on the light unit are clear of obstructions to maintain proper heat dissipation. The P12 features an efficient heat dissipation design to ensure stable operation.

Image 6.1: Illustration of the P12's heat dissipation design, indicating airflow for cooling.
7. Troubleshooting
If you encounter issues with your Falcon Eyes P12 light, refer to the following common problems and solutions:
- Light does not turn on:
- Check if the power cable is securely connected to both the control box and the power outlet.
- If using a V-mount battery, ensure it is fully charged and properly seated.
- Verify the power outlet is functional.
- Light output is inconsistent or flickering:
- Ensure all cables are securely connected.
- Check for stable power supply.
- If using DMX, verify DMX signal integrity and channel settings.
- Fan noise is excessive:
- Ensure the light unit's vents are not obstructed, allowing for proper airflow.
- Operating in extremely hot environments may cause the fan to run at higher speeds.
- Control box display is not working:
- Ensure the control box is properly connected to the light unit and receiving power.
- Try restarting the unit.
If the problem persists after attempting these solutions, please contact Falcon Eyes customer support for further assistance.
8. Specifications
| Feature | Specification |
|---|---|
| Model No. | P-12 |
| Output | 120W |
| Color Temperature | 5600K |
| Color Rendering Index (CRI) | Ra >95 |
| Lighting Angle | 15° ~ 60° |
| Brightness Control | 0~100 Level Stepless adjustable |
| Control Method | Touch screen, DMX512 |
| Voltage | AC Adaptor (DC-15V 10A), 50/60 Hz |
| Battery Compatibility | V-mount |
| Fan Noise | 0.2M: 40dB / 0.5M: 36.4dB |
| LUX (Flood) | 0.5M: 26500 | 1M: 7150 | 2M: 1450 |
| LUX (Focus) | 0.5M: 95400 | 1M: 19900 | 2M: 4250 |
| Net Weight (Light) | 1.93kg |
| Net Weight (Control Box) | 0.75kg |
| Dimensions | 310 x 150mm |
9. Safety Information
Please read and adhere to the following safety guidelines to prevent damage to the product or injury to yourself:
- Do not operate the light in wet conditions or expose it to rain or moisture.
- Avoid looking directly into the LED light when it is on, as it can cause eye strain or damage.
- Ensure proper ventilation around the light unit to prevent overheating.
- Always disconnect the power supply before cleaning or performing maintenance.
- Keep the product out of reach of children.
- Use only the specified power adapter and accessories.
- Do not attempt to disassemble or modify the light unit or control box. Refer all servicing to qualified personnel.
10. Warranty and Support
For warranty information or technical support, please contact your authorized Falcon Eyes dealer or visit the official Falcon Eyes website. Keep your purchase receipt as proof of purchase for warranty claims.