Important Safety Instructions
Read and understand all safety warnings and instructions before operating this tool. Failure to follow the warnings and instructions may result in electric shock, fire, and/or serious injury.
- Work Area Safety: Keep your work area clean and well-lit. Cluttered or dark areas invite accidents. Do not operate power tools in explosive atmospheres, such as in the presence of flammable liquids, gases, or dust.
- Electrical Safety: Power tool plugs must match the outlet. Never modify the plug in any way. Do not abuse the cord. Never use the cord for carrying, pulling, or unplugging the power tool. Keep cord away from heat, oil, sharp edges, or moving parts.
- Personal Safety: Always wear eye protection. Use hearing protection when operating the sharpener. Do not overreach. Keep proper footing and balance at all times. Dress properly. Do not wear loose clothing or jewelry. Keep your hair, clothing, and gloves away from moving parts.
- Tool Use and Care: Do not force the power tool. Use the correct power tool for your application. Disconnect the plug from the power source before making any adjustments, changing accessories, or storing power tools.
- Maintenance: Maintain power tools and accessories. Check for misalignment or binding of moving parts, breakage of parts, and any other condition that may affect the power tool’s operation. If damaged, have the power tool repaired before use.
Product Overview
The YWTR 120 Volt Electric Circular Saw Blade Sharpener is designed for efficient sharpening of circular saw blades. It features a robust die-cast aluminum base and an indexing arm for precise operation. The motor block can tilt 25 degrees left and right to accommodate various blade tooth configurations.

Figure 1: Overall view of the YWTR Electric Circular Saw Blade Sharpener with a circular saw blade installed, ready for sharpening.
Components Included:
- Electric Circular Saw Blade Sharpener Unit
- 4-inch Diamond Grinding Wheel
- 4-inch Emery Grinding Wheel
- Blade Indexing Arm
- Necessary Wrenches and Hex Key for assembly and adjustment

Figure 2: The YWTR Electric Circular Saw Blade Sharpener shown alongside the included 4-inch diamond and emery grinding wheels.

Figure 3: The set of wrenches and hex key provided for assembly and adjustments of the sharpener.
Setup
Proper setup is crucial for safe and effective operation. Follow these steps to prepare your sharpener for use:
- Unpacking: Carefully remove all components from the packaging. Inspect for any damage that may have occurred during shipping.
- Mounting the Base: Place the sharpener on a stable, level workbench. The die-cast aluminum base provides stability, but for added security, you may bolt it down using the pre-drilled holes.
- Installing the Grinding Wheel: Select either the diamond or emery wheel based on your blade material and desired finish. Ensure the wheel is securely fastened to the motor shaft. Refer to the diagram for correct orientation.
- Adjusting the Blade Receiver: The specialized blade receiver accepts blades with arbors up to 1 inch. Adjust the receiver to securely hold your circular saw blade.
- Connecting Power: Plug the 6 ft, 18 gauge power cord into a standard 120V, 60 Hz electrical outlet. Ensure the power switch is in the 'OFF' position before plugging in.
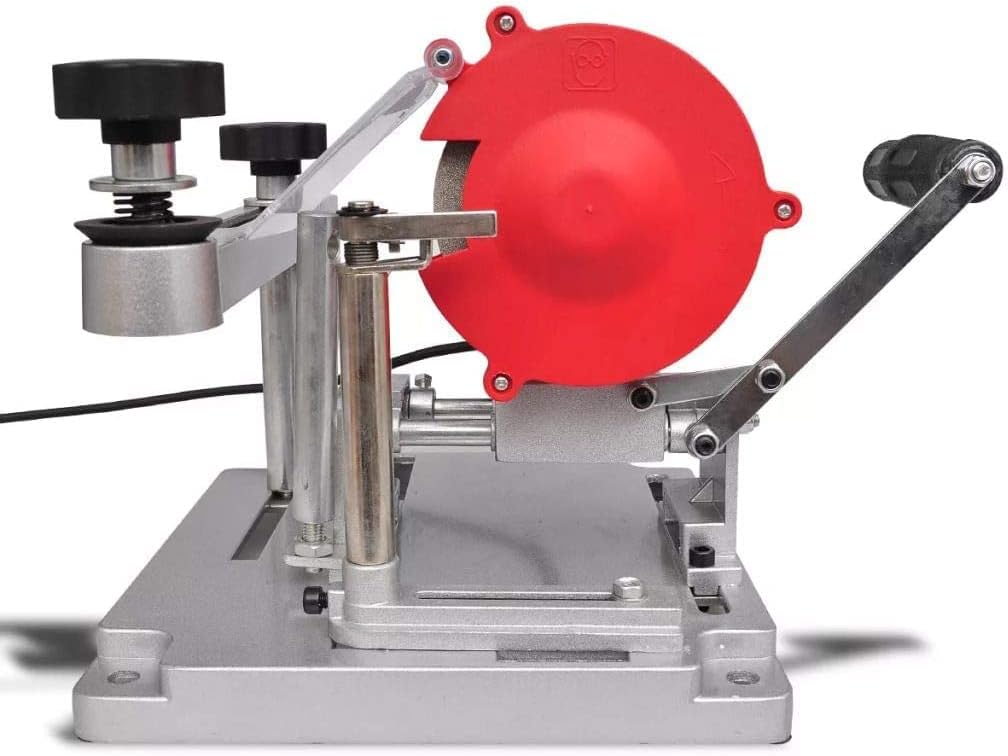
Figure 4: Side view of the sharpener, illustrating the motor housing and the handle for operating the blade indexing arm.
Operating Instructions
Follow these steps for effective and safe sharpening of your circular saw blades:
- Blade Mounting: Securely mount the circular saw blade onto the blade receiver. Ensure it is centered and stable.
- Angle Adjustment: The motor block tilts 25 degrees left and right. Adjust this angle to match the specific tooth configuration of your saw blade. Use the adjustment knob and angle markings for precision.
- Indexing Arm Setup: Position the blade indexing arm so that it engages with a tooth of the saw blade. This arm ensures consistent spacing and angle for each tooth sharpened.
- Sharpening Process: Turn on the sharpener. Carefully bring the saw blade tooth into contact with the rotating grinding wheel using the indexing arm. Apply light, consistent pressure. Sharpen each tooth individually, moving the blade to the next tooth using the indexing arm after each pass.
- Repeat for All Teeth: Continue this process until all teeth on the blade have been sharpened. For blades with alternating tooth bevels, you may need to adjust the motor block tilt for each set of teeth.
- Inspection: After sharpening, turn off the sharpener and unplug it. Carefully remove the blade and inspect the sharpened edges for uniformity and sharpness.

Figure 5: A close-up view showing a circular saw blade positioned against the grinding wheel for sharpening, highlighting the precision of the operation.

Figure 6: A detailed image focusing on the contact point between the grinding wheel and a single tooth of the saw blade during the sharpening process.

Figure 7: This image displays the adjustment mechanism for tilting the motor block, allowing for precise angle settings to match different blade tooth configurations.

Figure 8: A close-up of the blade indexing arm, which ensures consistent tooth spacing and precise movement of the blade during sharpening.
Maintenance
Regular maintenance ensures the longevity and optimal performance of your sharpener.
- Cleaning: After each use, unplug the sharpener and use a brush or compressed air to remove metal dust and debris from the unit, especially around the motor and grinding wheel area.
- Grinding Wheel Inspection: Periodically inspect the grinding wheels for wear or damage. Replace worn wheels promptly to maintain sharpening effectiveness and safety.
- Lubrication: Apply a light machine oil to moving parts and pivot points as needed to ensure smooth operation of the indexing arm and tilt mechanism.
- Cord Inspection: Regularly check the power cord for any signs of damage, cuts, or fraying. Replace a damaged cord immediately.
- Storage: Store the sharpener in a clean, dry place, away from moisture and extreme temperatures.
Troubleshooting
This section addresses common issues you might encounter with your saw blade sharpener.
- Sharpener Does Not Turn On:
- Check if the power cord is securely plugged into a working outlet.
- Ensure the power switch is in the 'ON' position.
- Verify that the circuit breaker or fuse for the outlet has not tripped.
- Blade Not Sharpening Effectively:
- Ensure the correct grinding wheel (diamond or emery) is installed for the blade material.
- Check if the grinding wheel is worn and needs replacement.
- Verify that the motor block tilt angle is correctly set for the blade's tooth configuration.
- Ensure the blade is securely mounted and not shifting during sharpening.
- Excessive Vibration or Noise:
- Check if the grinding wheel is properly installed and balanced.
- Ensure all fasteners on the sharpener are tight.
- Verify that the sharpener is placed on a stable surface.
- Blade Indexing Arm Not Functioning Smoothly:
- Clean any debris from the indexing arm mechanism.
- Apply a small amount of lubricant to the pivot points.
Specifications
Technical specifications for the YWTR 120 Volt Electric Circular Saw Blade Sharpener:
| Feature | Specification |
|---|---|
| Brand | YWTR |
| Model | 120 Volt Electric Circular Saw Blade Sharpener |
| Material | Metal |
| Color | Gray |
| Product Dimensions (L x W x H) | 13.75" x 9.5" x 11" |
| Item Weight | 11.8 Pounds |
| Grit Type | Coarse, Fine (with included wheels) |
| Power Source | Corded Electric |
| Voltage | 120 Volts |
| Frequency | 60 Hz |
| Motor Wattage | 140 Watts |
| Speed | 3800 RPM |
| Blade Diameter Capacity | 3-1/2" to 15-3/4" |
| Arbor Size Capacity | Up to 1" |
| Motor Block Tilt | 25° Left and Right |
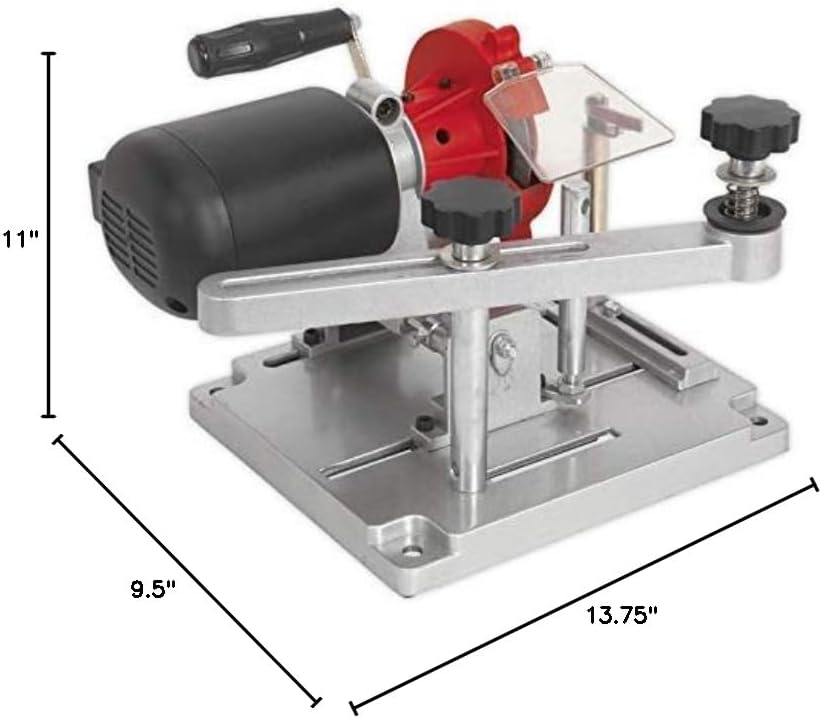
Figure 9: A diagram illustrating the key dimensions of the YWTR Electric Circular Saw Blade Sharpener.
Warranty and Support
For warranty information, please refer to the documentation provided at the time of purchase or contact the seller directly. Specific warranty terms may vary.
For technical support, parts, or service inquiries, please contact the seller or manufacturer through the contact information provided with your purchase. When contacting support, please have your product model and purchase date available.