1. Introduction
This manual provides essential information for the safe and effective operation, setup, and maintenance of the BMC REMSTAR GII BiPAP System T-25 with Humidifier. Please read this manual thoroughly before using the device.
The RESmart GII BPAP Series is designed to provide non-invasive ventilation for patients experiencing respiratory insufficiency, suitable for both hospital and home use.
2. Important Safety Information
WARNING: Read all instructions before use. Failure to follow instructions may result in serious injury or death.
- Always consult a healthcare professional for diagnosis and treatment of respiratory conditions.
- Do not use this device if it appears damaged or is not functioning correctly.
- Keep the device away from water and other liquids.
- Ensure proper ventilation around the device during operation.
- Use only accessories and parts approved by BMC.
- Unplug the device from the power outlet before cleaning or performing maintenance.
3. Product Features
The BMC REMSTAR GII BiPAP System T-25 incorporates advanced features for effective respiratory support:
- Bi-level Positive Airway Pressure (BPAP): Provides two distinct pressure levels for inhalation and exhalation.
- Ti Min/Ti Max: Ensures optimal inspiration time, significantly improving treatment efficacy.
- 3.5-inch Color LCD Display: Offers real-time pressure and flow waveform display for monitoring.
- SpO2 Kit (Optional): Allows for blood oxygen saturation and pulse rate display.
- Eco Smart Technology: Features an innovative dual water chamber heating system for optimal humidity and temperature delivery.
- Accurate Water Quantity Control: Includes real-time compensation for consistent humidification.
- Dynamic Parameters Adjustment: Adapts to patient needs for personalized therapy.
- Multiple Data Retrieval: Supports data access via SD Card, iCode II, and WiFi.
4. Setup Instructions
Follow these steps to set up your BMC REMSTAR GII BiPAP System T-25:
- Unpack the Device: Carefully remove all components from the packaging. Ensure all items listed in the package contents are present.
- Place the Device: Position the BiPAP machine on a stable, flat surface, ensuring adequate space around it for ventilation.
- Connect Power: Plug the power cord into the device's power inlet, then connect it to a suitable electrical outlet.
- Attach Humidifier (if applicable):
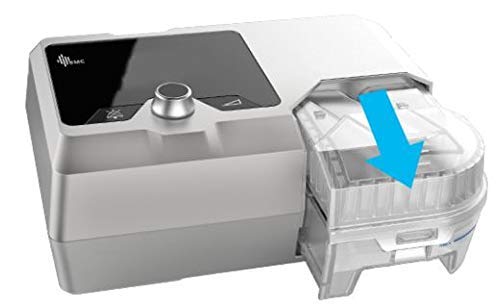
Figure 4.1: Attaching the humidifier to the main unit. The humidifier slides into place as indicated by the blue arrow.
If using the integrated humidifier, slide it securely into the designated slot on the main unit until it clicks into place. Ensure a firm connection.
- Fill Humidifier Water Chamber:
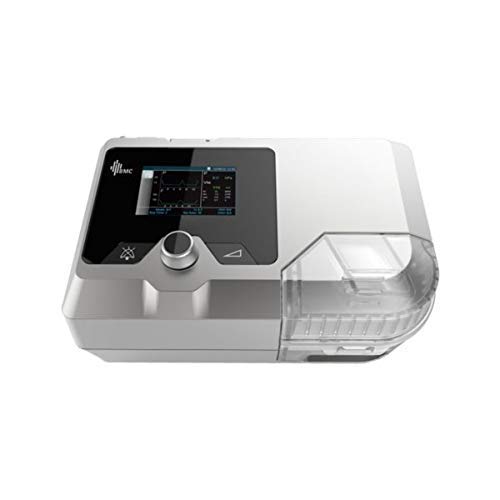
Figure 4.2: Top view of the BMC REMSTAR GII BiPAP System T-25, showing the humidifier section and heat output indicators.
Open the humidifier water chamber. Fill it with distilled water up to the maximum fill line. Do not overfill. Close the chamber securely.
- Connect Air Tubing: Attach one end of the air tubing to the air outlet port on the BiPAP machine and the other end to your mask.
- Fit Mask: Place the mask on your face and adjust the headgear for a comfortable and secure fit, ensuring no air leaks.
5. Operating Instructions
To begin therapy with your BiPAP system:
- Power On: Press the power button to turn on the device. The LCD display will illuminate.
- Adjust Settings: Use the control knob and buttons to navigate the menu and adjust therapy settings (e.g., pressure, ramp time, humidifier level) as prescribed by your healthcare provider.
- Start Therapy: Once settings are confirmed, press the start/stop button to begin therapy. Airflow will commence.
- Monitor Display: Observe the real-time pressure and flow waveforms on the display to ensure proper operation.
- End Therapy: To stop therapy, press the start/stop button again. The device will power down or enter standby mode.
Note: Your healthcare provider will program the initial therapy settings. Do not change settings without professional guidance.
6. Maintenance and Cleaning
Regular cleaning and maintenance are crucial for the longevity and hygienic operation of your device.
Daily Cleaning:
- Water Chamber: Empty any remaining water from the humidifier chamber. Rinse with distilled water and allow to air dry.
- Mask: Disassemble your mask and wash all components with mild soap and warm water. Rinse thoroughly and allow to air dry away from direct sunlight.
Weekly Cleaning:
- Air Tubing: Wash the air tubing with mild soap and warm water. Rinse thoroughly and hang to air dry.
- Device Exterior: Wipe the exterior of the BiPAP machine with a damp cloth. Do not immerse the device in water.
Filter Replacement:
Check the air filter regularly (typically monthly) and replace it if it appears dirty or discolored. Refer to your device's specific instructions for filter access and replacement.
7. Troubleshooting
This section addresses common issues you might encounter with your BiPAP system.
| Problem | Possible Cause | Solution |
|---|---|---|
| No power | Power cord disconnected; power outlet fault | Ensure power cord is securely plugged in. Test outlet with another device. |
| Air leak from mask | Mask not fitted correctly; mask worn out | Adjust mask and headgear for a snug fit. Replace mask if damaged or old. |
| Insufficient humidification | Water chamber empty; humidifier setting too low | Refill water chamber with distilled water. Increase humidifier setting. |
| Unusual noise from device | Air filter clogged; device malfunction | Check and replace air filter. If noise persists, contact customer support. |
If you encounter a problem not listed here or if solutions do not resolve the issue, contact BMC customer support or your healthcare provider.
8. Specifications
| Feature | Detail |
|---|---|
| Model | T-25 |
| Brand | BMC |
| Display | 3.5-inch Color LCD |
| Humidifier | Integrated, Eco Smart Technology with dual water chambers |
| Data Management | SD Card, iCode II, WiFi |
| Weight | 2.3 kg (approximately) |
| Dimensions | 21.4 x 19.2 x 19 cm (approximately) |
| Country of Origin | India |
9. Warranty and Support
For warranty information, technical support, or service inquiries, please contact your authorized BMC dealer or the manufacturer directly. Keep your purchase receipt as proof of purchase.
Manufacturer: BMC