Introduction
The Cuisinart DCB-10 Automatic Cold Brew Coffeemaker is designed to produce smooth, low-acid cold brew coffee efficiently. This manual provides detailed instructions for the safe operation, setup, maintenance, and troubleshooting of your coffeemaker. Please read all instructions thoroughly before first use to ensure optimal performance and longevity of your appliance.

Figure 1: Cuisinart DCB-10 Automatic Cold Brew Coffeemaker. This image shows the complete assembly of the coffeemaker, including the brewing chamber, carafe, and control panel.
Important Safety Information
- Always unplug the coffeemaker from the electrical outlet when not in use and before cleaning.
- Do not immerse the power cord, plug, or the coffeemaker base in water or other liquids.
- Close supervision is necessary when any appliance is used by or near children.
- Avoid contact with moving parts.
- Do not operate any appliance with a damaged cord or plug, or after the appliance malfunctions or has been dropped or damaged in any manner.
- The use of accessory attachments not recommended by Cuisinart may cause injuries.
- Do not use outdoors.
- Do not let cord hang over edge of table or counter, or touch hot surfaces.
- Do not place on or near a hot gas or electric burner, or in a heated oven.
- Do not use appliance for other than intended use.
Components
Familiarize yourself with the parts of your Cuisinart DCB-10 Automatic Cold Brew Coffeemaker:
- Main Unit Base: Houses the control panel and power components.
- 7-Cup Glass Carafe: Collects the brewed cold coffee. Features measurement markings.
- Removable Stainless Steel Filter Lid: Sits atop the carafe.
- Clear Brewing Chamber: Where water and coffee grounds are combined for brewing.
- Coffee Filter Basket: Holds the coffee grounds during the brewing process. This is a reusable filter.
- Removable Water Tank: Located at the back, for easy filling.

Figure 2: The 7-cup glass carafe with its lid. The carafe has clear markings for 3, 5, and 7 cups.
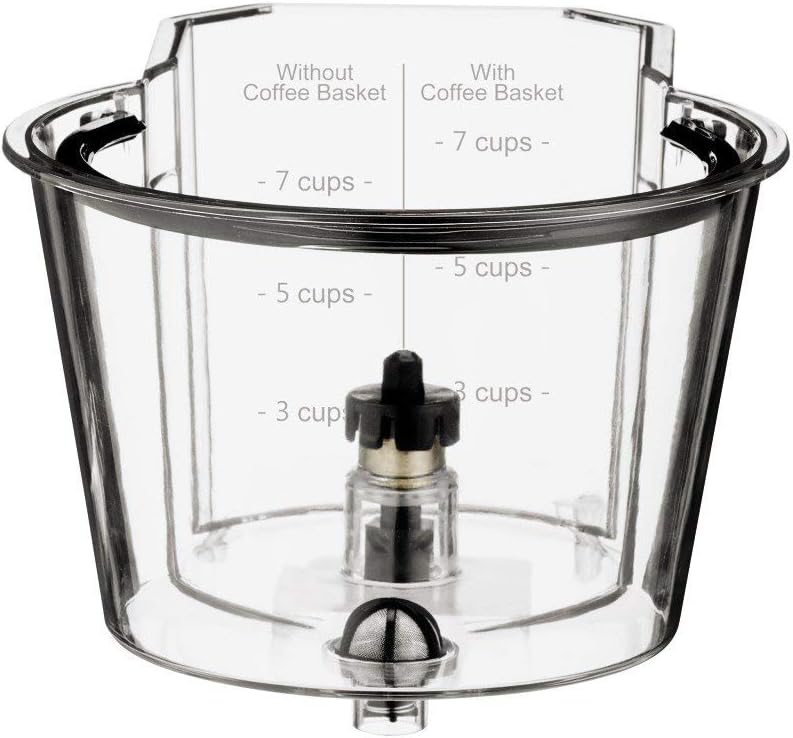
Figure 3: The clear brewing chamber, showing internal components and measurement lines for water levels, both with and without the coffee basket inserted.

Figure 4: The reusable coffee filter basket. This component holds the coffee grounds during the brewing process.
Setup
Before first use, clean all removable parts according to the "Maintenance & Cleaning" section. Ensure the unit is placed on a stable, flat surface.
- Place the main unit base on a dry, level surface.
- Insert the 7-cup glass carafe into the designated slot on the base. Ensure it is seated correctly.
- Place the clear brewing chamber onto the main unit, aligning it properly.
- Insert the coffee filter basket into the clear brewing chamber.
- Ensure the removable water tank is securely in place at the back of the unit.
- Plug the coffeemaker into a standard electrical outlet.

Figure 5: Assembly of the brewing chamber with the coffee filter basket inserted. This shows how the filter basket fits into the clear brewing chamber.
Operating Instructions
Follow these steps to brew cold coffee:
- Add Coffee Grounds: Open the lid of the clear brewing chamber and add your desired amount of coarse-ground coffee into the coffee filter basket. Refer to the table below for recommended coffee-to-water ratios.
- Add Water: Fill the removable water tank with cold, filtered water up to the desired level (e.g., 7 cups). The brewing chamber also has markings to guide you.
- Select Strength: On the control panel, choose your desired brew strength:
- Mild: Approximately 25 minutes brewing time.
- Medium: Approximately 35 minutes brewing time.
- Bold: Approximately 45 minutes brewing time.
- Start Brewing: Press the "Brew" button to begin the cold brew process. The indicator light for the selected strength will illuminate.
- Completion: Once the brewing cycle is complete, the coffeemaker will automatically stop. The cold brew concentrate will be in the glass carafe.
- Serve: Remove the carafe and serve the cold brew concentrate. It can be diluted with water, milk, or ice to your preference. Store any remaining concentrate in the refrigerator.
Recommended Coffee-to-Water Ratios:
| Desired Yield | Coffee Grounds (Coarse) | Water |
|---|---|---|
| 3 Cups | Approx. 1/4 cup (20g) | 3 cups (710ml) |
| 5 Cups | Approx. 1/2 cup (40g) | 5 cups (1180ml) |
| 7 Cups | Approx. 3/4 cup (60g) | 7 cups (1650ml) |
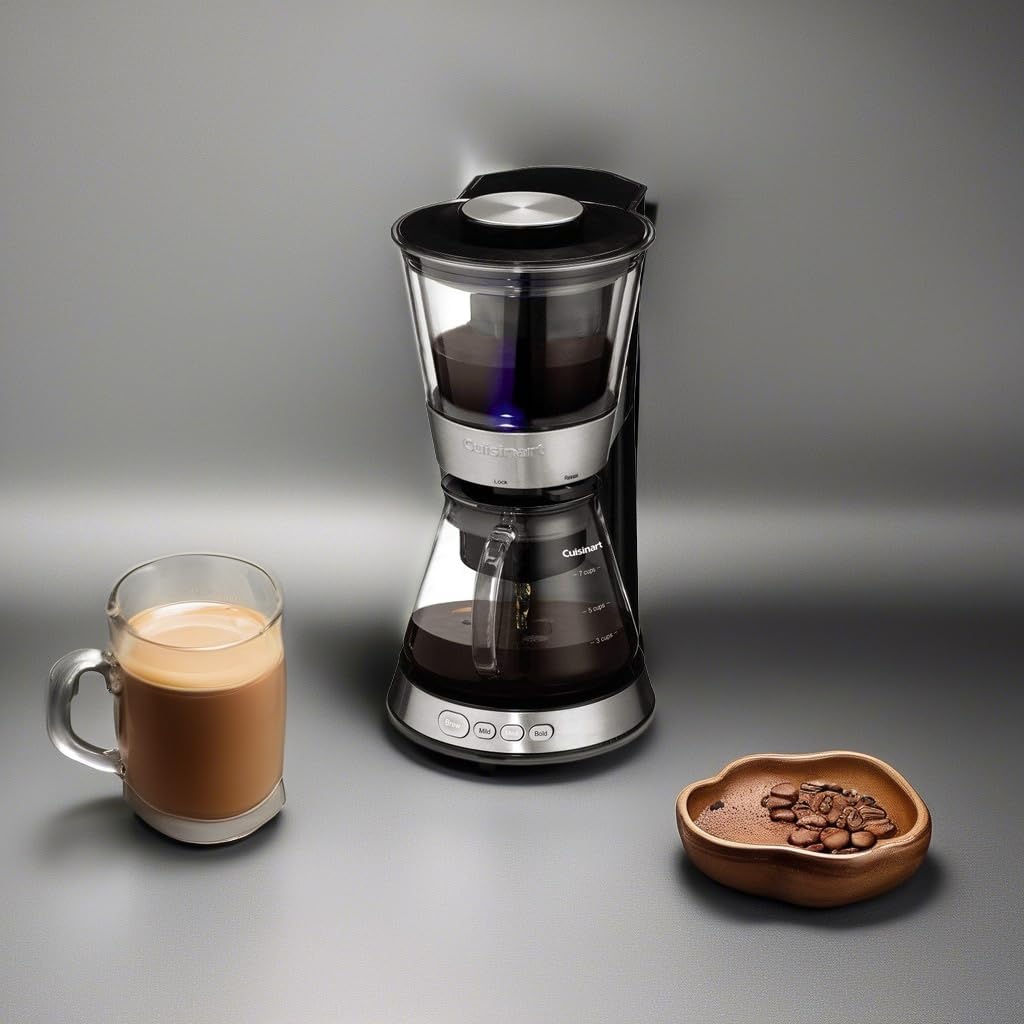
Figure 6: The Cuisinart DCB-10 in operation, with a mug of cold brew and coffee beans nearby. This illustrates the coffeemaker actively brewing.
Maintenance & Cleaning
Regular cleaning ensures optimal performance and extends the life of your coffeemaker.
Daily Cleaning:
- Unplug the coffeemaker and allow it to cool completely.
- Remove the glass carafe, clear brewing chamber, coffee filter basket, and removable water tank.
- Discard used coffee grounds from the filter basket.
- Wash all removable parts (carafe, brewing chamber, filter basket, water tank, and filter lid) in warm, soapy water. Rinse thoroughly. These parts are also top-rack dishwasher safe.
- Wipe the exterior of the main unit base with a soft, damp cloth. Do not immerse the base in water.
- Ensure all parts are completely dry before reassembling or storing.
Descaling (Monthly or as needed):
Mineral deposits from water can affect performance. Descale your coffeemaker regularly.
- Fill the water tank with a mixture of 1/3 white vinegar and 2/3 water.
- Place the empty carafe with its lid on the heating plate.
- Run a brewing cycle without coffee grounds.
- After the cycle, discard the vinegar solution.
- Run two full cycles with fresh, clean water to rinse out any remaining vinegar smell or taste.
Troubleshooting
| Problem | Possible Cause | Solution |
|---|---|---|
| Coffeemaker does not turn on. | Not plugged in; power outage; unit malfunction. | Ensure unit is securely plugged into a working outlet. Check circuit breaker. If issue persists, contact customer support. |
| Brewing process is slow or incomplete. | Mineral buildup; incorrect water level; clogged filter. | Perform descaling procedure. Ensure water tank is filled to the correct level. Clean the coffee filter basket thoroughly. |
| Coffee tastes weak or too strong. | Incorrect coffee-to-water ratio; wrong grind size; incorrect strength setting. | Adjust coffee grounds amount or water volume. Use coarse-ground coffee. Select a different strength setting (Mild, Medium, Bold). |
| Water leaks from the unit. | Parts not assembled correctly; damaged component. | Ensure all removable parts (carafe, brewing chamber, water tank) are properly seated. Inspect for cracks or damage. |
Specifications
- Model Name: CRT2CUIDCB10FRRB
- Brand: Cuisinart
- Capacity: 7 cups (glass carafe)
- Dimensions (D x W x H): 8.88" x 11.75" x 15.24"
- Weight: 6 pounds
- Operation Mode: Fully Automatic
- Filter Type: Reusable
- Special Features: Clear brewing chamber, removable water tank and coffee filter basket, strength selector (Mild, Medium, Bold).
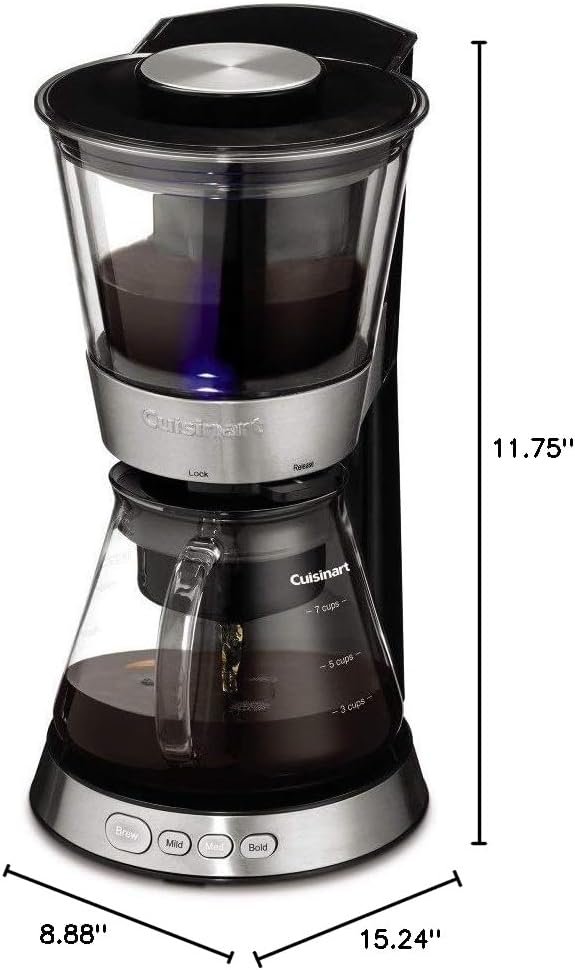
Figure 7: Product dimensions of the Cuisinart DCB-10 Automatic Cold Brew Coffeemaker, indicating its height, width, and depth.
Warranty and Support
This Cuisinart DCB-10 Automatic Cold Brew Coffeemaker is a manufacturer-refurbished unit. It has been professionally inspected and tested to function like new. It is backed by a 90-day warranty, ensuring peace of mind regarding its performance.
For technical support, warranty claims, or replacement parts, please refer to the contact information provided with your purchase or visit the official Cuisinart website. Please have your model number (CRT2CUIDCB10FRRB) ready when contacting support.
Under the Amazon Renewed Guarantee, renewed products are eligible for replacement or refund if you are not satisfied with your purchase within the specified return period.