1. Introduction
This manual provides detailed instructions for the safe and effective operation, setup, and maintenance of your Occus 8586 2-in-1 ESD Soldering and Rework Station. Please read this manual thoroughly before using the device to ensure proper function and to prevent damage or injury.
The Occus 8586 is a versatile tool combining a soldering iron and a hot air gun, designed for various electronic repair and rework tasks, including SMD component soldering and desoldering.
2. Safety Precautions
Always observe the following safety guidelines to prevent electric shock, fire, or personal injury:
- Ensure the power supply matches the specified voltage (220V).
- Do not operate the unit in damp or wet conditions.
- Keep flammable materials away from the hot air gun and soldering iron tips.
- Use in a well-ventilated area to avoid inhaling solder fumes.
- Wear appropriate personal protective equipment, including safety glasses.
- Do not touch the hot air nozzle or soldering iron tip when hot. Allow them to cool completely before handling.
- Always place the hot air gun in its holder and the soldering iron in its stand when not in use.
- Disconnect the power plug from the outlet before cleaning or servicing the unit.
- This device is ESD-safe; however, always follow proper ESD procedures when working with sensitive electronic components.
3. Package Contents
Verify that all items are present in the package:
- Occus 8586 Main Control Unit
- Hot Air Gun
- Soldering Iron
- Hot Air Gun Holder
- Soldering Iron Stand
- Power Cord (US Plug Type)
- Nozzles for Hot Air Gun (various sizes, if included)
- User Manual (this document)
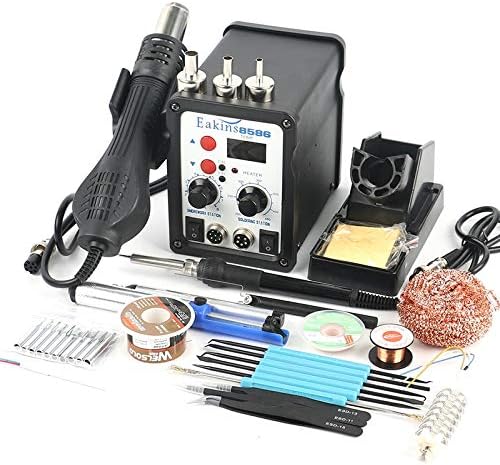
Figure 1: The complete Occus 8586 2-in-1 ESD Soldering and Rework Station kit, including the main unit, hot air gun, soldering iron, and accessories.
4. Component Identification
Familiarize yourself with the main components of the 8586 station:

Figure 2: Front panel of the Occus 8586 control unit, showing temperature displays, control knobs for air and temperature, and power switches for both soldering and rework functions.
- Hot Air Temperature Display: Shows the current temperature of the hot air gun.
- Soldering Iron Temperature Display: Shows the current temperature of the soldering iron.
- Hot Air Temperature Control Knob: Adjusts the hot air gun temperature (100-500°C).
- Air Volume Control Knob: Adjusts the airflow of the hot air gun.
- Soldering Iron Temperature Control Knob: Adjusts the soldering iron temperature (200-480°C).
- Hot Air Gun Power Switch: Turns the hot air gun function on/off.
- Soldering Iron Power Switch: Turns the soldering iron function on/off.
- Hot Air Gun Connector: Port for connecting the hot air gun.
- Soldering Iron Connector: Port for connecting the soldering iron.
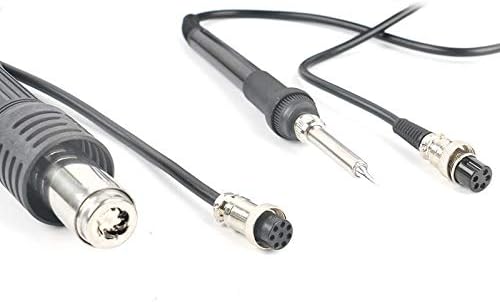
Figure 3: Close-up view of the hot air gun and soldering iron connectors, illustrating their secure attachment points to the main unit.

Figure 4: The soldering iron stand, designed to safely hold the hot soldering iron when not in active use, preventing accidental burns or damage.
5. Setup Instructions
- Unpacking: Carefully remove all components from the packaging. Inspect for any shipping damage.
- Placement: Place the main control unit on a stable, heat-resistant, and non-flammable surface. Ensure adequate ventilation around the unit.
- Connect Hot Air Gun: Connect the hot air gun's cable to the designated "SMD REWORK STATION" port on the front panel. Secure it by tightening the connector ring. Place the hot air gun in its holder.
- Connect Soldering Iron: Connect the soldering iron's cable to the designated "SOLDERING STATION" port on the front panel. Secure it by tightening the connector ring. Place the soldering iron in its stand.
- Power Connection: Ensure both the hot air gun and soldering iron power switches are in the "OFF" position. Connect the power cord to the back of the main unit and then plug it into a grounded 220V AC power outlet.
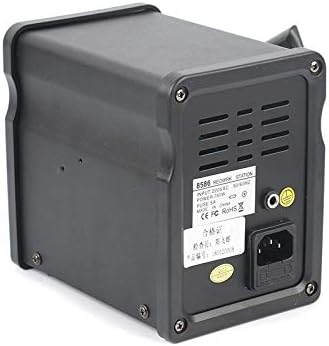
Figure 5: Rear view of the Occus 8586 control unit, highlighting the power input socket and ventilation grilles. Ensure proper power connection and unobstructed airflow.
6. Operating Instructions
6.1. Using the Hot Air Gun
- Power On: Flip the "SMD REWORK STATION" power switch to "ON". The display will show the current temperature.
- Set Temperature: Use the "Hot Air Temperature Control Knob" to set the desired temperature (100-500°C). The unit will quickly heat up to the set temperature.
- Adjust Airflow: Use the "Air Volume Control Knob" to adjust the airflow. Start with a lower setting and increase as needed for your application.
- Operation: Hold the hot air gun at a safe distance from the component, typically 1-2 cm, and move it in a circular motion to ensure even heating.
- Cool Down: When finished, place the hot air gun back into its holder. The unit will automatically enter a cool-down mode, blowing air until the temperature drops to a safe level before shutting off the heater. Do not turn off the main power switch until the cool-down cycle is complete.
6.2. Using the Soldering Iron
- Power On: Flip the "SOLDERING STATION" power switch to "ON". The display will show the current temperature.
- Set Temperature: Use the "Soldering Iron Temperature Control Knob" to set the desired temperature (200-480°C). The iron will heat up to the set temperature.
- Tinning the Tip: Before first use, or after cleaning, tin the soldering iron tip by applying a small amount of solder to it. This helps with heat transfer and prevents oxidation.
- Soldering: Apply the hot tip to the joint to heat both the component lead and the pad. Once heated, apply solder to the joint, not directly to the iron tip. Remove the solder, then remove the iron.
- Cleaning: Regularly clean the soldering iron tip using a damp sponge or brass wool to remove excess solder and flux residue.
- Power Off: When finished, place the soldering iron back into its stand and turn off the "SOLDERING STATION" power switch.
7. Maintenance
- Cleaning the Unit: Disconnect power before cleaning. Wipe the main unit with a soft, damp cloth. Do not use abrasive cleaners or solvents.
- Soldering Iron Tip Care:
- Always keep the tip tinned when not in use to prevent oxidation.
- Clean the tip regularly with a damp sponge or brass wool.
- Replace tips when they become pitted or excessively oxidized and cannot be tinned.
- Hot Air Nozzle Care: Ensure the hot air nozzles are free from debris. Clean gently if necessary.
- Air Filter (if applicable): Some units may have an internal air filter. Refer to specific diagrams if present for cleaning or replacement instructions.
- Storage: Store the unit in a dry, dust-free environment when not in use.
8. Troubleshooting
| Problem | Possible Cause | Solution |
|---|---|---|
| Unit does not power on. | No power supply; loose power cord; blown fuse. | Check power outlet and cord connection. Inspect and replace fuse if necessary (refer to specifications for fuse type). |
| Hot air gun not heating or weak airflow. | Temperature/airflow knob set too low; faulty heating element/fan; clogged nozzle. | Increase temperature/airflow settings. Check for obstructions in the nozzle. If problem persists, contact support. |
| Soldering iron not heating or inconsistent temperature. | Temperature knob set too low; loose connection; oxidized tip; faulty heating element. | Increase temperature setting. Ensure iron is securely connected. Clean and re-tin the tip. If problem persists, contact support. |
| Solder does not adhere to the tip. | Oxidized tip; insufficient temperature. | Clean and re-tin the tip thoroughly. Increase soldering iron temperature. |
9. Specifications
| Feature | Detail |
|---|---|
| Model Number | 8586 |
| Input Voltage | 220V AC |
| Total Output Power | 700W |
| Hot Air Gun Temperature Range | 100°C - 500°C |
| Soldering Iron Temperature Range | 200°C - 480°C |
| Temperature Stability | ±2°C |
| Dimensions (L x W x H) | 150 x 138 x 100 cm (Note: This dimension seems unusually large for a soldering station. Please verify with product packaging if possible.) |
| ESD Safe | Yes |
| Plug Type | US |
10. Warranty and Support
For warranty information or technical support, please refer to the contact details provided with your purchase or visit the official Occus website. Keep your purchase receipt as proof of purchase for warranty claims.
For further assistance, you may contact Occus customer service via their official channels. Please have your model number (8586) and purchase date ready.