Introduction
Thank you for choosing the OasisCraft 6.5ft Pre-lit Snowy Aspen Spruce Christmas Tree. This manual provides essential information for the safe and correct assembly, operation, and maintenance of your new artificial Christmas tree. Please read all instructions carefully before beginning assembly and retain this manual for future reference.

Image: The OasisCraft 6.5ft Pre-lit Snowy Aspen Spruce Christmas Tree beautifully set up in a living room, showcasing its full, flocked branches and warm white lights.
Safety Instructions
- Ensure the tree is placed on a level, stable surface to prevent tipping.
- Keep the tree away from heat sources, open flames, and direct sunlight.
- Do not overload electrical outlets. Use only the provided power adapter for the lights.
- Inspect all electrical connections and light bulbs before and during use. Replace any damaged bulbs or wiring immediately.
- Do not allow children or pets to climb on the tree.
- Unplug the tree from the power outlet when not in use or when leaving the house.
- For indoor use only.
Package Contents
Verify that all components are present before beginning assembly:
- Tree Sections (typically 3 sections: A, B, C)
- Metal Tree Stand
- Eyebolts for stand assembly
- Pre-strung warm white lights
- Instruction Manual
Setup Instructions
Follow these steps for proper assembly of your Christmas tree:
- Assemble the Tree Stand: Unfold the metal stand into an 'X' shape. Insert the eyebolts into the designated holes on the stand and tighten them to secure the stand firmly.
- Insert Bottom Section (C): Carefully place the largest tree section (labeled 'C' or bottom section) into the assembled stand. Ensure it is seated securely.
- Insert Middle Section (B): Place the middle tree section (labeled 'B') into the top of section C.
- Insert Top Section (A): Place the smallest tree section (labeled 'A' or top section) into the top of section B.
- Connect Light Wires: Locate the light connectors between each tree section. Connect the corresponding wires. Ensure all connections are snug.
- Shape the Branches (Fluffing): Starting from the bottom section and working your way up, gently pull down and spread out each branch. Bend individual tips to fill in any gaps and create a full, natural appearance. Pay special attention to shaping the inner branches to add volume.
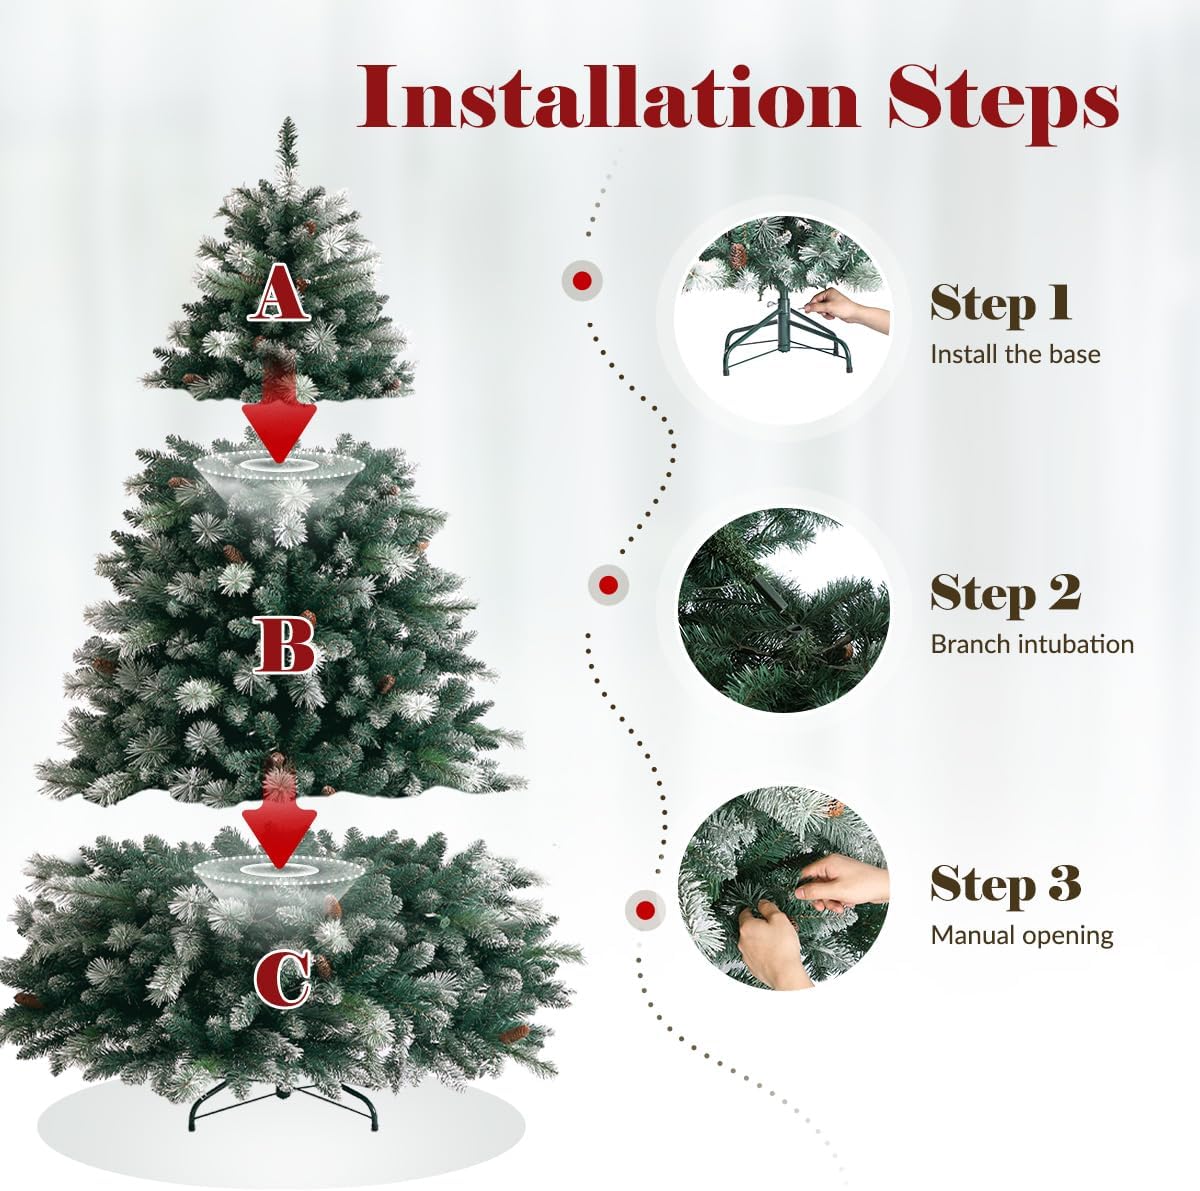
Image: Visual guide for tree assembly, illustrating the three main steps: setting up the base, inserting tree sections, and manually shaping the branches.

Image: Detailed diagram illustrating the three-step assembly process for the tree sections and base connection.
Setup Video Guide
Video: A step-by-step guide demonstrating the assembly process of an artificial Christmas tree, including setting up the stand and connecting the sections.
Video: A brief overview of the OasisCraft Pre-lit Snowy Aspen Spruce Christmas Tree, highlighting its features and ease of setup.
Operating Instructions
Your OasisCraft Christmas tree comes pre-lit with warm white incandescent lights. Simply plug the tree's power cord into a standard electrical outlet to illuminate the lights. No additional light stringing is required.

Image: A close-up view of the tree's pre-lit clear lights and the snowy, flocked texture of its branches.
Maintenance
- Cleaning: To clean the tree, gently dust the branches with a soft cloth or duster. Avoid using harsh chemicals or abrasive cleaners, as these may damage the flocking or lights.
- Light Care: If any lights go out, first check all connections. If individual bulbs are out, replace them with spare bulbs of the same type and wattage (not included, but typically available from the manufacturer or general retailers).
- Storage: Before storing, ensure the tree is completely unplugged. Disassemble the tree by reversing the assembly steps. Gently compress the branches. Store the tree in its original box or a dedicated tree storage bag in a cool, dry place away from direct sunlight and extreme temperatures.
Troubleshooting
- Lights Not Working:
- Check that the power cord is securely plugged into a working electrical outlet.
- Ensure all light section connectors are firmly attached.
- Inspect individual bulbs for looseness or breakage. Replace any faulty bulbs.
- Tree is Not Full: The tree branches may be compressed from packaging. Spend time carefully shaping and spreading each branch and individual tip to achieve a full appearance.
- Tree is Unstable: Ensure the metal stand is fully extended and the eyebolts are tightened securely. The tree sections should be firmly seated in each other and the stand.
Specifications
| Feature | Detail |
|---|---|
| Brand | OasisCraft |
| Product Dimensions | 46"D x 46"W x 78"H (6.5 feet tall) |
| Color | Green (with snowy flocking) |
| Material | Plastic |
| Item Weight | 4.6 Pounds |
| Item Package Quantity | 1 |
| Recommended Uses | Christmas Tree |
| Special Feature | Pre-lit |
| Tree Type | Pine |
| Base Type | Stand |
| Built-in Light | Yes |
| Tip Count | 1418 |
| Light Color | Warm White |
| Included Components | Stand |
| UPC | 763231472229 |
| Item Model Number | G1002A |
Warranty and Support
OasisCraft stands behind the quality of its products. For specific warranty details, please refer to the warranty card included in your product packaging or visit the official OasisCraft website. If you encounter any issues or have questions regarding your Christmas tree, please contact OasisCraft customer support for assistance.
Customer Support: Please refer to your purchase documentation or the manufacturer's website for the most current contact information.