1. Introduction
This manual provides essential information for the safe and efficient use of your Pikasola 400W 12V 3-Blade Wind Turbine Generator. Please read these instructions thoroughly before installation and operation to ensure optimal performance and longevity of the product. This horizontal axis wind turbine is designed to convert wind energy into electrical power, suitable for wind-solar hybrid systems.
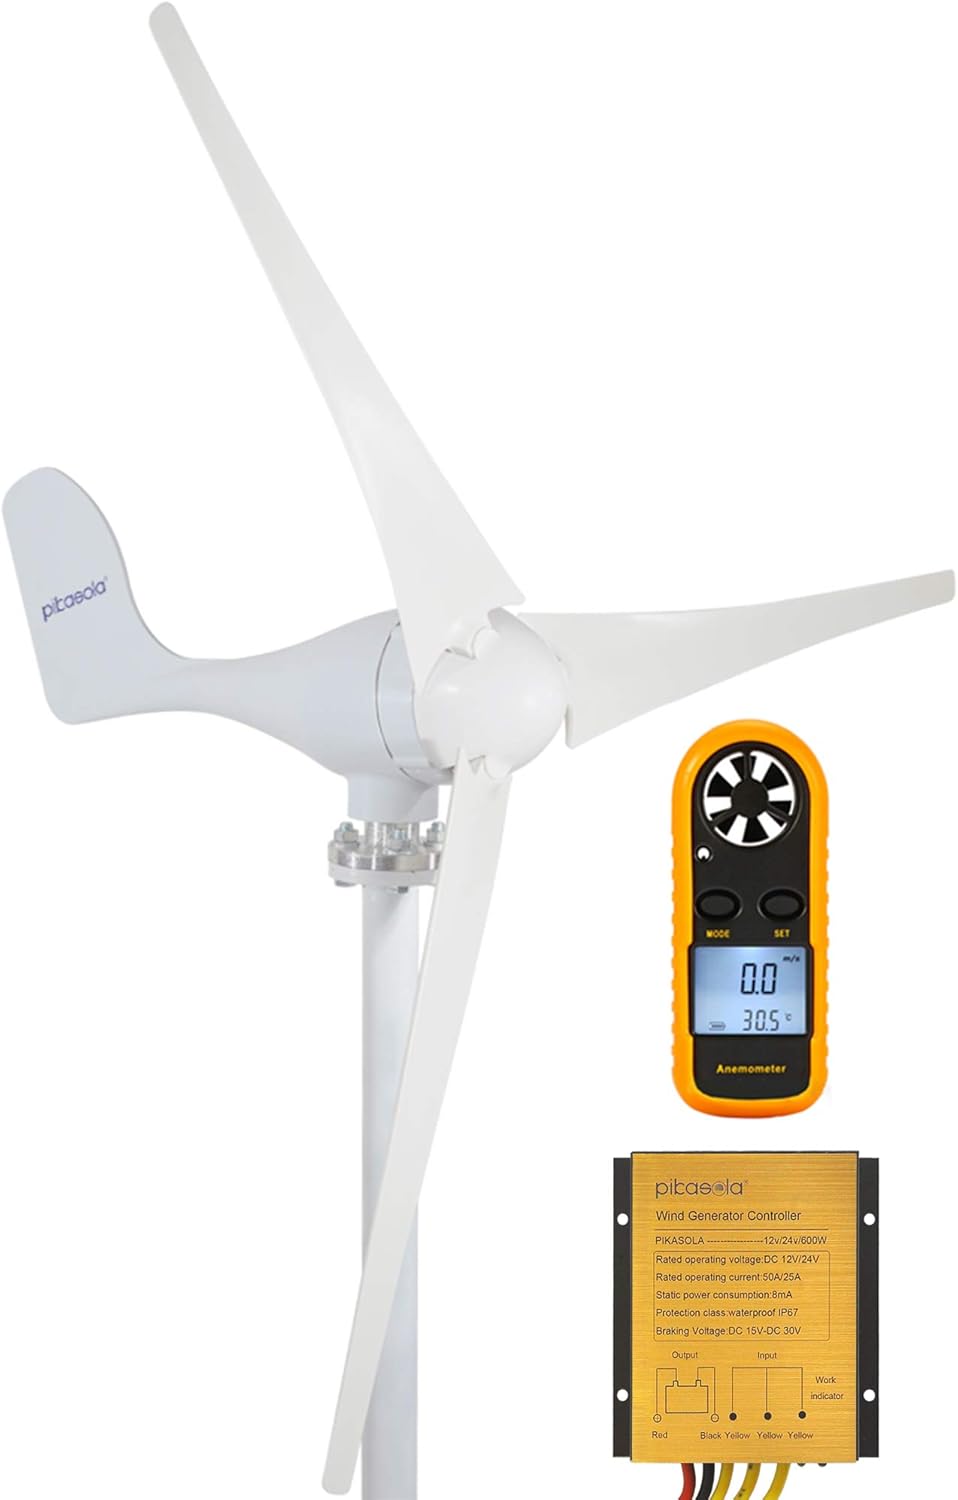
Figure 1.1: The Pikasola 400W 12V 3-Blade Wind Turbine Generator system, including the turbine, charge controller, and an anemometer for wind speed measurement.
2. Product Overview and Components
The Pikasola 400W Wind Turbine Generator is a horizontal axis system designed for efficient wind energy capture. Key components include the blades, generator, rotating body, and wind tail.
- Principle of Operation: This horizontal shaft wind turbine generator operates by having its shaft installed parallel to the ground. Wind drives the nylon carbon fiber blades, generating kinetic energy which then drives the internal generator to produce electricity.
- Wind Blades: The three blades are 60cm in length, constructed from durable nylon carbon fiber. This material offers waterproofing, corrosion resistance, lightweight properties, and high efficiency in capturing wind energy. Longer blades contribute to greater kinetic energy generation and power output.
- Generator: Features a three-phase permanent magnet synchronous motor. This efficient and compact AC generator utilizes high-performance NdFeB permanent magnets. It includes a fully integrated voltage regulator that automatically stops charging when the battery is full. An MPPT (Maximum Power Point Tracking) intelligent microprocessor controls the fan, effectively regulating current and voltage.
- Rotating Body: Equipped with a yaw adjustment system, the turbine automatically reads the wind direction and adjusts the rotor position to maximize wind energy capture. The tail fin is aerodynamically designed, contributing to a low starting speed and reduced vibration during operation.
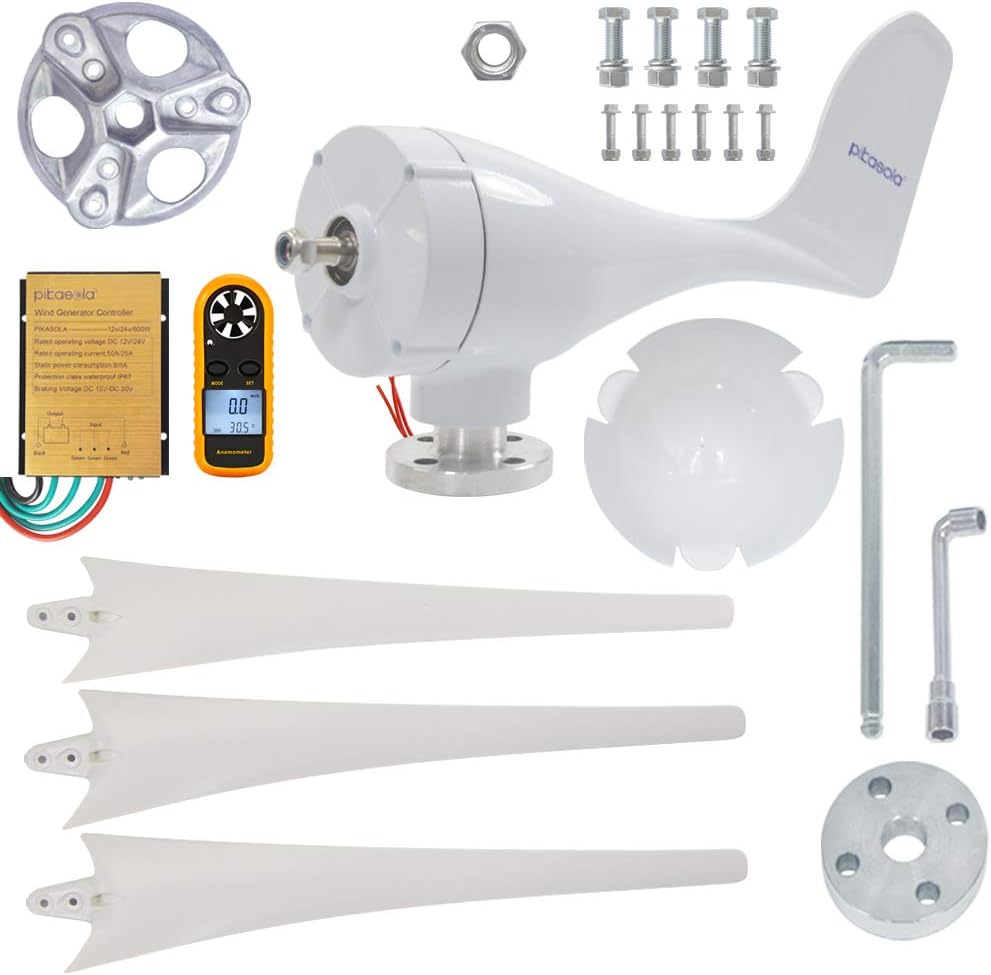
Figure 2.1: Exploded view showing the main components of the Pikasola 400W Wind Turbine, including the generator body, blades, hub, tail, and mounting hardware.
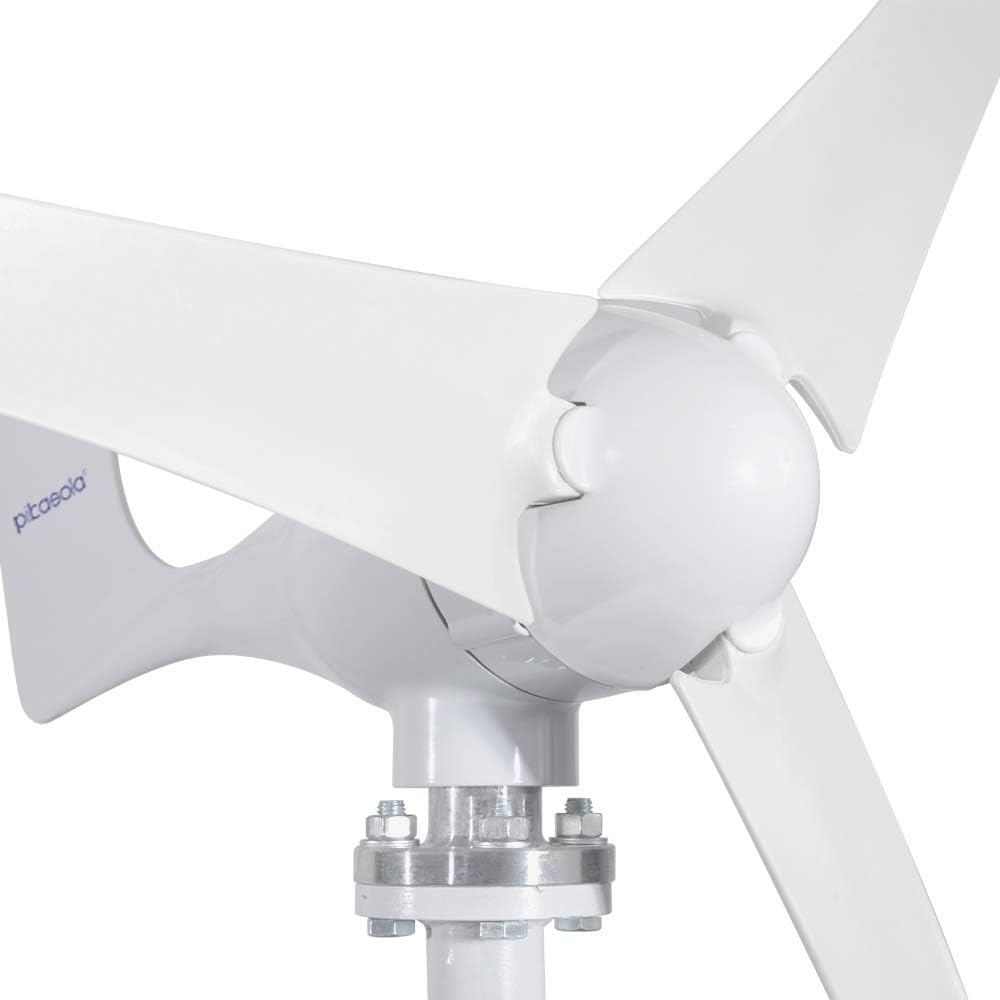
Figure 2.2: Close-up view of the turbine's hub and the attachment points for the three nylon carbon fiber blades.

Figure 2.3: The generator body and aerodynamically designed tail fin, which aids in wind direction tracking and stability.
3. Specifications
| Feature | Detail |
|---|---|
| Brand | Pikasola |
| Model | PIKAJS400W12V |
| Rated Wattage | 400 Watts |
| Output Wattage | 410 Watts (Max) |
| Voltage | 12 Volts AC |
| Start Wind Speed | 2.5 m/s |
| Blade Material | Nylon Carbon Fiber |
| Number of Blades | 3 |
| Rotor Diameter | 55 inches (approx. 140 cm) |
| Generator Type | Three-phase permanent magnet synchronous motor |
| Special Feature | Lightweight, Integrated Voltage Regulator, MPPT Controller |
| Item Weight | 13.7 Pounds (approx. 6.2 kg) |
| Package Dimensions | 27.4 x 12 x 9.6 inches |
| UPC | 745499000550, 745499000505 |

Figure 3.1: Illustration indicating the rotor diameter of the wind turbine, which is approximately 55 inches.
4. Safety Instructions
Adhering to safety guidelines is crucial during the installation, operation, and maintenance of the wind turbine. Failure to do so may result in injury or damage to equipment.
- Professional Installation: Installation should ideally be performed by qualified personnel or with strict adherence to safety protocols. Working at heights and with electrical components carries inherent risks.
- Site Selection: Choose an installation site free from overhead power lines, buildings, or other obstructions that could interfere with wind flow or pose a hazard. Ensure the mast is securely anchored and capable of withstanding local wind conditions.
- Electrical Safety: Always disconnect power before performing any electrical connections or maintenance. Ensure all wiring is correctly sized, insulated, and protected from environmental elements. Use appropriate circuit breakers and grounding.
- Moving Parts: The turbine blades rotate at high speeds. Keep hands, tools, and loose clothing away from the blades during operation and when performing maintenance. Always engage the brake or secure the blades before approaching the turbine.
- Weather Conditions: Do not attempt installation or maintenance during high winds, storms, or lightning.
- Personal Protective Equipment (PPE): Wear appropriate PPE, including safety helmets, gloves, and eye protection, during installation and maintenance.
5. Setup and Installation
Proper installation is critical for the performance and safety of your wind turbine.
5.1 Site Selection
The wind turbine should be installed in an area with consistent wind flow, free from significant obstructions.
- Clearance: Ensure there are no tall buildings or obstacles nearby. If obstacles are present, position the turbine as far as possible from them, or ensure the installation height is at least 20 feet higher than the top of the obstructions to maximize wind capture.
- Elevation: Utilizing elevated locations, such as hills, can enhance wind power generation. Avoid cliff edges or turbulent wind regions.
5.2 Assembly Steps
- Mounting Base: Secure the turbine's mounting base to a sturdy mast (not included). Ensure the mast is properly anchored and capable of supporting the turbine's weight and wind loads.
- Generator Body: Attach the generator body to the mounting base.
- Tail Fin: Secure the tail fin to the generator body.
- Blade Hub: Install the blade hub onto the generator shaft.
- Blades: Attach the three nylon carbon fiber blades to the blade hub using the provided fasteners. Ensure they are securely tightened and balanced.
- Electrical Connections: Connect the turbine's output wires to the wind power controller. Follow the wiring diagram carefully, ensuring correct polarity and secure connections.
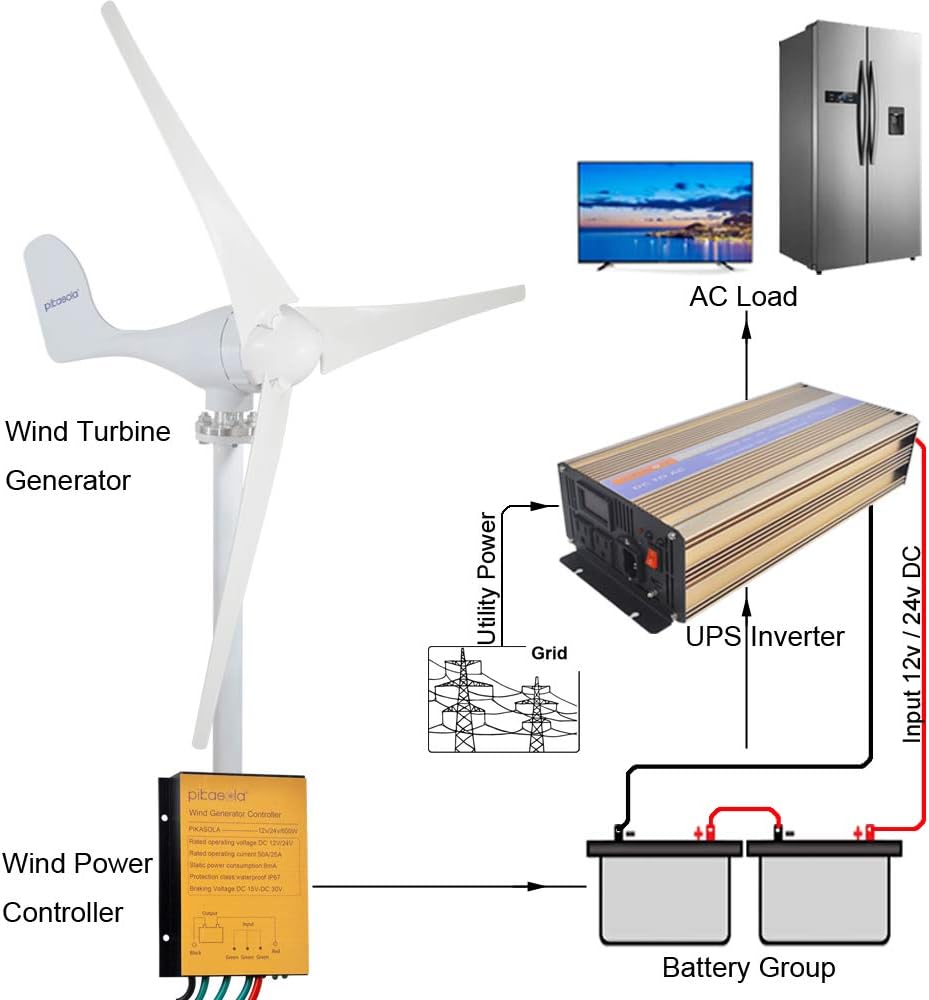
Figure 5.1: System wiring diagram illustrating the connection of the wind turbine generator to the wind power controller, battery group, and an optional UPS inverter for AC loads.
5.3 Wiring the System
The wind turbine generates AC power which is then managed by the wind power controller. This controller charges a 12V battery bank. For AC loads, an inverter (not included) is required.
- Connect the three output wires from the wind turbine to the "Input" terminals of the wind power controller (typically marked Red, Green, Yellow).
- Connect the "Output" terminals of the wind power controller to your 12V battery group, ensuring correct positive and negative connections.
- If using an inverter, connect the inverter to the battery group. The inverter will convert the DC power from the batteries into AC power for household appliances.
- Ensure all connections are tight and insulated to prevent short circuits and corrosion.
6. Operating Instructions
Once installed and wired correctly, the Pikasola wind turbine operates largely automatically.
- Automatic Operation: The turbine will begin to rotate and generate power when wind speeds reach the start wind speed of 2.5 m/s.
- MPPT Controller: The integrated MPPT intelligent microprocessor in the controller will optimize power output and regulate charging to your battery bank. It will automatically stop charging when the battery is fully charged.
- Wind Direction Tracking: The yaw adjustment system will automatically orient the turbine into the wind for maximum efficiency.
- Monitoring: Periodically check the charge controller's indicators (if available) to confirm proper operation and battery charging status.
7. Maintenance
Regular maintenance ensures the long-term performance and safety of your wind turbine.
- Visual Inspection (Monthly):
- Check blades for any cracks, damage, or debris accumulation.
- Inspect all visible wiring for wear, fraying, or loose connections.
- Verify that mounting bolts and fasteners are tight.
- Ensure the tail fin is intact and moves freely.
- Cleaning (As Needed):
- Clean blades and the turbine body to remove dirt, dust, or ice buildup that could affect performance. Use a soft cloth and mild detergent if necessary.
- Bearing Check (Annually): Listen for unusual noises from the generator or rotating parts. If any grinding or excessive noise is heard, professional inspection may be required.
- Electrical Connections (Annually): With power disconnected, inspect all electrical connections for corrosion or looseness. Clean and re-tighten as needed.
- Braking System: If your controller has a manual brake function, test it periodically to ensure it engages properly.
Important: Always engage the turbine's brake or secure the blades before performing any maintenance to prevent accidental rotation.
8. Troubleshooting
This section addresses common issues you might encounter with your wind turbine.
| Problem | Possible Cause | Solution |
|---|---|---|
| Turbine not spinning or spinning slowly in adequate wind. |
|
|
| No power output despite turbine spinning. |
|
|
| Excessive noise or vibration. |
|
|
| Battery not charging or charging slowly. |
|
|
9. Warranty and Support
Pikasola products are designed through rigorous experiments and tests to ensure accurate parameters and reliable performance.
- For any questions, concerns, or support needs regarding your Pikasola 400W Wind Turbine Generator, please contact Pikasola customer service.
- Refer to your purchase documentation for specific warranty terms and conditions.
- You can often find contact information on the official Pikasola website or through your retailer.