1. Introduction
Thank you for choosing the BITIWEND Wireless Door Sensor Chime. This system is designed to provide reliable alerts for open doors or windows in various environments such as homes, offices, and stores. It features a wide operating range, multiple chime melodies, and adjustable volume levels for a customizable user experience.
2. Safety Information
- This product is non-waterproof. Avoid exposure to water or high humidity to prevent damage.
- Do not disassemble or attempt to repair the device yourself. Contact customer support for assistance.
- Keep the device away from extreme temperatures and direct sunlight.
- Ensure the receiver is plugged into a standard electrical outlet with the correct voltage (110 Volts AC).
- Dispose of batteries according to local regulations.
3. Package Contents
The BITIWEND Wireless Door Sensor Chime package includes:
- 1 x Plug-in Receiver
- 2 x Door Sensors (Transmitters)
- Double-sided adhesive tape
- Mounting screws
- User Manual (this document)
4. Product Features
- Wide Operating Range: Up to 600ft (150m) in open areas, ensuring coverage throughout your home or business.
- Customizable Alerts: Choose from 58 distinct melodies and 5 adjustable volume levels (0 dB to 110 dB).
- Memory Function: Retains your last selected melody and volume settings even after a power outage.
- Expandable System: Each receiver can pair with up to 20 magnetic door alarm sensors, and each sensor can connect to an unlimited number of receivers.
- Versatile Use: Ideal for monitoring doors and windows in various settings including residential, commercial, and indoor environments.

Image: The BITIWEND plug-in receiver and a compact door sensor.

Image: Overview of the chime system's features including ringtones, volume levels, range, and LED indicator.
5. Installation
Follow these steps to install your BITIWEND Wireless Door Sensor Chime:
- Prepare the Receiver: Plug the receiver into any standard electrical outlet within your desired listening area.
- Prepare the Sensor:
- Open the sensor casing and remove the insulating paper from the battery compartment. This activates the battery.
- Choose a clean, dry surface on your door or window frame for mounting.
- Mount the Sensor:
- Use the provided double-sided adhesive tape to stick the main sensor unit to the door or window frame. Ensure the arrow on the sensor points towards the magnetic strip.
- Mount the smaller magnetic strip on the moving part of the door or window, aligning it with the main sensor unit. The gap between the two parts should be no more than 1 cm (0.4 inches) when the door/window is closed.
- Alternatively, you can use the provided screws for a more permanent installation.
- Test the System: Open and close the door or window to verify that the chime sounds.

Image: Visual guide showing the steps for installing the door sensor using adhesive tape or screws.
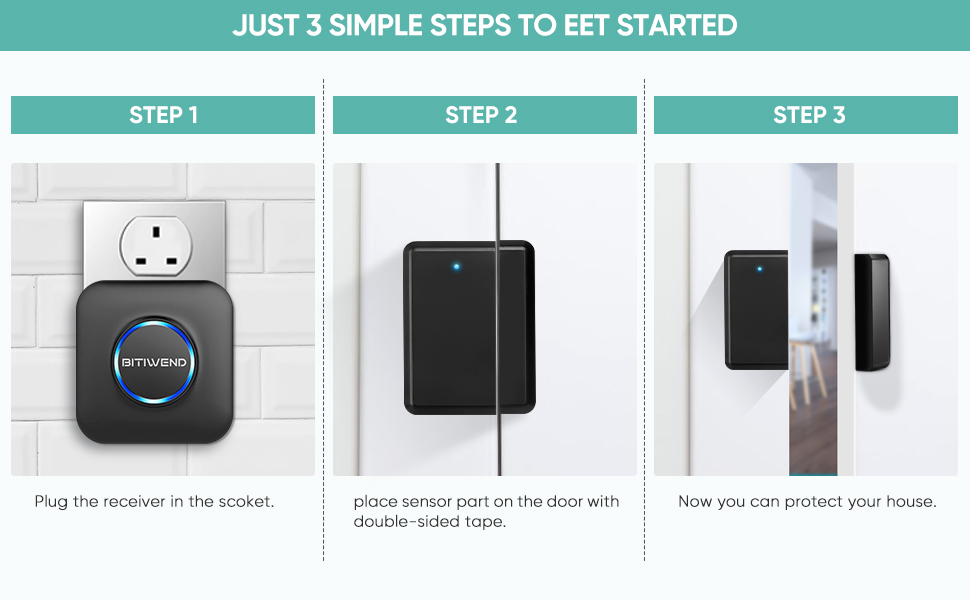
Image: A simplified three-step visual guide for quick setup: plug in receiver, place sensor, and activate.
6. Operation
6.1 Changing Melodies
To select a different melody:
- Press the "Music Selection" button on the receiver to cycle through the 58 available melodies.
- Once you hear your desired melody, stop pressing the button. The receiver will automatically save this selection.
6.2 Adjusting Volume
To adjust the volume level:
- Press the "Volume Control" button on the receiver to cycle through the 5 volume levels (0 dB to 110 dB).
- Select the volume level that best suits your environment. The receiver will save this setting.

Image: Illustration highlighting the 58 available chime melodies.

Image: Illustration showing the 5 adjustable volume levels for the chime.
7. Pairing Additional Sensors/Receivers
The system is expandable. You can pair additional BITIWEND sensors or receivers as needed.
- Enter Pairing Mode: Press and hold the "Volume Control" button on the receiver for approximately 5 seconds until you hear a "ding-dong" sound and the LED indicator flashes rapidly. The receiver is now in pairing mode.
- Activate Sensor: Within 10 seconds, separate the magnetic strip from the main sensor unit (simulate opening a door/window). The receiver will chime, indicating successful pairing.
- Exit Pairing Mode: The receiver will automatically exit pairing mode after 10 seconds if no sensor is activated, or you can press any button to exit manually.
To pair an additional receiver to an existing sensor, follow the same steps, ensuring the sensor is already installed and activated.
8. Maintenance
8.1 Battery Replacement (Sensor)
The door sensor is powered by a Lithium Manganese Dioxide battery. The battery level can affect the signal receiving range. It is recommended to change the battery once every 8-12 months, or when the sensor's performance degrades.
- Carefully open the sensor casing.
- Remove the old battery and insert a new CR2032 Lithium Manganese Dioxide battery, ensuring correct polarity.
- Close the casing and test the sensor.
8.2 Cleaning
Wipe the devices with a soft, dry cloth. Do not use liquid cleaners or abrasive materials.
9. Troubleshooting
| Problem | Possible Cause | Solution |
|---|---|---|
| Chime does not sound when door/window opens. |
|
|
| Chime sounds intermittently. |
|
|
| Volume is too low or too high. | Volume setting needs adjustment. | Adjust volume using the "Volume Control" button on the receiver (refer to Section 6.2). |
10. Specifications
- Model: 2T1
- Brand: BITIWEND
- Operating Voltage (Receiver): 110 Volts (AC)
- Power Source (Sensor): Battery Powered (Lithium Manganese Dioxide)
- Wireless Range: Up to 600ft (150m) in open area
- Melodies: 58 options
- Volume Levels: 5 levels (0 dB to 110 dB)
- Material: ABS
- Installation Method: Self-Adhesive / Plug-in
- Usage: Commercial/Residential/Indoor
- Item Weight: 118 g
- Dimensions (Parcel): 7.8 x 7.19 x 6.71 cm
11. Warranty and Support
BITIWEND products are designed for reliability and performance. For warranty information, technical support, or any questions regarding your product, please refer to the contact information provided with your purchase or visit the official BITIWEND website. Please retain your proof of purchase for warranty claims.