
1. Introduction
This manual provides detailed instructions for the installation, configuration, operation, and maintenance of the DFI-ITOX CS630-Q370CRM motherboard. Designed for 8th Generation Intel Core Processors with an LGA 1151 socket, this motherboard offers multiple PCIe/PCI expansion slots and rich I/O capabilities, making it suitable for various computing applications. Please read this manual thoroughly before proceeding with installation or operation.
2. Setup Guide
2.1. Package Contents
Before installation, ensure all components are present in the package:
- DFI-ITOX CS630-Q370CRM Motherboard
- SATA Data Cables
- I/O Shield
- Driver CD/DVD or USB drive
- Quick Installation Guide
2.2. Motherboard Layout
Familiarize yourself with the motherboard's layout and key components before installation.
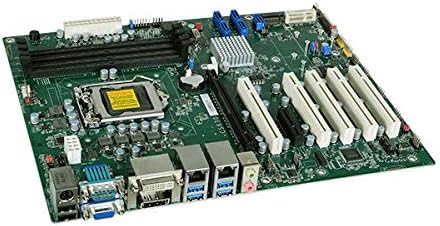
Image 1: Overview of the DFI-ITOX CS630-Q370CRM motherboard. This image displays the main components including the CPU socket, RAM slots, PCIe/PCI expansion slots, and the rear I/O panel.
2.3. Component Installation Steps
Follow these steps for proper component installation:
- CPU Installation:
- Carefully open the CPU socket lever.
- Align the CPU (LGA 1151) with the socket, ensuring the gold triangle on the CPU matches the indicator on the socket.
- Gently place the CPU into the socket without forcing it.
- Close the socket lever to secure the CPU.
- Install the CPU cooler according to its manufacturer's instructions.
- Memory (RAM) Installation:
- Locate the two DDR4 DIMM slots.
- Open the clips at both ends of the DIMM slot.
- Align the memory module's notch with the slot's key.
- Press down firmly on both ends of the memory module until the clips snap into place.
- Expansion Card Installation:
- Identify the appropriate PCIe or PCI slot for your expansion card (e.g., graphics card, network card).
- Remove the corresponding slot cover from your PC case.
- Align the card with the slot and press down firmly until it is fully seated.
- Secure the card with a screw to the PC case.
- Storage Device Connection:
- Connect SATA data cables from your storage devices (HDDs, SSDs) to the SATA 3 ports on the motherboard.
- Connect the power cables from your power supply to the storage devices.
- Power Supply Connection:
- Connect the 24-pin ATX main power connector from your power supply to the motherboard.
- Connect the 8-pin (or 4-pin) ATX 12V CPU power connector to the motherboard.
- Front Panel Connections:
- Connect the front panel headers (Power LED, HDD LED, Power Switch, Reset Switch, USB ports, Audio ports) to their respective pins on the motherboard. Refer to the motherboard diagram for correct pin assignments.
3. Operating Instructions
3.1. Initial Boot and BIOS/UEFI Setup
After assembling your system, perform the initial boot:
- Connect a monitor, keyboard, and mouse.
- Power on the system.
- Press the designated key (usually DEL or F2) repeatedly during startup to enter the BIOS/UEFI setup utility.
- Configure boot order, date/time, and other system settings as needed. Save changes and exit.
3.2. Operating System and Driver Installation
Install your preferred operating system (e.g., Windows, Linux) from a bootable USB drive or DVD. After OS installation, install all necessary drivers from the provided driver media or download the latest versions from the DFI-ITOX website. This includes chipset drivers, graphics drivers, audio drivers, and network drivers.
4. Maintenance and Care
Regular maintenance ensures the longevity and stable operation of your motherboard:
- Dust Removal: Periodically clean dust from the motherboard and components using compressed air. Ensure the system is powered off and unplugged before cleaning.
- BIOS/UEFI Updates: Check the DFI-ITOX website for the latest BIOS/UEFI updates. Follow the provided instructions carefully to update the firmware, as improper updates can cause system instability.
- Environmental Conditions: Operate the motherboard in a well-ventilated environment with stable temperature and humidity to prevent overheating and component damage.
5. Troubleshooting
This section addresses common issues you might encounter:
| Symptom | Possible Cause | Solution |
|---|---|---|
| System does not power on | Loose power connections, faulty power supply, faulty power switch | Check 24-pin and 8-pin power connectors. Test power supply. Verify front panel power switch connection. |
| No display output | Loose graphics card, incorrect monitor input, faulty RAM | Reseat graphics card. Ensure monitor is on correct input. Reseat RAM modules. Test with one RAM module at a time. |
| System reboots unexpectedly | Overheating, unstable power, faulty drivers | Check CPU/GPU temperatures. Ensure power supply is adequate. Update all drivers. |
| Peripheral devices not detected | Incorrect drivers, faulty port, device not properly connected | Install/update device drivers. Try a different port. Ensure device is fully connected. |
6. Technical Specifications
Key specifications for the DFI-ITOX CS630-Q370CRM motherboard:
| Feature | Specification |
|---|---|
| Manufacturer | DFI-ITOX |
| CPU Socket | LGA 1151 |
| Compatible Devices | Personal Computer |
| Chipset Type | Intel Q370 |
| Graphics Card Interface | PCI, PCI Express |
| Memory Slots Available | 2 |
| System Bus Standard Supported | SATA 3 |
| UPC | 725330360746 |
7. Warranty Information
For specific warranty terms and conditions, please refer to the documentation included with your purchase or visit the official DFI-ITOX website. Warranty coverage typically applies to manufacturing defects under normal use conditions.
8. Customer Support
If you encounter issues not covered in this manual or require further assistance, please contact DFI-ITOX customer support. You can usually find contact information on the manufacturer's official website or through your point of purchase.