1. Introduction
Welcome to the GrowLED 10-Pod Indoor Garden Germination Kit user manual. This system is designed to provide an optimal environment for growing various plants indoors, from herbs to vegetables, using hydroponic technology. Please read this manual thoroughly before operating your new indoor garden to ensure proper setup and long-term success.
2. Product Overview
2.1 Components
The GrowLED 10-Pod Indoor Garden Germination Kit includes the following main components:
- Water Tank / Reservoir
- Grow Deck with 10 planting holes
- Adjustable LED Grow Light Panel
- Metal Pole / Light Stand
- Water Level Indicator
- Planting Baskets
- Smart Soils (pre-set with nutrients)
- Power Adapter
- Funnel for water refilling
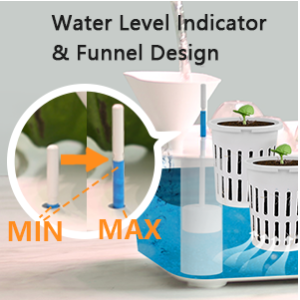
Image: Illustration of various components included in the GrowLED 10-Pod Indoor Garden Kit, such as the water tank, grow light, and planting pods.
2.2 Key Features
- Hydroponic Growing System: Allows for soil-free cultivation, reducing mess and promoting efficient plant growth.
- 20W High Efficiency Grow Light: Provides optimal light spectrum for photosynthesis with a maximum PPFD of 1153 umol/m²/s.
- Height Adjustable Light: The light panel can be adjusted up to 18.5 inches to accommodate plant growth stages.
- Automatic Timer: Features 8/12/16/24-hour optional timer modes for consistent light cycles.
- 5-Level Dimmable Brightness: Adjust light intensity to suit different plant needs.
- 4.5L Large Capacity Water Tank: Reduces the frequency of water refills.
- Nutrients Integrated Smart Soils: Pre-set with nutrients, eliminating the need for liquid plant food for 2-3 months.
- Food Grade Material: Constructed from certified food-grade plastic for safe use.
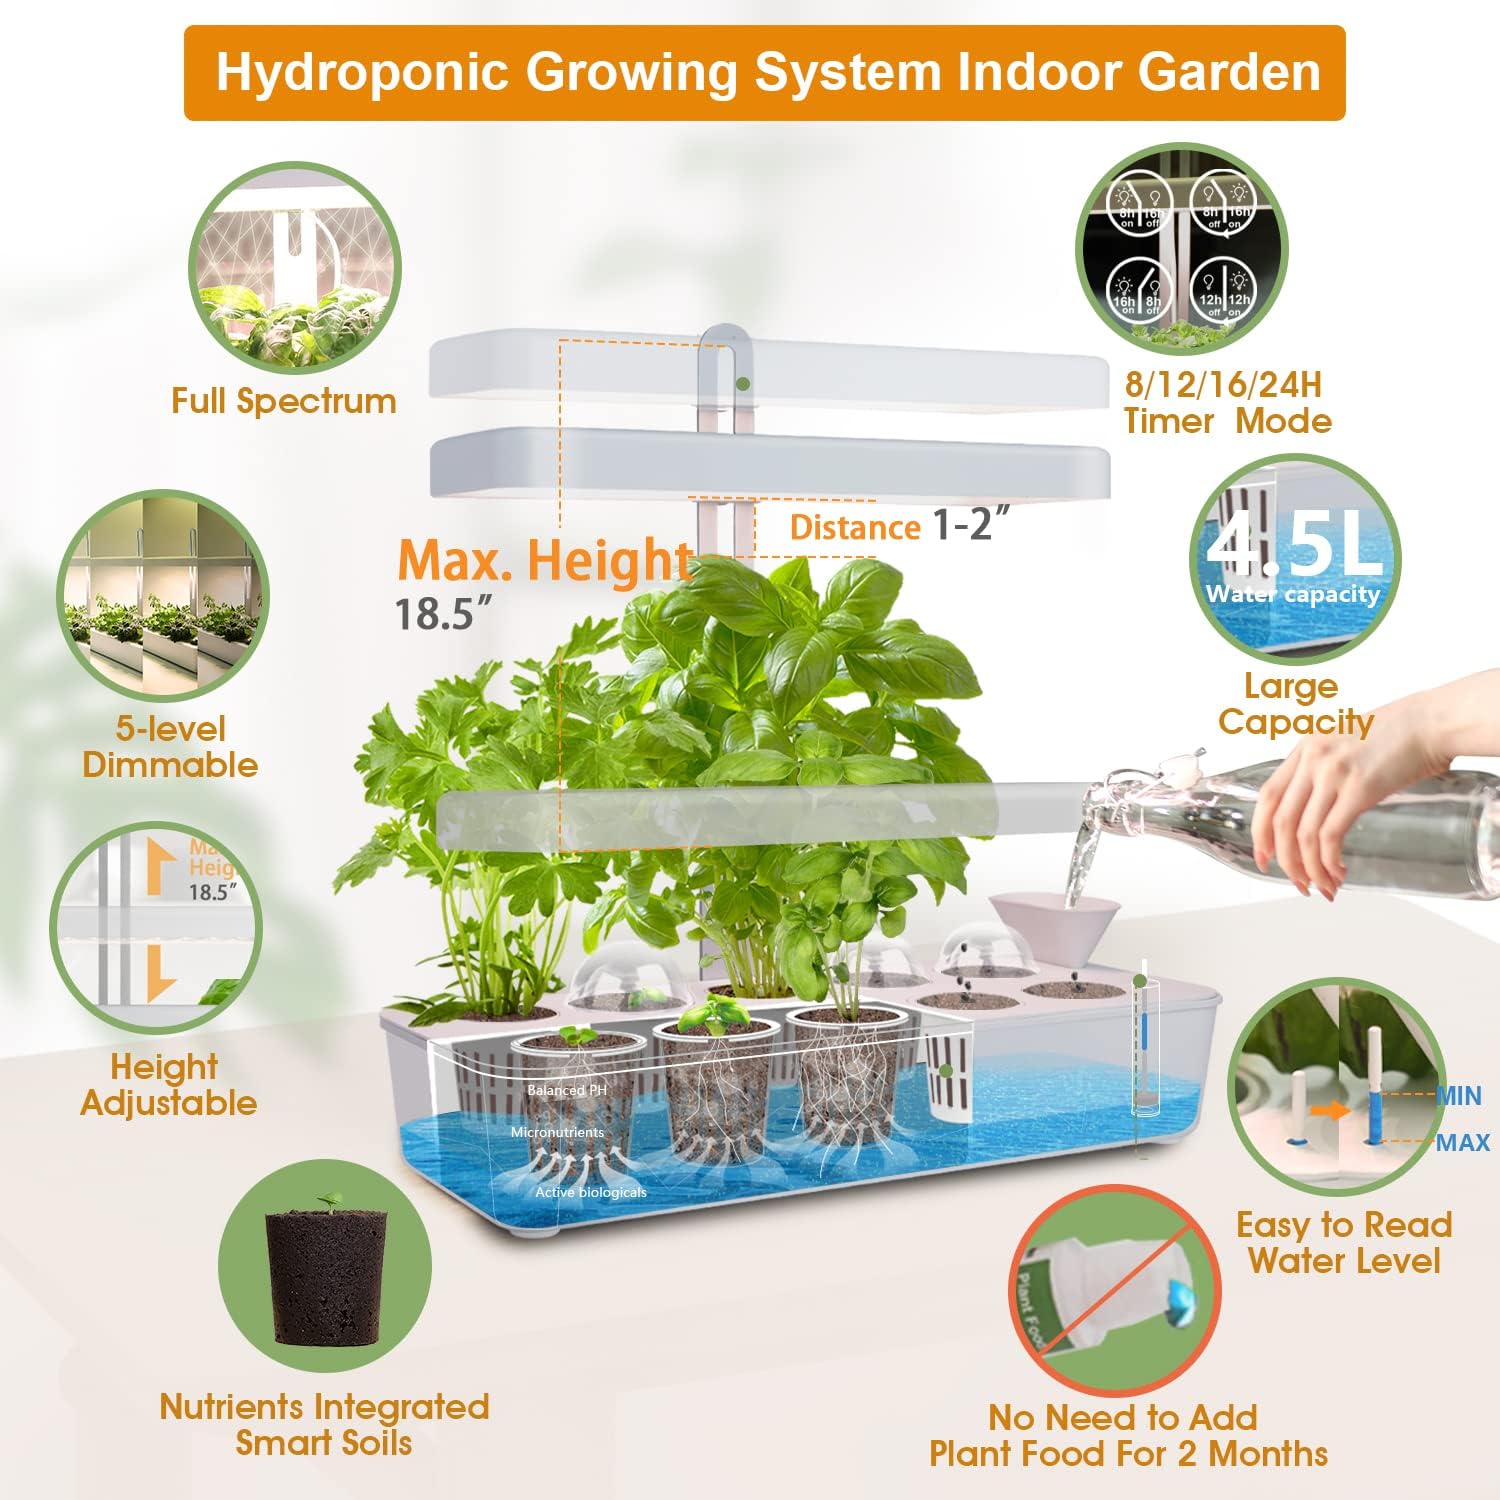
Image: Diagram illustrating key features such as adjustable height, water capacity, and smart soil integration.
3. Setup Instructions
Follow these steps to assemble your GrowLED Indoor Garden:
- Connect the Water Tank and Metal Pole: Secure the metal pole to the water tank using the provided screw.
- Assemble the Water Level Indicator: Insert the water level indicator into its designated slot on the water tank.
- Place the Grow Deck: Position the grow deck onto the water tank and insert the funnel into the designated opening.
- Fix the Light Panel: Attach the LED light panel to the top of the metal pole using the other screw.
- Insert Planting Baskets and Smart Soils: Place the planting baskets into the holes on the grow deck. Insert the smart soils into the small holes within the planting baskets.
- Add Seeds: Plant your desired seeds into the smart soils.
- Fill with Water: Use the funnel to fill the water tank with clean water up to the MAX line indicated by the water level indicator.
- Connect Power: Plug the power adapter into the unit and then into a standard electrical outlet.

Image: Step-by-step visual guide for assembling the GrowLED Indoor Garden.
4. Operating Instructions
4.1 Power On/Off
Once plugged in, the unit will automatically turn on. Use the power button on the control panel to manually turn the light on or off.
4.2 Setting the Timer
The GrowLED system features an automatic timer for the grow light. Press the timer button to cycle through the available modes:
- 8H On / 16H Off: Ideal for plants requiring less light.
- 12H On / 12H Off: A balanced cycle for many common plants.
- 16H On / 8H Off: Recommended for most herbs and vegetables for optimal growth.
- 24H On: Continuous light, suitable for germination or specific plant needs.
The timer will automatically repeat the selected cycle daily.

Image: Visual representation of the four optional timer modes for the grow light.
4.3 Adjusting Light Brightness
The grow light has 5 dimmable levels. Use the brightness control button to adjust the light intensity according to your plants' requirements. Higher brightness is generally suitable for mature plants or those requiring intense light, while lower settings can be used for seedlings or less demanding plants.
4.4 Adjusting Light Height
As your plants grow, adjust the height of the LED light panel to maintain an optimal distance. The recommended distance between the light and the top of your plants is 1-2 inches for most growth stages. The light can be extended up to a maximum height of 18.5 inches.
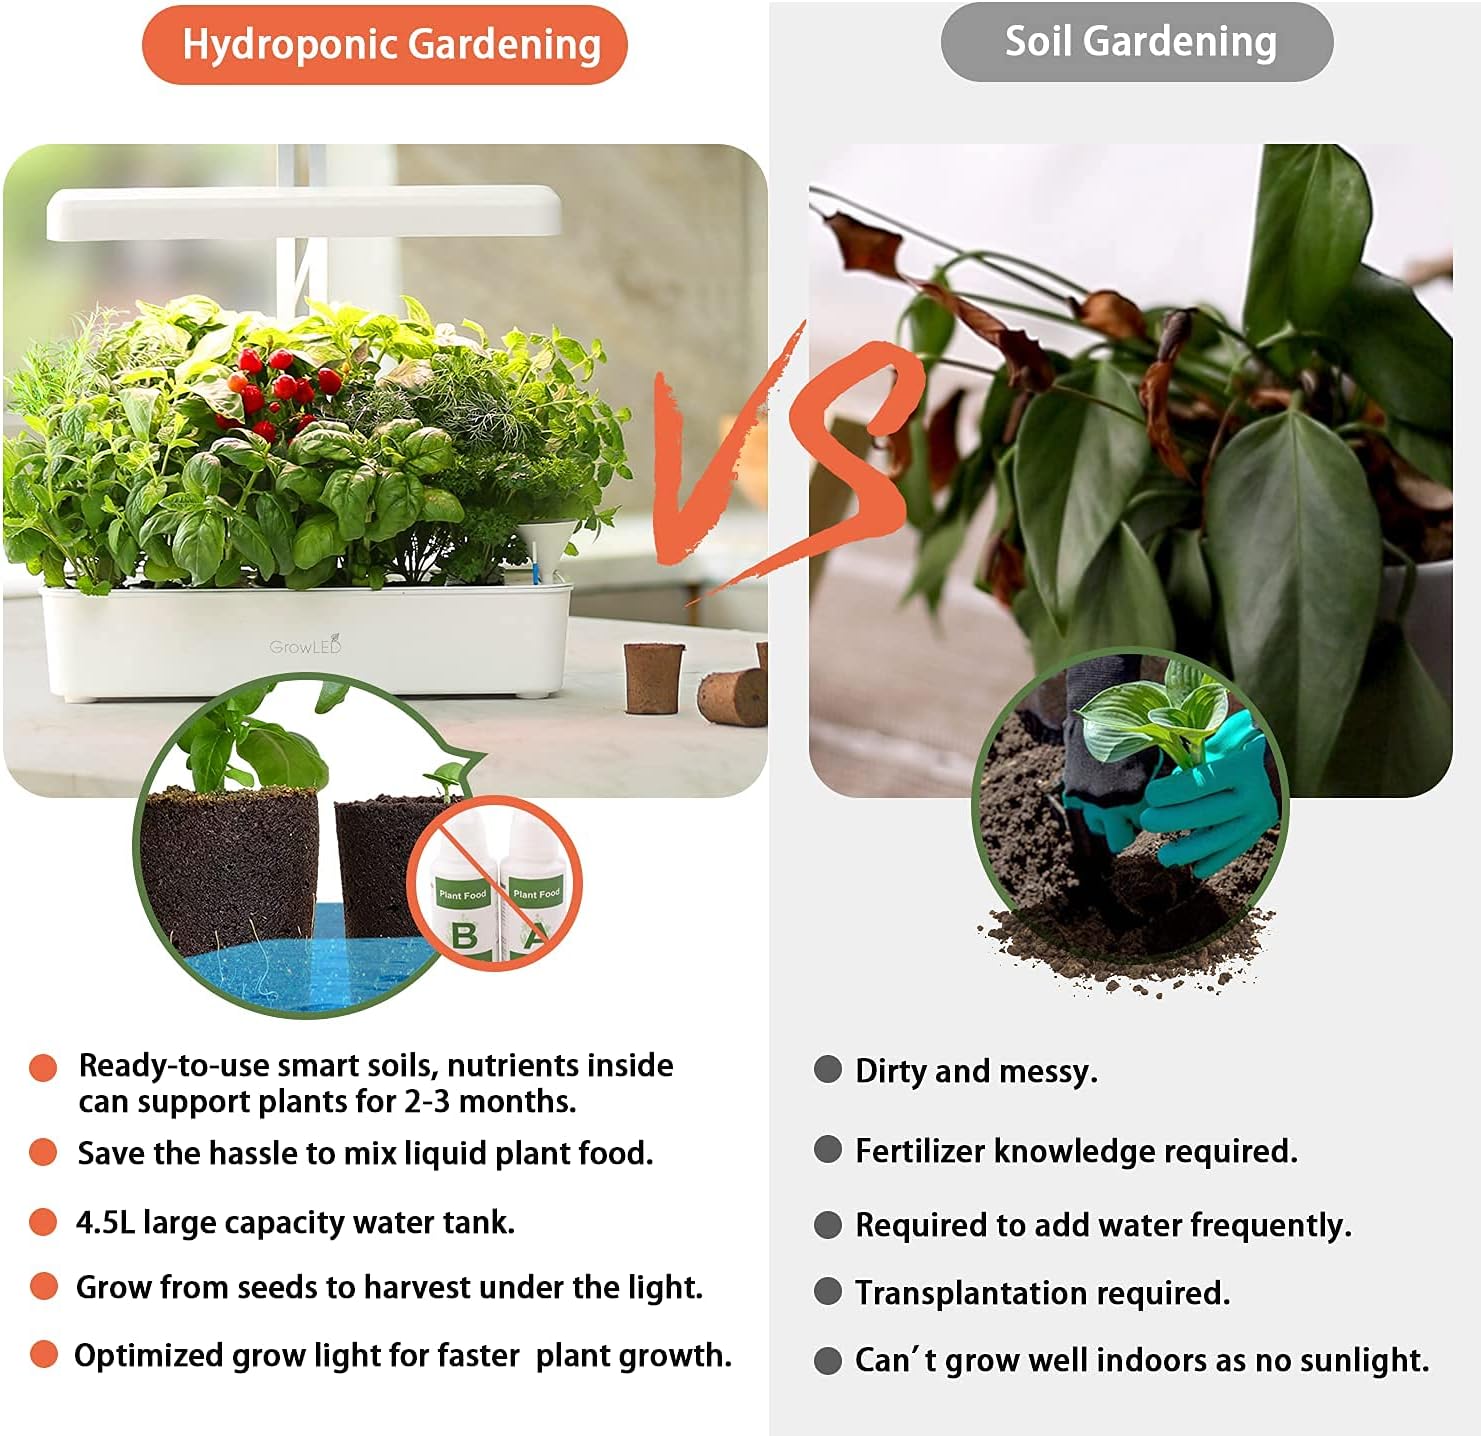
Image: Diagram showing the adjustable height feature of the grow light, from lowest germination stage to maximum height.
5. Maintenance
5.1 Water Refill
Monitor the water level indicator regularly. When the indicator shows the MIN level, refill the water tank using the funnel. The 4.5L capacity typically allows for less frequent refills.

Image: Close-up of the water level indicator and the funnel design for easy water refilling.
5.2 Nutrient Management
The included smart soils contain pre-integrated nutrients sufficient for 2-3 months of growth. After this period, you may need to add liquid hydroponic nutrients to the water reservoir according to the specific needs of your plants and the nutrient solution's instructions. Always follow the nutrient manufacturer's guidelines for dosage.
Image: Illustration showing the smart soils with balanced pH, micronutrients, and active biologicals, indicating no immediate need for external plant food.
5.3 Cleaning
Periodically clean the water tank and grow deck to prevent algae buildup and maintain a healthy growing environment. Disconnect power before cleaning. Use a soft cloth and mild soap, then rinse thoroughly with clean water. Do not submerge the light panel or power adapter in water.
6. Troubleshooting
| Problem | Possible Cause | Solution |
|---|---|---|
| Light not turning on | Power adapter not connected; unit unplugged; timer setting. | Ensure power adapter is securely connected and plugged into a working outlet. Check timer settings to ensure the light is scheduled to be on. |
| Plants not growing well | Insufficient light; incorrect water level; nutrient deficiency; improper temperature. | Adjust light height and brightness. Ensure water level is maintained. If beyond 2-3 months, add hydroponic nutrients. Maintain room temperature between 65-75°F (18-24°C). |
| Algae growth in water tank | Excess light exposure to water; infrequent cleaning. | Ensure grow deck covers all openings. Clean the water tank regularly. Consider using opaque covers for unused planting holes. |
| Water level indicator stuck | Debris or mineral buildup. | Remove and clean the water level indicator. Rinse thoroughly to remove any buildup. |
7. Specifications
| Feature | Detail |
|---|---|
| Model Number | GLMGIST20W |
| Product Dimensions | 7.6 x 19.3 x 47.5 cm; 2.84 kg (approx. 3 x 7.6 x 18.7 inches; 6.26 lbs) |
| Water Tank Capacity | 4.5 Liters |
| Grow Light Power | 20W |
| Light Spectrum | Full Spectrum |
| Light Brightness Levels | 5-level dimmable |
| Timer Modes | 8H/12H/16H/24H On |
| Max. Light Height | 18.5 inches |
| Material | Food Grade Plastic |
8. Warranty and Support
For warranty information and customer support, please refer to the documentation included with your product or contact GrowLED customer service directly. Keep your purchase receipt for warranty claims.
For further assistance, you may visit the official GrowLED website or contact their support team via the contact information provided on the product packaging or their official channels.
