1. Introduction
This manual provides instructions for the proper installation and care of your LASE replacement diaphragm. This aftermarket diaphragm is designed to restore the performance of compatible Yamaha speaker drivers, specifically models JA4201, JA4207, JA4208, S4115, and NB074960, with an impedance of 8 Ohms.
Careful handling and correct installation are crucial for optimal sound quality and longevity of the diaphragm.
2. Safety Information
- Always disconnect power from the speaker system before attempting any installation or repair.
- Handle the diaphragm with extreme care. The voice coil and dome are delicate and can be easily damaged by touch or impact.
- Wear appropriate personal protective equipment, such as gloves, to prevent oils and dirt from your hands from transferring to the diaphragm.
- Use only non-magnetic tools to avoid damaging the speaker's magnetic structure.
- Keep small parts away from children.
3. Package Contents
- 1 x LASE Replacement Diaphragm (8 Ohm)
4. Installation Guide
This section outlines the general steps for replacing a speaker diaphragm. Specific procedures may vary slightly depending on the exact speaker model. If you are unsure, consult a qualified technician.
Tools Required:
- Screwdriver set (Phillips and/or flathead, as needed)
- Small, non-magnetic pry tool or flat blade (optional, for careful separation)
- Clean, lint-free cloth
- Compressed air or soft brush (for cleaning)
Installation Steps:
- Prepare the Speaker: Ensure the speaker system is completely powered off and disconnected from any audio sources or amplifiers.
- Access the Driver: Carefully remove the speaker grille and any mounting screws that secure the driver unit to the speaker cabinet. Gently pull the driver out, being mindful of any connected wires.
- Remove the Old Diaphragm: Locate the screws or clips holding the diaphragm assembly in place on the driver. Unscrew or unclip them. Carefully lift the old diaphragm straight up and out. Note the orientation of the terminals.
-
Clean the Gap: Use compressed air or a soft brush to thoroughly clean the magnetic gap where the voice coil sits. Ensure no debris, dust, or metal shavings remain, as these can cause rubbing and damage to the new diaphragm.

Image 1: Top view of the LASE replacement diaphragm, showing the metal frame and dome.
-
Install the New Diaphragm: Carefully align the new LASE diaphragm with the mounting holes on the driver. Ensure the voice coil slides smoothly into the magnetic gap without touching the sides. The terminals on the diaphragm should align with the speaker's connection points.

Image 2: LASE replacement diaphragm featuring a black rubber gasket for a secure fit.
-
Secure the Diaphragm: Re-insert and tighten the screws or re-attach the clips to secure the new diaphragm. Do not overtighten.
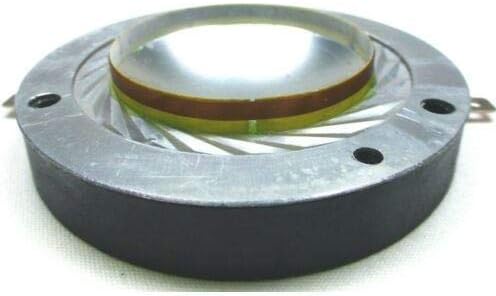
Image 3: Side view illustrating the voice coil component of the LASE replacement diaphragm.
- Connect and Test: Reconnect the speaker driver wires if they were detached. Carefully place the driver back into the cabinet and secure it with its mounting screws. Reconnect the speaker system to your amplifier and perform a low-volume test to ensure proper function before full use.
5. Maintenance
The LASE replacement diaphragm requires minimal maintenance once installed correctly. To ensure its longevity and optimal performance:
- Avoid exposing the speaker to excessive moisture or extreme temperatures.
- Keep the speaker grille in place to protect the diaphragm from physical damage and dust accumulation.
- Do not touch the diaphragm dome, as oils and dirt can affect its performance.
- Operate the speaker within its recommended power limits to prevent overheating or damage to the voice coil.
6. Troubleshooting
If you encounter issues after installing the replacement diaphragm, consider the following:
- No Sound:
- Check all wiring connections to ensure they are secure and correctly polarized.
- Verify the amplifier is powered on and functioning correctly.
- Ensure the diaphragm terminals are making good contact with the driver's connection points.
- Distorted Sound / Buzzing:
- The voice coil may be rubbing against the magnetic gap. This often indicates improper seating of the diaphragm or debris in the gap. Carefully remove the diaphragm, clean the gap again, and re-install with precision.
- Check for any loose screws or components within the speaker driver or cabinet.
- Ensure the amplifier is not overdriving the speaker.
- Low Volume:
- Confirm the amplifier's output level is appropriate.
- Check for correct impedance matching between the speaker and amplifier.
7. Specifications
| Feature | Specification |
|---|---|
| Brand | LASE |
| Compatible Yamaha Models | NB074960, JA-4201, JA-4207, JA-4208, S-4115, S-4115H |
| Impedance | 8 Ω |
| Overall Diaphragm Diameter | 2.75" (70.42mm) |
| Voice Coil Diameter | 1.65" (42.04mm) |
8. Warranty Information
This product comes with a Limited Warranty. For specific details regarding the warranty period, coverage, and claims process, please refer to the purchase documentation or contact the seller directly.
9. Customer Support
If you have any questions, require further assistance with installation, or encounter issues not covered in this manual, please contact the seller or manufacturer for support. Provide your product details and a clear description of the problem for efficient assistance.