1. Product Overview
The AOPUTTRIVER AP-846A is a professional digital anemometer designed for high-accuracy measurement of wind speed, wind temperature, and air flow (CFM/CMM). This multi-functional device is suitable for various applications including HVAC system analysis, air blower testing, environmental monitoring, and outdoor activities.
Key features include a large backlit LCD display, data hold function, MAX/MIN/AVG measurement modes, unit switching, and automatic power-off for battery conservation. The remote vane sensor with an extendable coiled cable allows for flexible and precise measurements in various environments.

Figure 1: AOPUTTRIVER AP-846A HVAC Anemometer
2. Package Contents
Upon opening the package, please verify that all items listed below are present and in good condition:
- 1 x AOPUTTRIVER AP-846A Digital Anemometer Main Unit
- 1 x Remote Vane Sensor with Coiled Cable
- 1 x 9V (6F22) Battery
- 1 x Hard Carrying Case
- 1 x User Manual
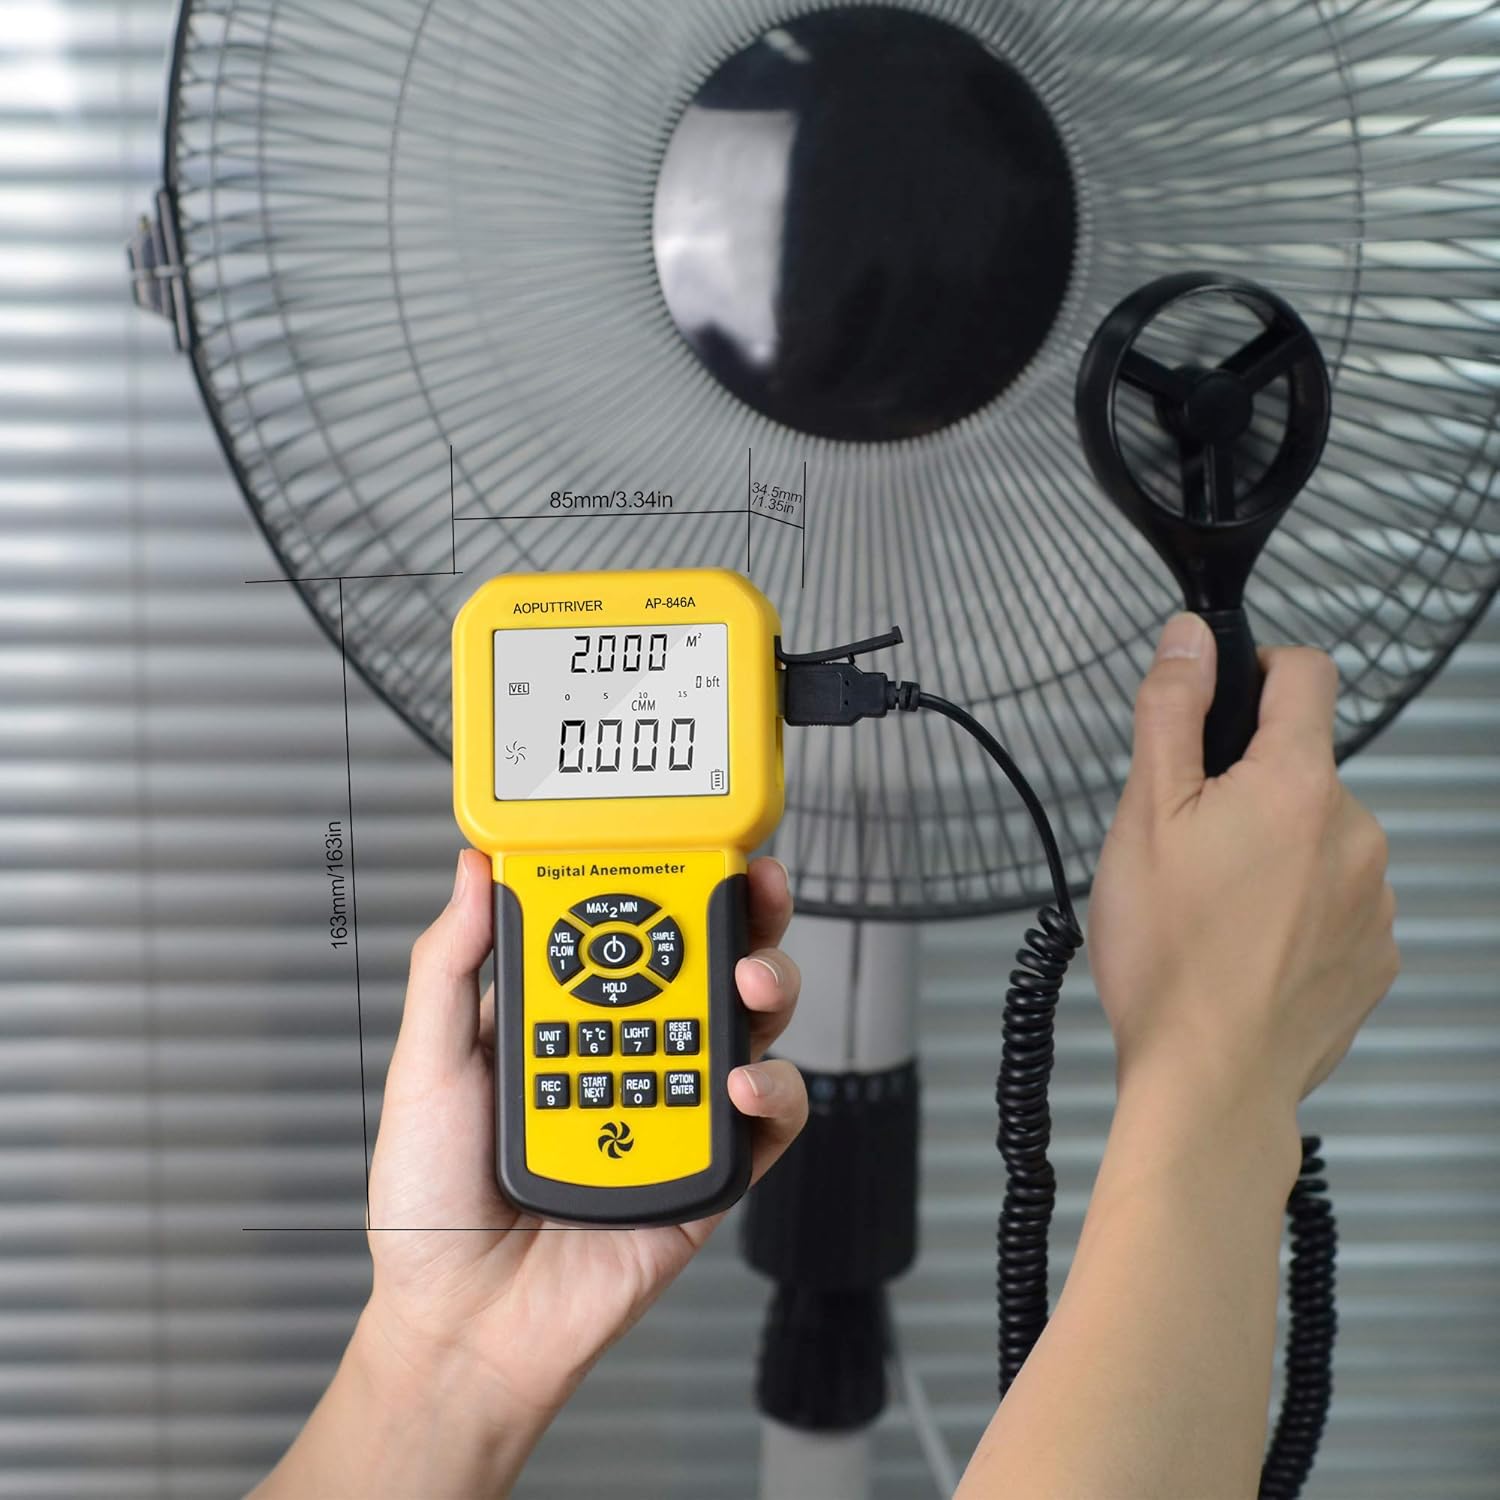
Figure 2: Package Contents
3. Component Identification
Familiarize yourself with the main components and controls of the AP-846A anemometer:

Figure 3: Labeled Components
- LCD Display: Shows measurement readings, units, and indicators.
- MAX/MIN Value Switch: Toggles between maximum, minimum, and current readings.
- Power Key: Turns the device on/off.
- Wind Velocity/Flow Transform Key: Switches between wind velocity and air flow (CFM/CMM) modes.
- Data Holding Key: Freezes the current reading on the display.
- Unit Transform Key: Changes measurement units (e.g., m/s, mph, °C, °F).
- Data Record Key: Initiates data recording.
- Measuring Key for Average Value of Wind Flow: Calculates and displays the average air flow.
- Read Recorded Data Key: Recalls stored data.
- Wind Flow AVG 2/3 MAX and Figure Input: Used for advanced air flow calculations and area input.
- Reset Key in "READ" Mode/Clear Recorded: Resets recorded data.
- Backlight On/Off Key: Press to activate/deactivate the display backlight.
- Temperature Unit Switch: Toggles between Celsius (°C) and Fahrenheit (°F).
- Duct Area Input and Sampling Time Setting Key: Used for setting duct area for CFM/CMM calculations.
- Connecting Wire: Connects the main unit to the vane sensor.
- Wind Velocity Sensors: Rotating vane for wind speed measurement.
4. Setup
4.1 Battery Installation
The AP-846A requires one 9V (6F22) battery. To install or replace the battery:
- Locate the battery compartment on the back of the main unit.
- Unscrew the two screws securing the battery cover.
- Insert the 9V battery, ensuring correct polarity.
- Replace the battery cover and secure it with the screws.
Note: For optimal performance and to prevent leakage, use alkaline batteries and remove batteries if the device will not be used for an extended period.
4.2 Connecting the Vane Sensor
Connect the remote vane sensor to the main unit by plugging the USB-style connector of the coiled cable into the corresponding port on the top of the main unit.
Video 1: Demonstrates battery installation and connecting the vane sensor to the main unit.
5. Operating Instructions
5.1 Power On/Off
- To power on, press the Power Key (3 in Figure 3).
- To power off, press and hold the Power Key for a few seconds. The device also features an auto power-off function after 5 minutes of inactivity to save battery.
5.2 Backlight Control
Press the Backlight On/Off Key (12 in Figure 3) to turn the display backlight on or off. This improves visibility in low-light conditions.
5.3 Unit Selection
The AP-846A supports multiple units for wind speed and temperature:
- Wind Speed Units: Press the Unit Transform Key (6 in Figure 3) to cycle through m/s, km/h, ft/min, knots, and mph.
- Temperature Units: Press the Temperature Unit Switch (13 in Figure 3) to switch between Celsius (°C) and Fahrenheit (°F).
5.4 Wind Speed and Temperature Measurement
To measure wind speed and temperature:
- Ensure the vane sensor is connected to the main unit.
- Power on the device.
- Hold the vane sensor in the airflow, ensuring the air flows through the vane in the direction indicated by the arrow on the sensor.
- The wind speed and temperature readings will be displayed on the LCD.

Figure 4: Measuring airflow from an HVAC unit.

Figure 5: Measuring airflow from a fan.
5.5 CFM (Cubic Feet per Minute) Measurement
To measure CFM, you need to input the area of the duct or vent:
- Press the "UNIT" key (6 in Figure 3) to select CFM or CMM mode.
- Press the "AREA" key (14 in Figure 3), then use the number keys to enter the duct area (e.g., 1 or 2 for predefined areas, or custom input).
- Press the "ENTER" key to confirm the area.
- Position the vane sensor in the airflow. The CFM/CMM reading will be displayed.
Formula: Flow = Velocity * (Free Area)
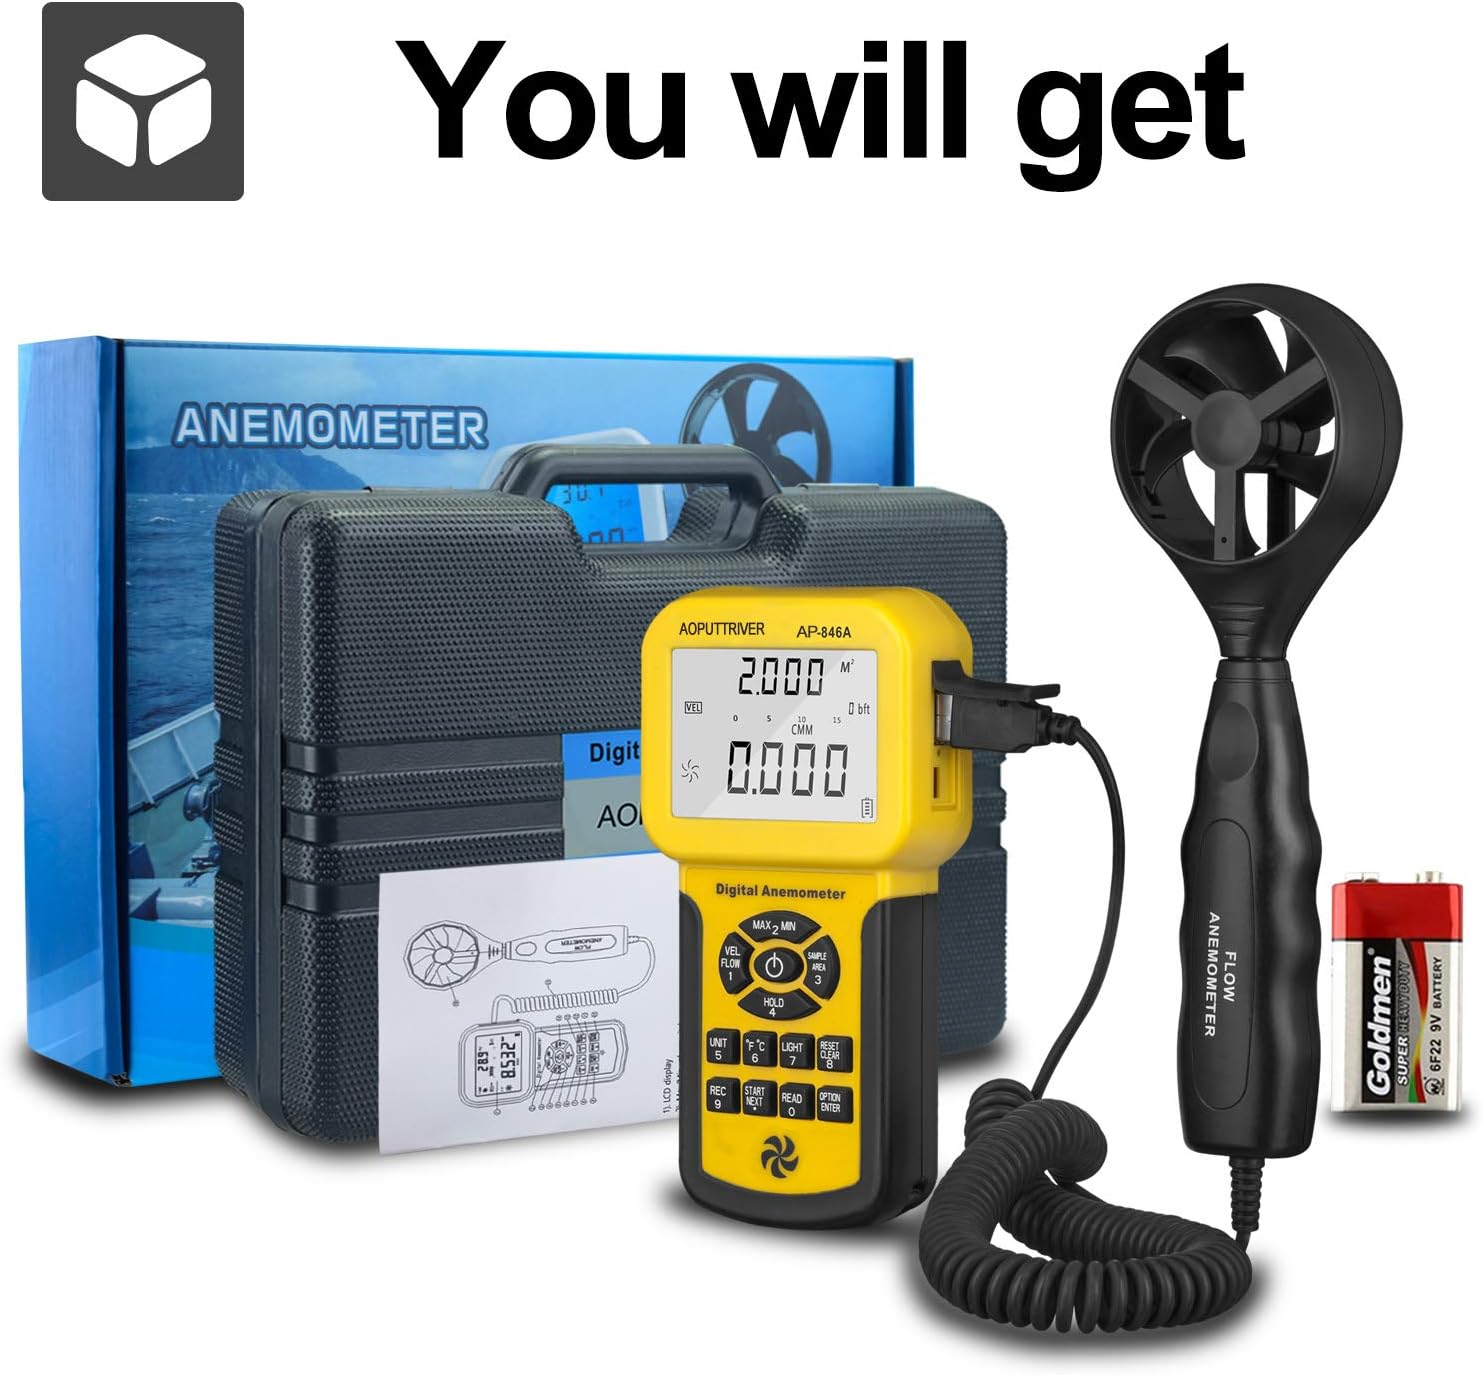
Figure 6: CFM Measurement Guide
5.6 MAX/MIN/AVG Measurement
Press the MAX/MIN Value Switch (2 in Figure 3) to cycle through maximum, minimum, and current readings. For average air flow, use the Measuring Key for Average Value of Wind Flow (8 in Figure 3).
5.7 Data Hold
Press the Data Holding Key (5 in Figure 3) to freeze the current reading on the display. Press it again to release the hold.
6. Maintenance
- Keep the device clean and dry. Wipe with a soft, damp cloth. Do not use abrasive cleaners or solvents.
- Store the anemometer in its protective carrying case when not in use to prevent damage to the vane sensor.
- Replace the 9V battery when the low power indicator appears on the display.
- Avoid exposing the device to extreme temperatures or high humidity.
7. Troubleshooting
- No Display/Device Not Turning On: Check battery installation and ensure the battery has sufficient charge. Replace if necessary.
- Inaccurate Readings: Ensure the vane sensor is clean and rotates freely. Verify that the sensor is positioned correctly in the airflow, facing the direction of the flow. Check for any obstructions.
- Display Not Changing: Check if the Data Hold function is activated. Deactivate it by pressing the Data Holding Key.
- CFM/CMM Readings Incorrect: Double-check the entered duct area value. Ensure the correct units (CFM/CMM) are selected.
8. Specifications
| Feature | Specification |
|---|---|
| Wind Speed Range | 0.001-100 mph (0.001-45 m/s) |
| Wind Speed Accuracy | ±3% + 0.2 rdg (mph), ±3% + 0.1 rdg (m/s) |
| Temperature Range | 32-113°F (0-45°C) |
| Wind Flow Range (CFM) | 0-999900 ft³/min |
| Wind Flow Range (CMM) | 0-999900 m³/min |
| Wind Flow Area | 0.001-9999 ft² |
| Resolution | 0.001 mph (wind speed), 0.001-100 (wind flow) |
| Display | 1.69 x 2.3 inch Large LCD with Backlight |
| Power Supply | 1 x 9V (6F22) Battery (included) |
| Auto Power Off | After 5 minutes of inactivity |
| Dimensions (Main Unit) | 3.4 x 1.5 x 6.5 inches |
| Item Weight | 11.3 ounces (320 Grams) |
| Material | Acrylonitrile Butadiene Styrene (ABS) |

Figure 7: Wind Velocity Range and Accuracy
9. Warranty and Support
AOPUTTRIVER provides 2-Years Technical Support for this product. If you encounter any problems or have questions regarding your AP-846A anemometer, please contact AOPUTTRIVER customer support for assistance. They will provide troubleshooting guidance or arrange for a replacement if necessary.


