Introduction
This manual provides detailed instructions for the assembly, operation, and maintenance of your CyclingDeal KP-453-4 Vertical Freestanding 4-Bike Parking Rack. Please read this manual thoroughly before use to ensure safe and efficient operation.
Safety Information
- Ensure all components are securely fastened before loading bikes.
- Do not exceed the maximum weight capacity of 33 lbs (15kg) per bike or 132 lbs (60kg) total.
- Place the rack on a flat, stable surface to prevent tipping.
- Keep children and pets away from the rack during assembly and when bikes are loaded.
- Regularly inspect the rack for any signs of wear or damage. Do not use if damaged.
Package Contents
Verify that all parts are present before beginning assembly:
- Main vertical support pole sections
- Base support legs
- Adjustable bike cradles (4 sets)
- All necessary bolts, nuts, and washers for assembly
- Assembly tools (if included, otherwise standard tools like wrenches may be required)
Setup Instructions
Follow these steps to assemble your bike parking rack:
- Assemble the Base: Attach the base support legs to the bottom section of the main vertical pole. Ensure all bolts are tightened securely.

Image: Overall dimensions and adjustable features of the bike rack, illustrating the base and vertical pole assembly.
- Connect Vertical Pole Sections: Join the vertical pole sections together. The rack is designed to be freestanding, so ensure the connections are firm.
- Install Bike Cradles: Attach the adjustable bike cradles to the vertical pole using the provided hardware. The cradles can be bolted onto different machined holes to adjust their height.
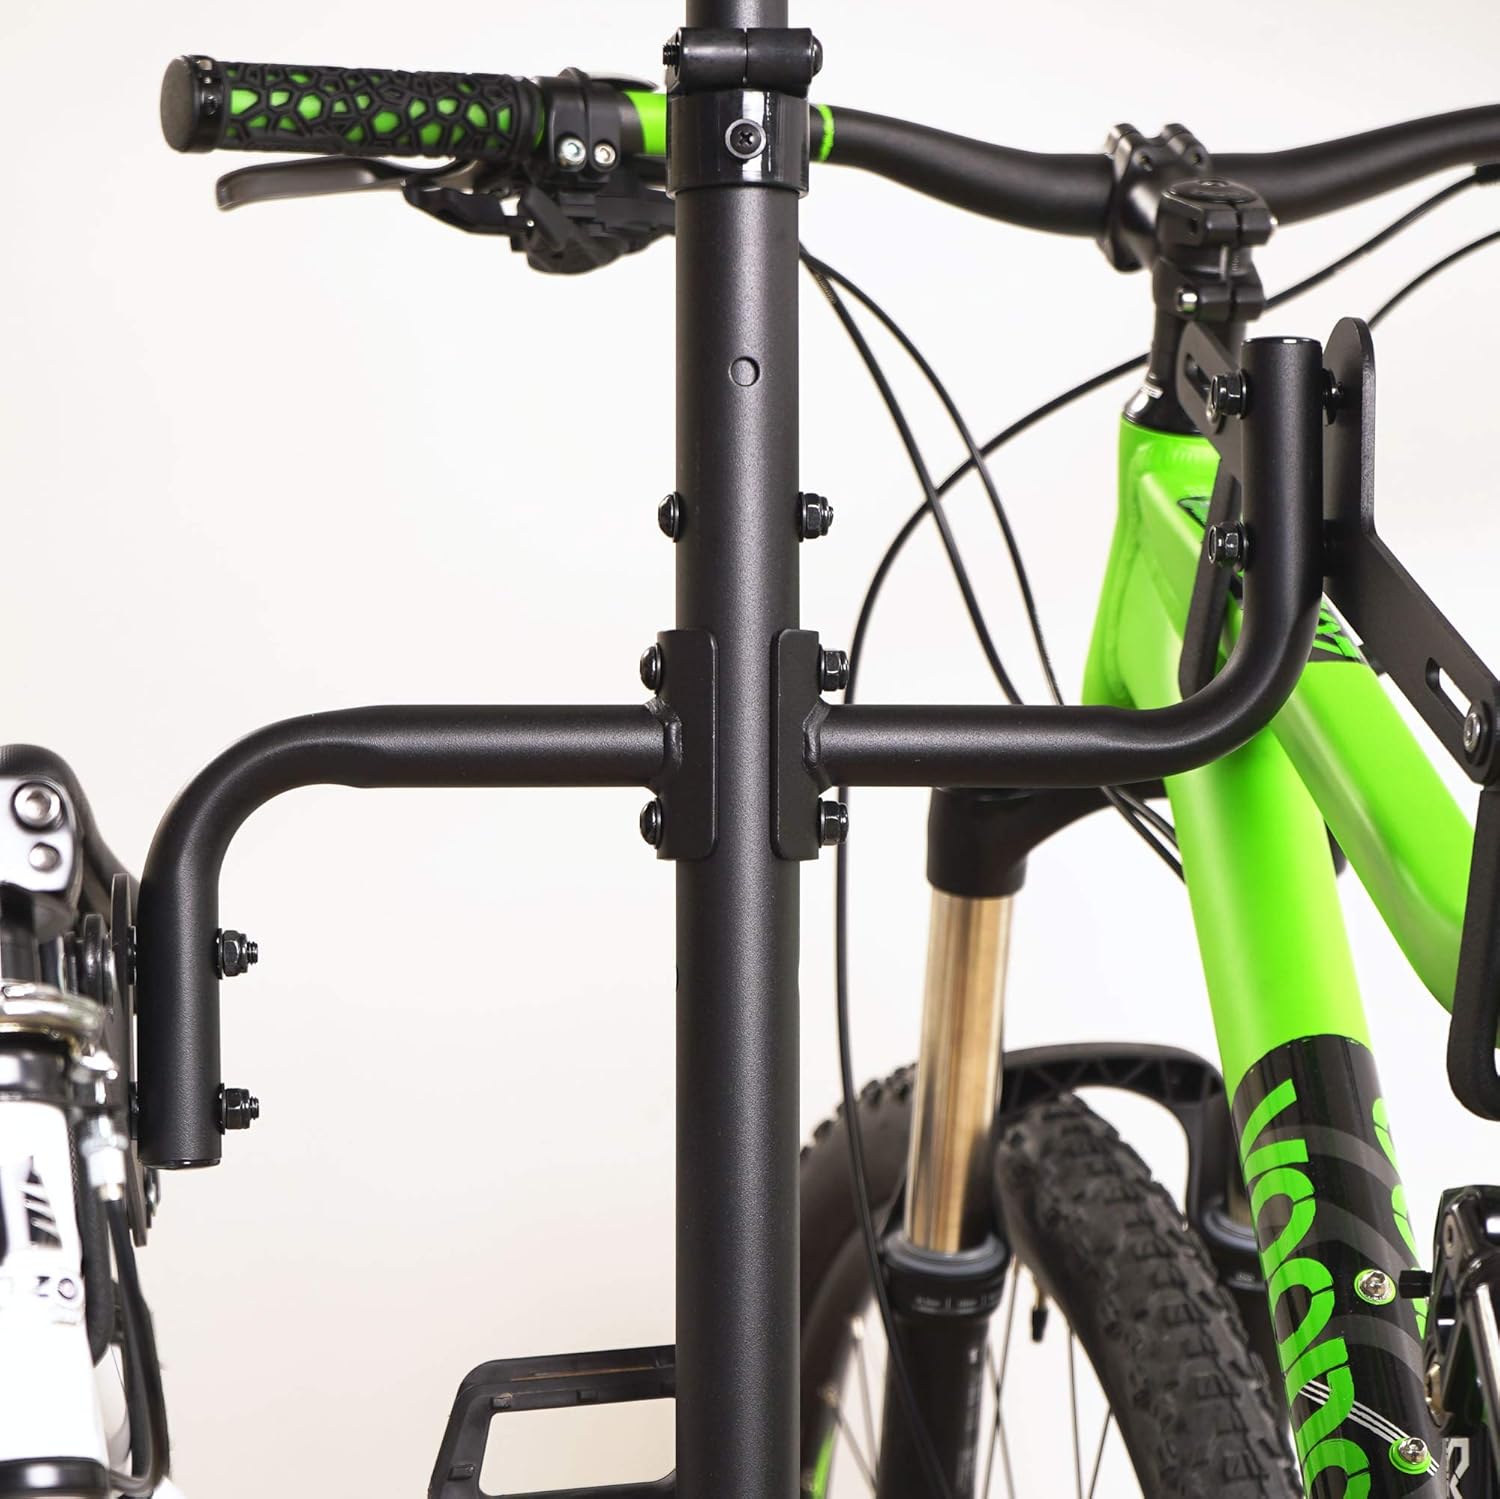
Image: Close-up view of a bike cradle securely attached to the vertical support pole using bolts.
- Adjust Cradle Distance: The distance between the two hooks on each cradle is adjustable to accommodate various bike frame sizes. Adjust as needed for your bicycles.
- Final Tightening: Double-check all bolts and connections to ensure they are fully tightened for maximum stability.
Assembly Video Guide
Video: A detailed guide on how to assemble and use the CyclingDeal KP-453-4 Vertical Hanger Parking Rack.
Operating Instructions
- Loading Bikes: Carefully lift your bicycle and place its top tube onto the cradles. Ensure the bike is balanced and stable on the hooks.

Image: A green mountain bike positioned on the rack, demonstrating proper bike placement on the cradles.
- Adjusting Cradles for Frame Geometry: The cradles can be tilted to accommodate bikes with sloping top tubes or aggressive frame geometries. Loosen the cradle bolts, adjust the tilt, and re-tighten.

Image: Detail of a bike frame on an adjustable cradle, highlighting the tilting feature for various frame shapes.
- Unloading Bikes: Carefully lift the bike off the cradles.
- Weight Distribution: For optimal stability, distribute bikes evenly across the rack. If only one or two bikes are stored, try to place them on opposite sides or lower positions to maintain balance.
Maintenance
- Cleaning: Wipe down the rack with a damp cloth as needed to remove dust and dirt. Avoid abrasive cleaners.
- Inspection: Periodically check all bolts and connections for tightness. Re-tighten any loose fasteners to ensure continued stability.
- Damage: If any part of the rack becomes bent, cracked, or otherwise damaged, discontinue use immediately and contact customer support for replacement parts or advice.
Troubleshooting
| Problem | Possible Cause | Solution |
|---|---|---|
| Rack feels wobbly or unstable | Loose bolts or uneven surface. | Ensure all assembly bolts are fully tightened. Place the rack on a flat, level surface. If issues persist, check for missing hardware or manufacturing defects. |
| Bike does not sit securely on cradles | Cradles not adjusted for bike frame. | Adjust the tilt and distance of the cradle hooks to match your bike's top tube geometry. |
| Difficulty loading/unloading bikes | Cradle height is too high or too low. | Adjust the cradle height on the vertical pole to a comfortable and safe level for lifting your bikes. |
Specifications
| Feature | Detail |
|---|---|
| Model Number | KP-453-4 |
| Material | Aluminum, Steel (powder-coated) |
| Color | Black |
| Assembled Dimensions (H x Base W) | Approx. 86.6 inches (220 cm) x 29.1 inches (74 cm) |
| Max Bike Capacity | 4 bikes |
| Max Weight per Bike | 33 lbs (15 kg) |
| Total Weight Capacity | 132 lbs (60 kg) |
| Mounting Type | Freestanding Floor Mount |
| Special Features | Adjustable Cradles, Tilting Mechanism |
| Assembly Required | Yes |
Warranty and Support
The CyclingDeal KP-453-4 Vertical Freestanding 4-Bike Parking Rack comes with a 2-Year Manufacturer Warranty. For warranty claims, technical support, or inquiries regarding replacement parts, please contact CyclingDeal customer service through their official website or the retailer where the product was purchased.
Please retain your proof of purchase for warranty validation.


