Introduction
The Godox MS300 Studio Strobe Monolight is a compact and powerful lighting solution designed for professional and amateur photographers. Featuring a built-in 2.4 GHz Godox Wireless X System, it offers precise control over flash power, modeling light, and triggering. This manual provides detailed instructions for the safe and effective use of your MS300 monolight, ensuring optimal performance and longevity.
Safety Information
Please read and understand all safety precautions before use.
- Electrical Safety: Always ensure the power supply matches the unit's requirements (110V). Do not operate with wet hands or in damp environments. Disconnect power before cleaning or maintenance.
- Heat Warning: The modeling lamp can become very hot during operation. Avoid touching it directly. Allow sufficient cooling time before handling or replacing.
- Eye Protection: Do not look directly into the flash tube when firing, as it can cause temporary vision impairment.
- Ventilation: Ensure adequate ventilation around the unit to prevent overheating. Do not cover the ventilation openings.
- Mounting: Securely mount the strobe on a stable light stand. Ensure all locking mechanisms are tightened to prevent accidental falls.
- Children: Keep the unit out of reach of children.
Package Contents
Verify that all items are present in your package:
- 1x Godox MS300 Flash Unit
- 1x Power Supply Cord
- 1x Lamp Cover
- 1x Modeling Lamp
- 1x Instruction Manual (this document)
Product Overview
Familiarize yourself with the main components of your Godox MS300 monolight.
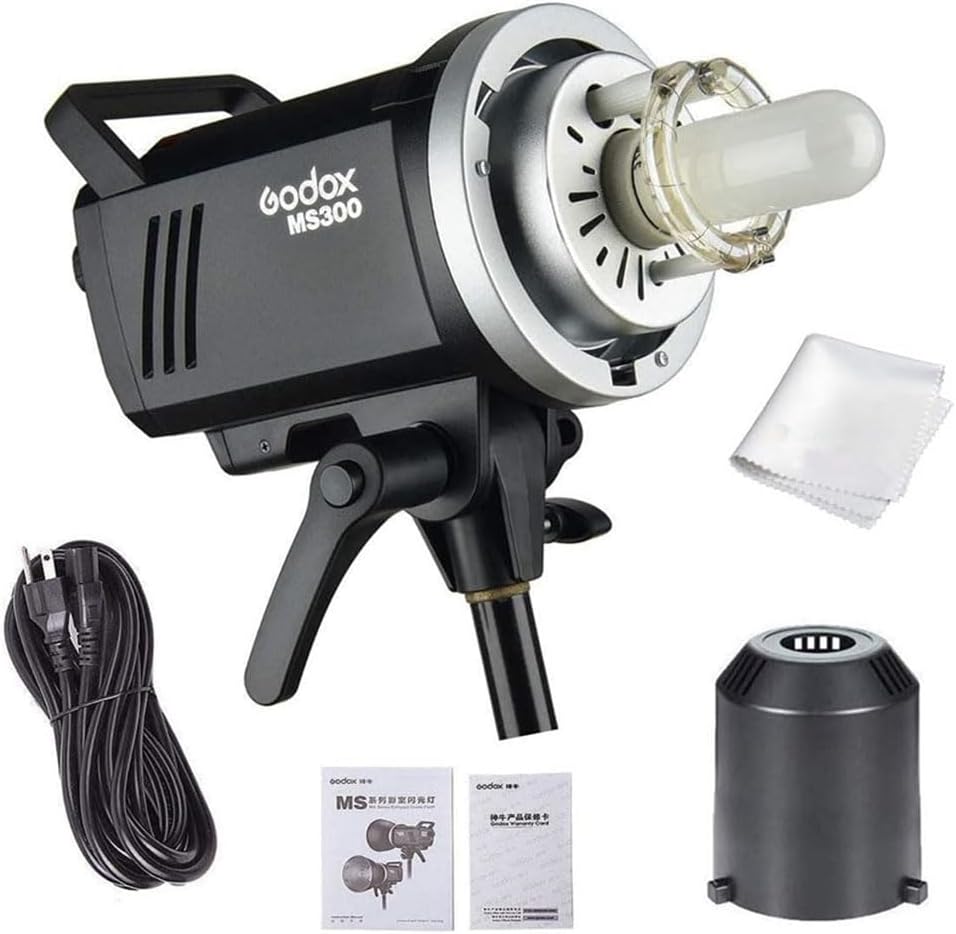
Figure 1: The Godox MS300 Studio Strobe Monolight shown with its power cord, lamp cover, modeling lamp, and instruction manual.

Figure 2: The rear control panel of the MS300, displaying the LCD screen, control dial, function buttons (GR/CH, S1/S2, Sound, Modeling Lamp, Test Flash), power switch, sync port, USB port, and power input.
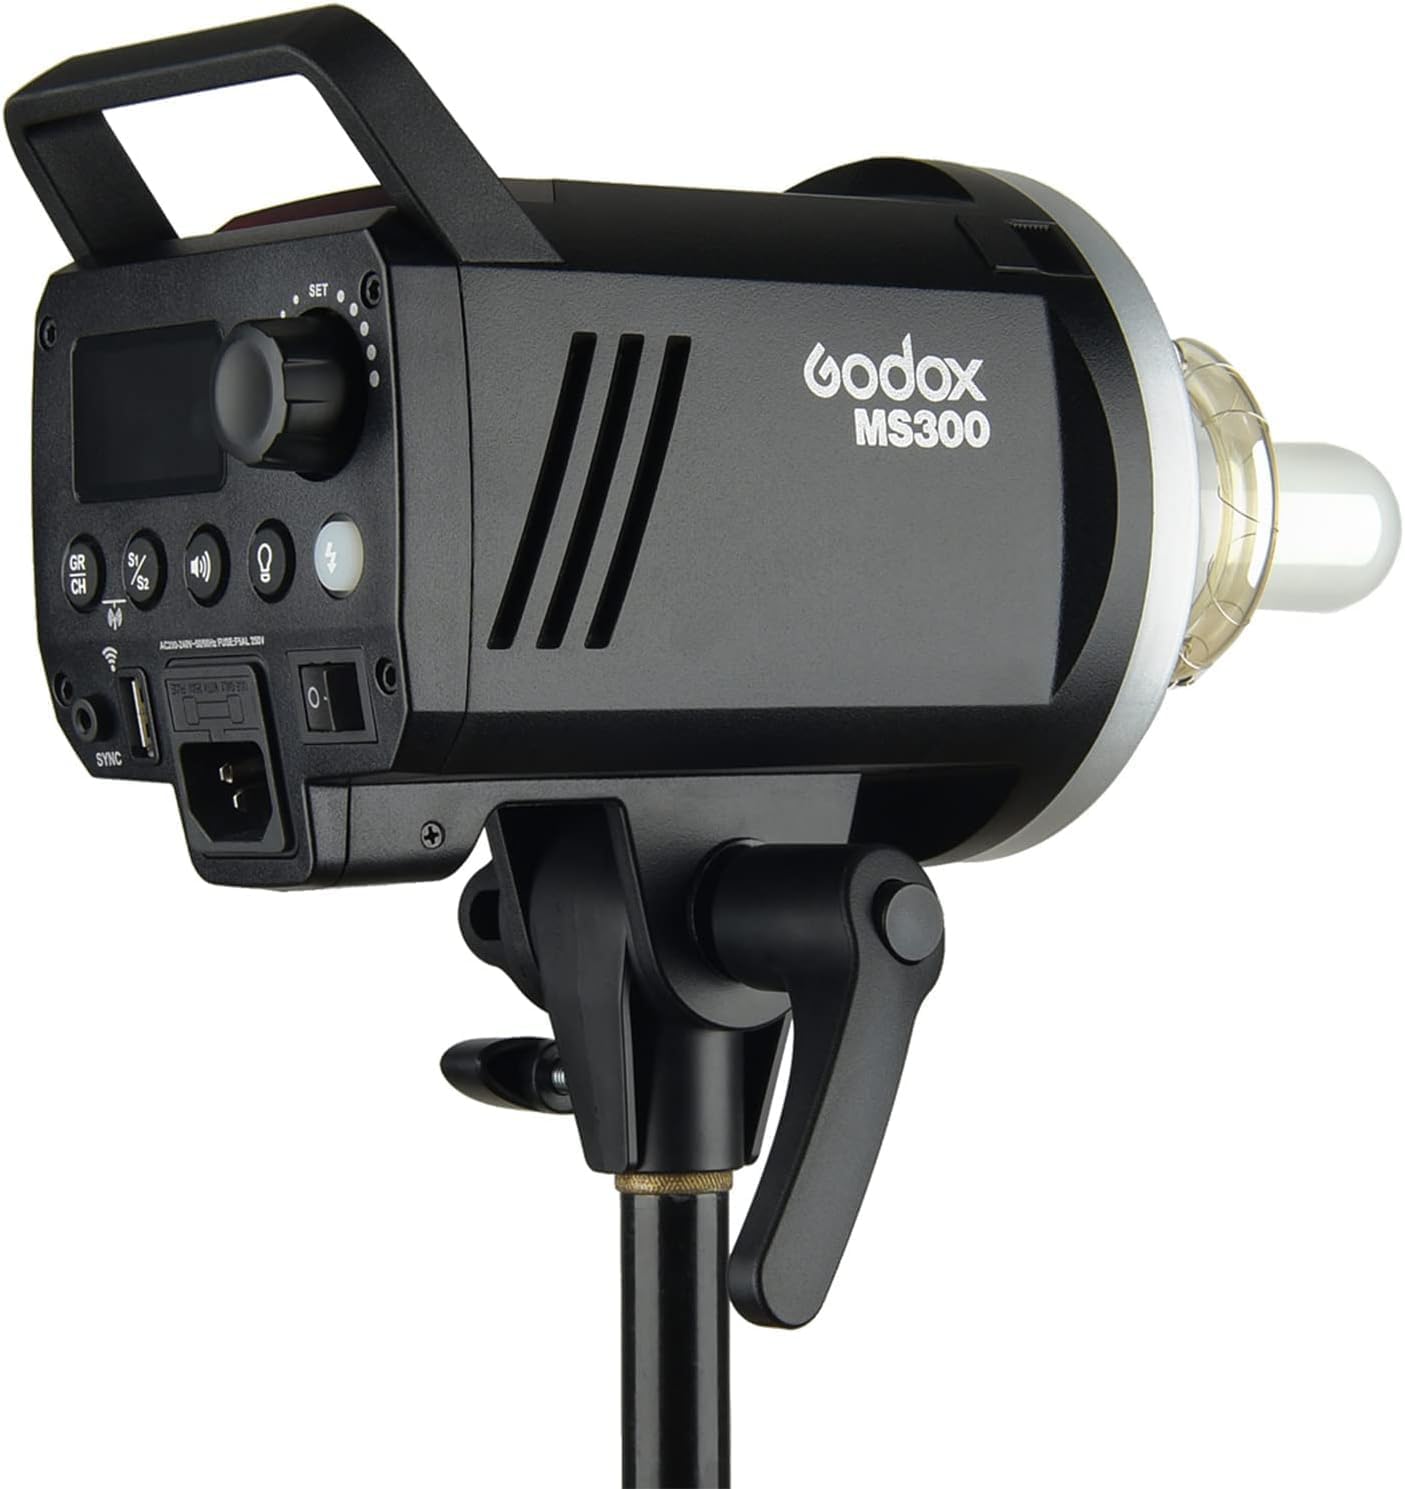
Figure 3: Close-up view of the flash tube and modeling lamp assembly on the front of the MS300 monolight, ready for a Bowens mount accessory.
Setup
- Mounting the Strobe: Attach the MS300 to a sturdy light stand using the integrated mounting bracket. Tighten the locking knob securely to prevent movement.
- Installing the Modeling Lamp: Carefully insert the modeling lamp into its socket on the front of the strobe. Ensure it is seated firmly.
- Attaching the Lamp Cover: Place the protective lamp cover over the flash tube and modeling lamp when the unit is not in use or during transport.
- Connecting Power: Connect the power supply cord to the power input on the rear panel of the strobe, then plug it into a suitable 110V AC outlet.
- Attaching Light Modifiers (Optional): The MS300 features a Bowens mount. To attach a reflector, softbox, or other modifier, align the modifier's mount with the strobe's mount, insert, and twist clockwise until it locks into place. Ensure it is securely fastened.

Figure 4: The Godox MS300 monolight with a standard Bowens mount reflector attached, ready for use.
Operation
- Power On/Off: Flip the power switch on the rear panel to turn the unit on or off.
- Adjusting Flash Power: Use the control dial on the rear panel to adjust the flash output from 1/1 (full power) to 1/32 in 50 precise steps. The current power setting will be displayed on the LCD screen.
- Modeling Lamp Control: Press the modeling lamp button to cycle through different modes: On, Off, or Proportional (brightness adjusts with flash power). The 150W modeling lamp's brightness can be adjusted from 5% to 100%.
- Test Flash: Press the test flash button to manually fire the strobe and check the light output.
- Wireless X System: The MS300 features a built-in 2.4 GHz Godox Wireless X System. Use compatible Godox wireless triggers (e.g., X1, XT16, XPro, X2) to wirelessly control the strobe's power, modeling light, and triggering. The system supports 32 radio channels and 16 groups. Refer to your wireless trigger's manual for specific pairing and operation instructions.
- Group and Channel Selection: Press the GR/CH button to select the desired group and channel for wireless communication. Ensure these settings match your wireless trigger.
- S1/S2 Optical Slave Modes: Press the S1/S2 button to activate optical slave modes.
- S1 Mode: The strobe will fire in response to a single flash from another strobe.
- S2 Mode (Anti-Preflash): The strobe will ignore the pre-flash from a camera's built-in flash and fire on the main flash. This function provides synchronization with cameras capable of firing a preflash.
- Sound Prompt: Press the sound button to enable or disable the audible beep that indicates when the strobe is recycled and ready to fire.
- Memory Function: The flash can remember the current parameter after 3 seconds when the setting is finished. Operation data will be restored to the original data once restarted.
Maintenance
- Cleaning: Use a soft, dry cloth to clean the exterior of the strobe. For stubborn marks, a slightly damp cloth can be used, followed by immediate drying. Do not use harsh chemicals or abrasive cleaners.
- Flash Tube and Modeling Lamp: Handle these components with care. Avoid touching the glass directly to prevent oil residue, which can shorten their lifespan. Replace them if they become damaged or cease to function.
- Storage: Store the strobe in a cool, dry place, away from direct sunlight and excessive humidity. Always attach the lamp cover during storage and transport.
- Ventilation: Regularly check that the ventilation openings are clear of dust and debris.
Troubleshooting
| Problem | Possible Cause | Solution |
|---|---|---|
| Strobe does not power on. | No power connection; faulty power cord; unit malfunction. | Check power cord connection and outlet. Try a different power cord. If problem persists, contact support. |
| Flash does not fire. | Trigger not connected/paired; incorrect channel/group; flash tube faulty; unit in sleep mode. | Ensure trigger is properly connected/paired. Verify channel and group settings. Press test button. If problem persists, contact support. |
| Modeling lamp not working. | Lamp burnt out; lamp not properly installed. | Check if lamp is securely installed. Replace modeling lamp if burnt out. |
| Overheating warning. | Insufficient ventilation; excessive rapid firing. | Ensure clear ventilation. Allow unit to cool down. Reduce firing frequency. |
Specifications
- Model: MS300
- Flash Output: 300Ws
- Guide Number (GN): 58 (m ISO 100)
- Color Temperature: 5600K ± 200K
- Operating Voltage: 110V/60Hz
- Power Adjustment: 1/1 to 1/32 (50 steps)
- Recycling Time: 0.1 to 1.8 seconds
- Flash Duration: 1/2000 to 1/800 second
- Modeling Lamp: 150W, adjustable 5% to 100%
- Wireless System: Built-in Godox 2.4G Wireless X System
- Channels/Groups: 32 Channels, 16 Groups
- Sync Modes: S1/S2 Optical Slave, Sync Cord, Wireless Trigger
- Mount: Bowens Mount
- Dimensions: 11.81 x 4.72 x 5.12 inches
- Weight: 5.07 pounds
Warranty and Support
This product is covered by a limited warranty against defects in materials and workmanship. For specific warranty terms, please refer to the warranty card included with your purchase or contact Godox customer support. For technical assistance or service inquiries, please visit the official Godox website or contact your authorized dealer.


