1. Introduction
This instruction manual provides detailed guidance for assembling your Model Expo MS1457CBT 18th Century Longboat Starter Kit. This kit features true plank-on-frame construction, allowing you to build a historically accurate, highly detailed wood and metal model at a 1:48 scale. The finished model will have a length of 11-3/4 inches and a height of 10 inches. Careful attention to these instructions will ensure a successful and rewarding building experience.

Image 1.1: A fully assembled Model Expo 18th Century Longboat, showcasing its detailed wooden hull, mast, and rigging, mounted on a display stand.
2. Safety Precautions
Always prioritize safety during the assembly process. This kit includes various tools and materials that require careful handling.
- Sharp Tools: Exercise extreme caution when using knives, files, and drills. Always cut away from your body and keep fingers clear of blades.
- Adhesives and Paints: Use glues and paints in a well-ventilated area. Avoid prolonged inhalation of fumes. Refer to the specific product labels for additional safety information.
- Small Parts: This kit contains small parts that could be a choking hazard. Keep them out of reach of small children and pets.
- Eye Protection: Consider wearing safety glasses to protect your eyes from small flying debris or chemical splashes.
3. Kit Contents
Before beginning assembly, verify that all components listed below are present in your kit. If any parts are missing or damaged, please refer to the warranty and support section.
3.1. Materials
- Laser-cut basswood parts for hull and structural components.
- Assorted wood strips and dowels for planking, mast, and spars.
- Metal fittings and decorative elements.
- Rigging thread.
- Acrylic paint set.
- Adhesive.
3.2. Tools Included
The starter kit includes a selection of essential tools to aid in the assembly process:
- Hobby knife with assorted blades.
- Pin vise with drill bits.
- Small files.
- Tweezers.
- Small pliers.
- Paintbrushes.
- Sanding paper.
- Small clamps.

Image 3.1: An array of tools provided in the kit, including a hobby knife, drill bits, files, tweezers, pliers, paintbrushes, sandpaper, and small clamps.
4. Setup and Preparation
Proper preparation is crucial for a smooth building experience.
4.1. Workspace
Set up a clean, well-lit, and organized workspace. Protect your work surface with a cutting mat or scrap material. Ensure good ventilation, especially when using adhesives and paints.
4.2. Reviewing Instructions and Plans
Familiarize yourself with the entire 20-page color instruction book and full-size plans before starting. Understanding the overall assembly sequence will prevent errors and simplify the process.
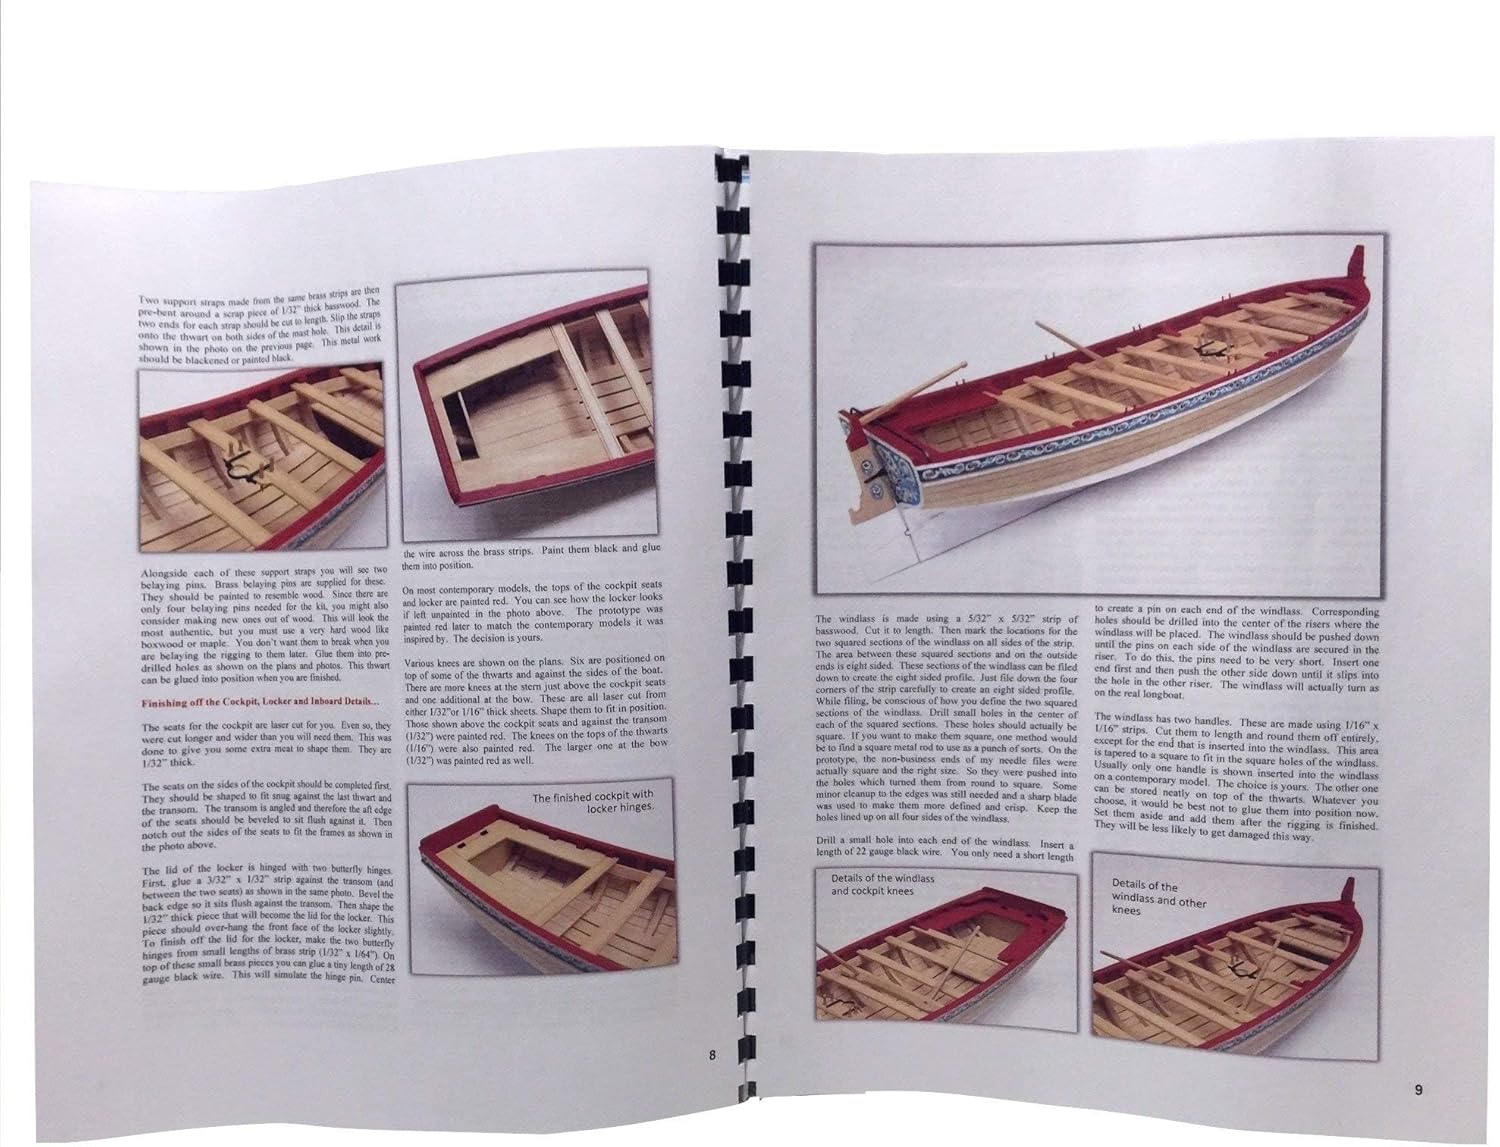
Image 4.1: Pages from the instruction manual, showing detailed diagrams and text for various assembly steps of the longboat model.
5. Assembly Instructions
Follow these steps carefully. Refer to the included plans and instruction book for detailed diagrams and specific part identification.
5.1. Hull Construction (Plank-on-Frame)
- Keel and Bulkheads: Begin by assembling the main keel and attaching the laser-cut bulkheads. Ensure they are square and securely glued. Allow sufficient drying time.
- Planking: Carefully bend and attach the basswood planks to the bulkheads, starting from the keel and working upwards. Use clamps to hold planks in place while the glue dries. Trim excess planking as needed.
- Sanding the Hull: Once all planks are securely attached and dry, sand the hull smooth to prepare for painting and finishing.
5.2. Decking and Interior Details
- Deck Installation: Fit and glue the deck pieces onto the hull structure.
- Interior Components: Assemble and install interior details such as thwarts (benches), floorboards, and any other internal structures as indicated in the plans.
5.3. Mast and Spars
- Shaping: Shape the wooden dowels for the mast and spars according to the plans.
- Installation: Securely mount the mast into its designated position on the deck. Attach the spars.
5.4. Rigging
- Standing Rigging: Attach the standing rigging (fixed lines) to support the mast and spars.
- Running Rigging: Install the running rigging (movable lines) that would control sails (though sails are not included in this specific kit, the rigging structure is present).
- Tensioning: Ensure all rigging is taut but not overly stressed, following the diagrams for correct lead and attachment points.
5.5. Finishing Details
- Rudder: Assemble and attach the rudder.
- Decorative Elements: Add any remaining metal fittings or decorative pieces to complete the model.
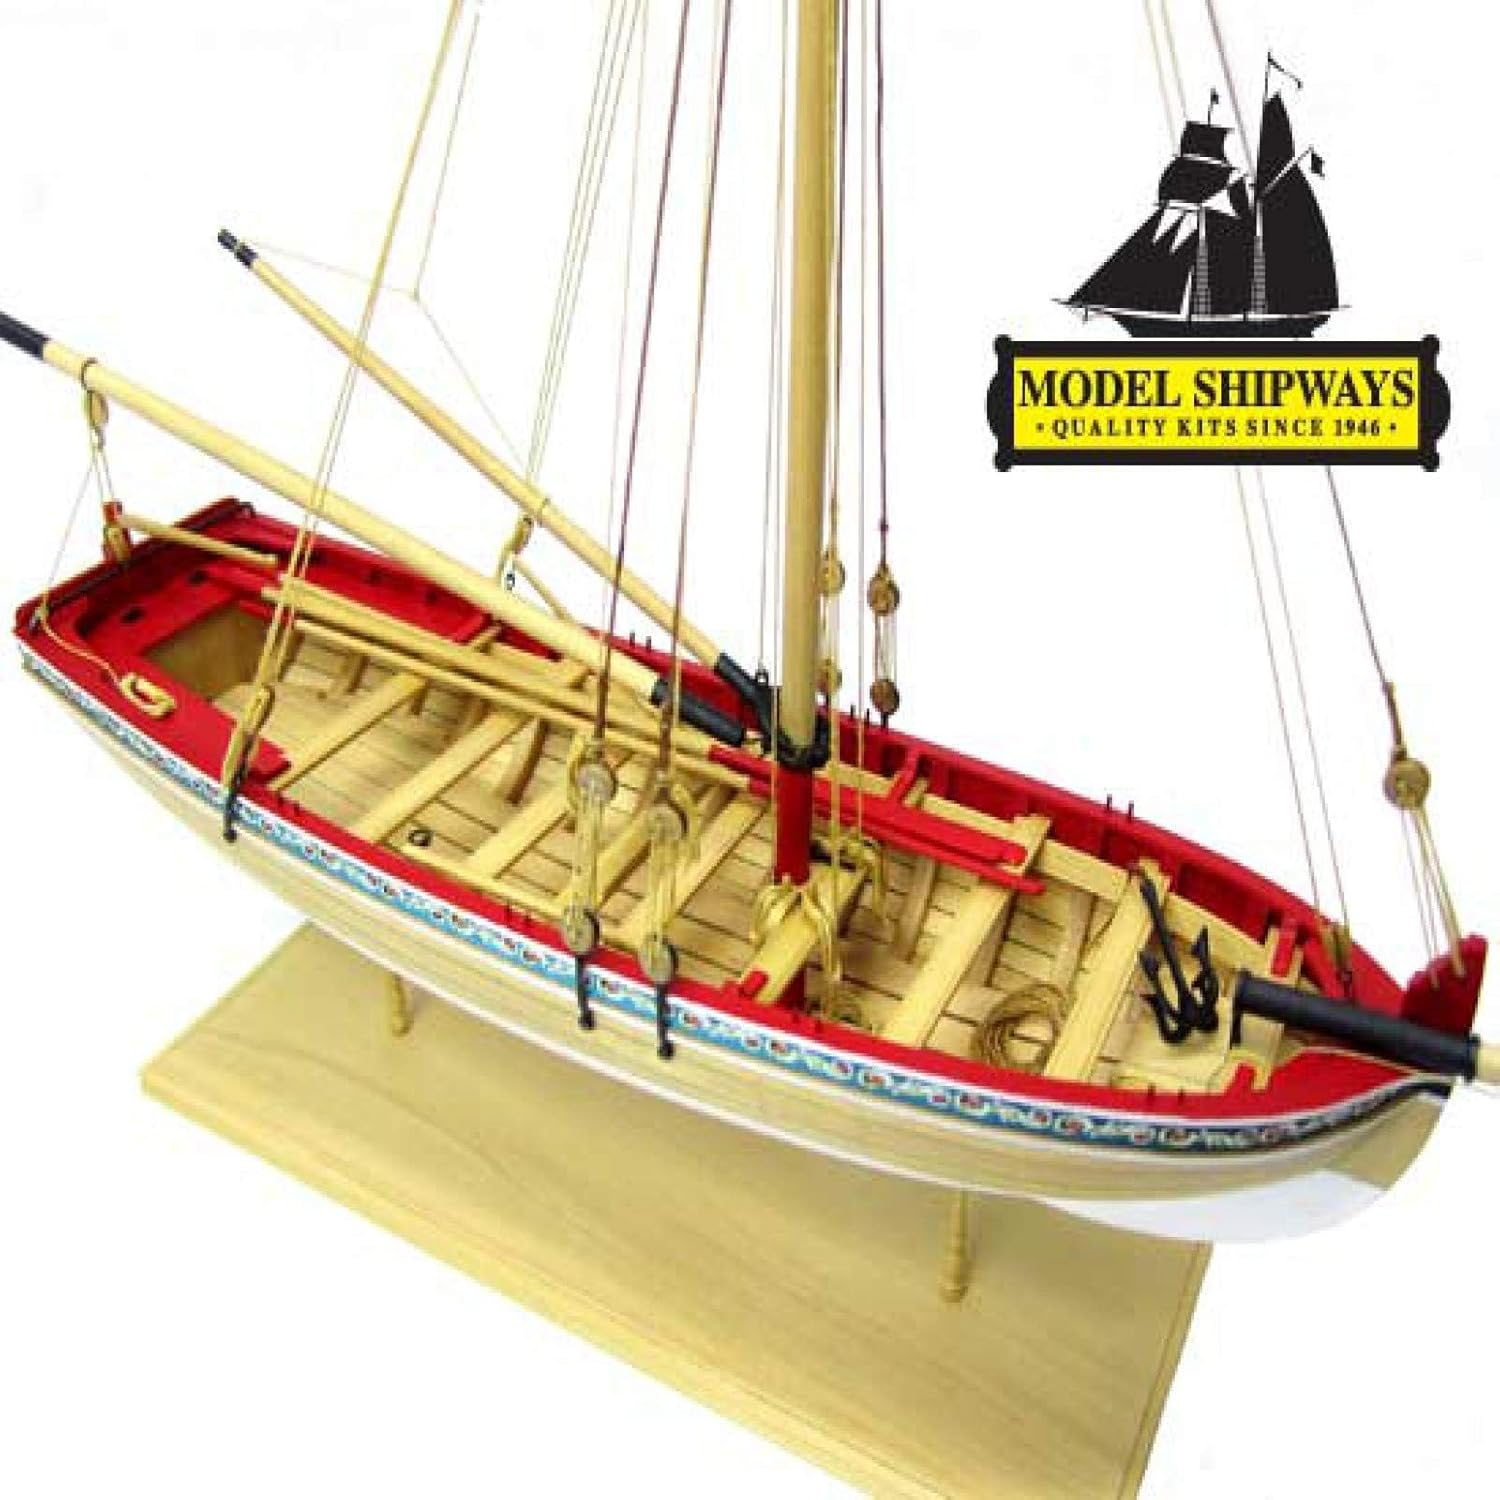
Image 5.1: A detailed view of the longboat's deck, highlighting the wooden thwarts, mast base, and the initial stages of rigging.
6. Painting and Finishing
The kit includes acrylic paints to add color and realism to your model. Refer to historical references or the kit box art for color scheme suggestions.
- Preparation: Ensure all surfaces are clean, dry, and smooth before painting.
- Application: Apply thin, even coats of paint. Multiple thin coats are preferable to one thick coat. Allow each coat to dry completely before applying the next.
- Detailing: Use fine brushes for intricate details and decorative elements.
- Protective Coat (Optional): A clear matte or satin varnish can be applied after painting to protect the finish and provide a uniform sheen.

Image 6.1: A side profile of the finished longboat model, displaying the painted hull, intricate stern decoration, and the detailed rigging.
7. Maintenance and Display
To preserve the appearance of your finished model, follow these maintenance guidelines:
- Dusting: Regularly dust the model with a soft, dry brush or a can of compressed air to prevent dust buildup in intricate areas.
- Handling: Handle the model carefully, grasping it by the hull or base rather than delicate rigging or small parts.
- Display Environment: Display your model in a stable location away from direct sunlight, extreme temperatures, and high humidity, which can cause wood to warp or paint to fade. A display case can offer additional protection.
8. Troubleshooting Common Issues
Here are solutions to some common challenges encountered during model building:
- Parts Not Fitting: If a part does not fit perfectly, gently sand or file the edges until it slides into place. Avoid forcing parts, as this can cause damage.
- Glue Issues: If glue is visible or parts detach, allow the glue to fully cure, then carefully re-glue. For excess glue, a hobby knife or fine sandpaper can be used once dry.
- Rigging Difficulties: Rigging requires patience. Use tweezers to handle small lines and apply minimal tension. If a line frays, trim it and re-thread.
- Warped Wood: Minor warping can sometimes be corrected by gently clamping the wood in the desired shape and applying moisture, then allowing it to dry slowly. For significant warping, contact support for replacement parts.
9. Product Specifications
| Model Number | MS1457CBT |
| Scale | 1:48 (1/4" = 1 ft.) |
| Finished Length | 11-3/4 inches |
| Finished Height | 10 inches |
| Material | Wood (Basswood), Metal |
| Construction Type | Plank-on-Frame |
| Included Components | Laser-cut basswood parts, necessary tools, paint, wood & metal materials, full-size plans, 20-page color instruction book |
| Manufacturer | Model Expo |
10. Warranty and Support
Model Expo stands by the quality of its products. We offer a Lifetime Guarantee on all our kits.
- Free Replacement Parts: If a part ever gets missing or damaged during your build, we will replace it for free.
- Contact Support: For assistance with assembly, missing parts, or any other inquiries, please visit the Model Expo Store on Amazon or refer to the contact information provided in your kit packaging.
11. Video Resources
Enhance your building experience with official product videos:
Video 11.1: An official video from Model Expo showcasing the completed 18th Century Longboat model, providing various angles and close-ups of its detailed construction and rigging. This video offers a visual reference for the final appearance of your model.