Introduction
This manual provides essential information for the installation, operation, and maintenance of your RUIX OV403 ATX Mid-Tower PC Case. Please read these instructions carefully before proceeding with assembly to ensure proper functionality and longevity of your system.

Image: The RUIX OV403 ATX Mid-Tower PC Case, showcasing its transparent design and pre-installed ARGB fans.
Key Features
- Pre-Installed Fans: Equipped with 4 high-performance 120mm ARGB PWM prism gaming fans for optimal cooling and customizable lighting.
- Panoramic Tempered Glass: Features tempered glass panels on the front, sides, and top, providing a clear view of internal components. A support structure ensures the top glass panel's integrity.
- Spacious Interior: Designed for high-capacity builds, supporting GPUs up to 420mm in length, two 3.5-inch hard drives, and one 2.5-inch hard drive.
- Modern Connectivity: Includes high-speed USB 3.0 and Type-C ports on the exterior for broad device compatibility.
- Built-in GPU Support Bracket: Prevents GPU sag and enhances system aesthetics.
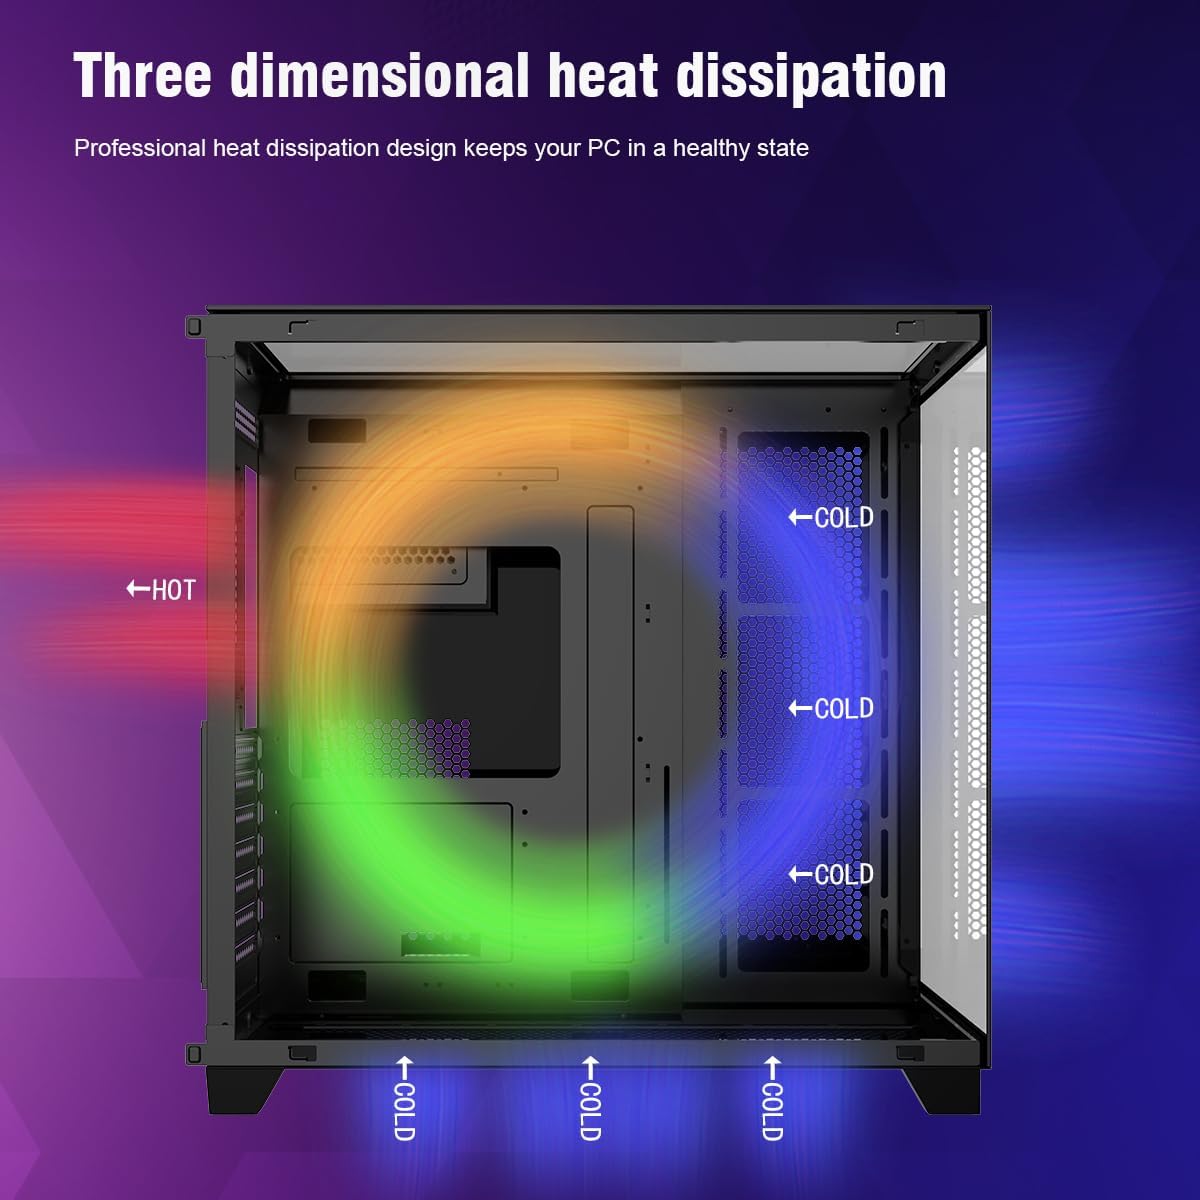
Image: An internal view of the RUIX OV403 case, highlighting the spacious layout and pre-installed fans.
Setup
1. Unpacking and Inspection
- Carefully remove the PC case from its packaging.
- Inspect the case for any signs of damage during transit.
- Remove all tempered glass panels by gently lifting and detaching them. Refer to the 'Upgraded Design' image for panel removal guidance.

Image: An exploded diagram illustrating the removable tempered glass panels and dust filters for easy access and maintenance.
2. Motherboard Installation
- Install the necessary standoffs for your motherboard form factor (ATX, M-ATX, ITX).
- Carefully place your motherboard into the case, aligning it with the standoffs and I/O shield.
- Secure the motherboard with screws.
3. Component Installation
- Install your CPU cooler (air or liquid AIO). The case supports up to 360mm liquid radiators.
- Install your graphics card into the PCIe slot. Utilize the built-in GPU support bracket to prevent sag.
- Mount your storage drives (2.5-inch SSDs and 3.5-inch HDDs) in the designated bays.
- Install the power supply unit (PSU) in its dedicated compartment.
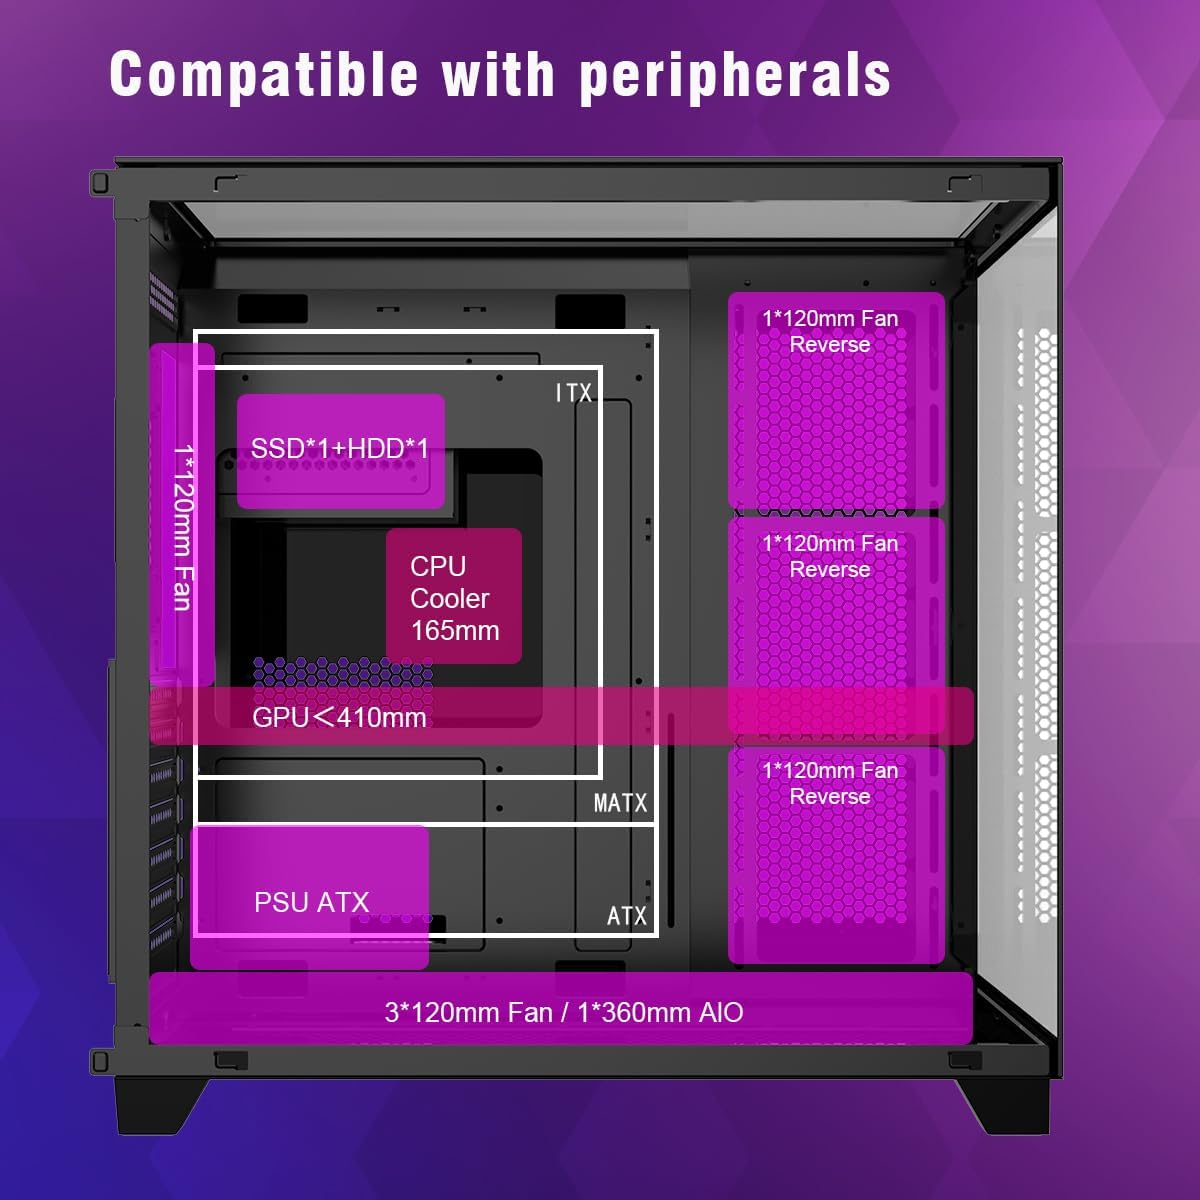
Image: A visual guide to component compatibility, including GPU length, CPU cooler height, and drive bay locations.
4. Cable Management
- Route all power and data cables through the designated cutouts and tie-down points behind the motherboard tray.
- Connect the front panel cables (USB 3.0, Type-C, audio, power, reset, LED) to your motherboard.
Operation
1. Power On/Off
- Ensure all components are securely installed and cables are connected.
- Connect the power cable to your PSU and a wall outlet.
- Press the power button on the top panel of the case to turn on your system.
2. ARGB Fan Control
- The pre-installed ARGB fans can be controlled via your motherboard's RGB software (if compatible) or a dedicated RGB controller (if included or purchased separately).
- Refer to your motherboard manual for specific RGB software instructions.
3. Front Panel Ports
- The top panel features USB 3.0 and Type-C ports for high-speed data transfer and device connectivity.
- Audio jacks are also available for headphones and microphones.

Image: Detailed view of the front I/O panel, showing USB 3.0, Type-C, HD Audio, Reset, and Power buttons.
Maintenance
1. Cleaning
- Regularly clean the exterior of the case with a soft, damp cloth. Avoid abrasive cleaners.
- For internal cleaning, power off and unplug the PC. Use compressed air to remove dust from fans and components.
2. Dust Filter Maintenance
- The case features magnetic dust filters for easy removal and cleaning.
- Gently remove the dust filters from the top and bottom of the case.
- Clean the filters with water and mild soap, or use compressed air. Ensure they are completely dry before reattaching.
Troubleshooting
- No Power: Check all power connections, including the PSU, motherboard 24-pin, and CPU power cables. Ensure the PSU switch is in the 'ON' position.
- Fans Not Spinning/RGB Not Working: Verify that all fan and RGB cables are correctly connected to the motherboard or controller. Check your motherboard's BIOS/UEFI settings or RGB software for fan speed and lighting control.
- No Display: Ensure your graphics card is properly seated in its PCIe slot and all power cables are connected. Check that your monitor cable is securely connected to the graphics card.
- USB/Audio Ports Not Working: Confirm that the front panel USB and audio headers are correctly connected to your motherboard.
Specifications
| Feature | Detail |
|---|---|
| Brand | RUIX |
| Model Name | OV403 |
| Case Type | Mid Tower |
| Motherboard Compatibility | ATX |
| Pre-Installed Fans | 4 x 120mm ARGB PWM Prism Fans |
| GPU Length Support | Up to 420mm |
| CPU Cooler Height | Up to 165mm |
| Radiator Support | Up to 360mm |
| Drive Bays | 2 x 3.5-inch HDD, 1 x 2.5-inch SSD |
| Front I/O Ports | USB 3.0 (x2), Type-C (x1), HD Audio |
| Dimensions (LxWxH) | 16.8 x 11 x 16.3 inches |
| Material | Plastic, Stainless Steel, Tempered Glass |
| Color | Black |
Related Product Videos (from RUIX Gaming)
Video: Ruix OV603 PC Case. This video showcases features of a similar RUIX PC case model, providing insight into the brand's design and functionality.
Video: OV502 Computer Case. Another video from RUIX Gaming demonstrating features of a related PC case model.
Warranty and Support
The RUIX OV403 ATX Mid-Tower PC Case is covered by a manufacturer's warranty. For specific warranty terms, duration, and to register your product, please refer to the warranty card included with your purchase or visit the official RUIX website.
For technical support, troubleshooting assistance, or inquiries regarding your RUIX product, please contact RUIX customer service through their official website or the contact information provided in your product packaging.
You can visit the RUIX Store for more information: RUIX Store on Amazon