1. Product Overview
This manual provides detailed instructions for the installation, operation, and maintenance of your AmeriLite LED Replacement Tail Lights. These lights are designed to enhance the rear visibility and aesthetic of your vehicle.
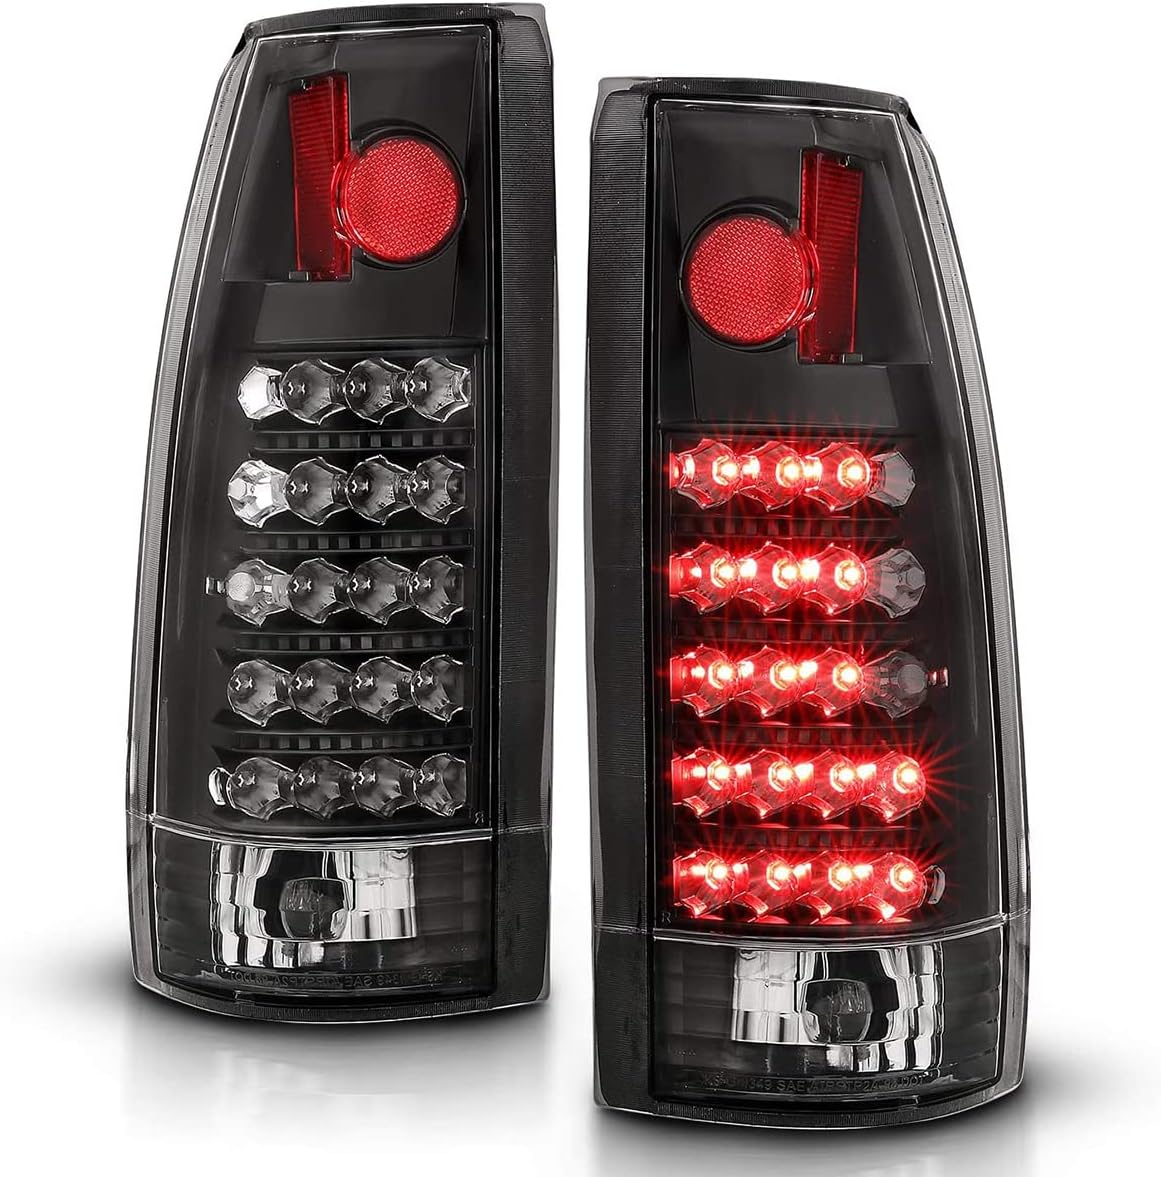
Figure 1: AmeriLite LED Tail Lights (Pair)
The image displays a pair of AmeriLite LED tail lights with black housing and clear lenses. The right light shows illuminated red LEDs for brake/running/turn signals, while the left light shows clear reverse light sections.
Key Features:
- LED Illumination: Provides bright and efficient lighting for running, brake, and turn signal functions.
- Durable Construction: Manufactured with premium materials for longevity.
- Direct OEM Replacement: Designed for straightforward installation without modifications.
- DOT & SAE Compliant: Meets or exceeds U.S. and Canadian safety standards.
2. Vehicle Compatibility
These AmeriLite LED Tail Lights are specifically designed for the following vehicle models:
- 1988-1999 Chevy GMC C/K Fullsize Pickup Trucks
- 1992-1994 Chevy Blazer (Full Size Models)
- 1992-1999 GMC Yukon / Chevy Suburban
- 1994-1999 Chevy Tahoe
- 1999-2000 Cadillac Escalade
Important Note: These tail lights are designed for old body (classic) models only. They are not compatible with stepside bed models or 1999-2000 new body models.

Figure 2: Compatibility Guide
This image illustrates the specific Chevrolet, GMC, and Cadillac models and years compatible with these tail lights, explicitly stating exclusions for stepside and new body models.
3. Safety Information
Always prioritize safety during installation and operation. Failure to follow safety guidelines may result in injury or damage to your vehicle.
- Ensure the vehicle's ignition is off and the battery is disconnected before beginning any electrical work.
- Wear appropriate personal protective equipment, including safety glasses and gloves.
- If you are unsure about any step of the installation process, consult a qualified automotive technician.
- Verify all connections are secure and properly insulated to prevent short circuits.
- Test all lighting functions (running lights, brake lights, turn signals, reverse lights) before driving.
4. Package Contents
Upon opening the package, verify that all components are present and undamaged:
- 1x Driver Side LED Tail Light Assembly
- 1x Passenger Side LED Tail Light Assembly
- 1x 3157 Clear Bulb (for reverse light function)
- Turn Signal Resistor (pre-installed or included for hyper-flash prevention)

Figure 3: Tail Light Components
This image highlights the key components of the tail light assembly: the red safety reflector, the running/brake/turn signal section, the reverse light section, the black housing, and the crystal clear lens. It also shows the included 3157 clear bulb for the reverse function.
5. Installation Instructions
Follow these steps for proper installation of your new AmeriLite LED Tail Lights. This is a direct OEM replacement, requiring no modification to your vehicle's existing structure.
- Prepare the Vehicle: Park your vehicle on a level surface, engage the parking brake, and turn off the ignition. For safety, disconnect the negative terminal of your vehicle's battery.
- Access Existing Tail Lights: Open the tailgate or access panel to reach the mounting screws or bolts of the original tail light assembly. Remove these fasteners.
- Remove Old Tail Light: Carefully pull the old tail light assembly away from the vehicle. It may be held in place by clips or alignment pins.
- Disconnect Wiring: Disconnect the electrical connectors from the old tail light bulbs and housing. Note the orientation of the wiring.
- Install Reverse Bulb: Insert the provided 3157 clear bulb into the reverse light socket of the new AmeriLite LED tail light assembly.
- Connect New Tail Light: Connect the main electrical connector of the new AmeriLite LED tail light assembly to your vehicle's wiring harness. Ensure a secure connection. If a separate turn signal resistor is provided, connect it as per the included resistor instructions to prevent hyper-flashing.
- Position New Tail Light: Carefully align the new tail light assembly with the mounting points on your vehicle. Push it firmly into place until it sits flush.
- Secure New Tail Light: Reinstall the mounting screws or bolts that were removed in Step 2. Do not overtighten.
- Repeat for Other Side: Follow steps 2-8 for the other side of the vehicle.
- Reconnect Battery and Test: Reconnect the negative terminal of your vehicle's battery. Turn on your vehicle's ignition and test all lighting functions: running lights, brake lights, turn signals (left and right), and reverse lights. Ensure all lights illuminate correctly and there is no hyper-flashing for turn signals.

Figure 4: Rear View and Wiring
This image shows the rear of the tail light assembly, detailing the mounting tab, the turn signal resistor, and the main electrical connector with its associated wiring. This provides a visual guide for connecting the new tail light to the vehicle's harness.
6. Operating Instructions
Once installed, your AmeriLite LED Tail Lights operate automatically with your vehicle's existing lighting system.
- Running Lights: Activate when your vehicle's headlights or parking lights are turned on.
- Brake Lights: Illuminate brightly when the brake pedal is pressed.
- Turn Signals: Flash when the turn signal lever is engaged (left or right).
- Reverse Lights: Illuminate when the vehicle is shifted into reverse gear.

Figure 5: Illuminated Tail Lights
The image shows both the driver and passenger side AmeriLite LED tail lights fully illuminated, demonstrating the bright red LED output for brake/running/turn signal functions.
7. Maintenance
AmeriLite LED Tail Lights require minimal maintenance to ensure optimal performance and longevity.
- Cleaning: Clean the lens surfaces regularly with a soft cloth and mild automotive soap. Avoid abrasive cleaners or harsh chemicals that could damage the lens material.
- Inspection: Periodically inspect the tail light assemblies for any signs of damage, cracks, or loose connections.
- Bulb Replacement: The LED components are designed for long life and are not user-replaceable. The 3157 reverse bulb can be replaced if it burns out. Refer to your vehicle's service manual for specific instructions on accessing and replacing the reverse bulb.
8. Troubleshooting
If you encounter issues with your AmeriLite LED Tail Lights, refer to the following troubleshooting guide:
| Problem | Possible Cause | Solution |
|---|---|---|
| Lights not illuminating | Loose electrical connection, blown fuse, incorrect wiring. | Check all wiring connections for security. Inspect vehicle's fuse box for blown fuses related to tail lights. Verify wiring matches vehicle's harness. |
| Turn signals flash too quickly (hyper-flashing) | LED lights draw less power than incandescent bulbs, causing the vehicle's flasher relay to interpret it as a burnt-out bulb. | Ensure the turn signal resistor is correctly installed. If not, install one according to its instructions. Some vehicles may require an LED-compatible flasher relay. |
| Reverse light not working | Burnt-out 3157 bulb, loose connection to reverse bulb socket. | Check the 3157 reverse bulb and replace if necessary. Ensure the bulb is seated correctly in its socket. |
| Moisture inside the lens | Condensation due to temperature changes, improper seal. | Small amounts of condensation are normal and should dissipate. If excessive or persistent, check for proper sealing around the housing and mounting points. Ensure vent holes (if present) are not blocked. |
9. Specifications
| Feature | Detail |
|---|---|
| Brand | AmeriLite |
| Model Number | 03-CF8898LEDJM |
| Color | Clear Black Housing |
| Specific Uses | Tail Lights (Running, Brake, Turn Signal, Reverse) |
| Lens Material | Polycarbonate |
| Wattage | 3.5 watts (LEDs) |
| Safety Rating | DOT Compliant, SAE Compliant |
| Dimensions (L x W x H) | Approximately 16.9 x 16.6 x 4.9 inches |
| Item Weight | Approximately 5.48 pounds |

Figure 6: DOT Marking
This close-up image shows the "DOT" marking on the tail light lens, indicating compliance with Department of Transportation safety standards.
10. Warranty and Support
AmeriLite products are manufactured with strict quality control standards. For warranty information, technical support, or assistance with your product, please contact AmeriLite directly through their official website or the retailer where the product was purchased.
You can visit the AmeriLite Store for more information: AmeriLite Store on Amazon