1. Introduction
This manual provides detailed instructions for the installation, operation, and maintenance of your new AmeriLite replacement headlights. These headlights are designed to enhance visibility and the aesthetic of your vehicle. Please read this manual thoroughly before beginning installation or operation to ensure proper function and safety.

Figure 1.1: AmeriLite Headlights for Jeep Grand Cherokee (illuminated view).
2. Product Compatibility
These AmeriLite headlights are specifically designed for the following vehicle models:
- Make: Jeep
- Model: Grand Cherokee
- Years: 2014, 2015, 2016
- Type: SUV, Halogen Headlight Type
Important Note: These headlights are NOT compatible with vehicles originally equipped with Factory HID (High-Intensity Discharge) headlight systems. Please verify your vehicle's original headlight type before installation. Factory HID headlights typically have a different housing shape and bulb type.

Figure 2.1: Vehicle compatibility comparison. Top image shows a compatible halogen headlight type. Bottom image shows an incompatible factory HID headlight type.
3. Package Contents
Upon opening the package, please ensure all the following items are present and undamaged:
- 1x Driver Side Headlight Assembly (Black Housing)
- 1x Passenger Side Headlight Assembly (Black Housing)
- 1x High Beam Halogen Bulb (9005 type)
- 1x Low Beam Halogen Bulb (H11 type)

Figure 3.1: Headlight components and included bulbs.
4. Key Features
These AmeriLite headlights offer the following features:
- LED Bar/Daytime Running Light: Integrated high-intensity LED light bar for modern styling and improved daytime visibility.
- LED Turn Signal: Bright LED turn signals for clear indication.
- Projector Low Beam: Provides a focused and precise light output for the low beam, enhancing night driving visibility.
- DOT & SAE Compliant: Meets or exceeds all U.S. and Canadian safety standards for automotive lighting.
- Durable Construction: Made with premium materials and designed to be waterproof for long-lasting performance.
- Direct OEM Replacement: Engineered for a precise fit, requiring no modification for installation.

Figure 4.1: High Intensity LED Bar and Turn Signal.
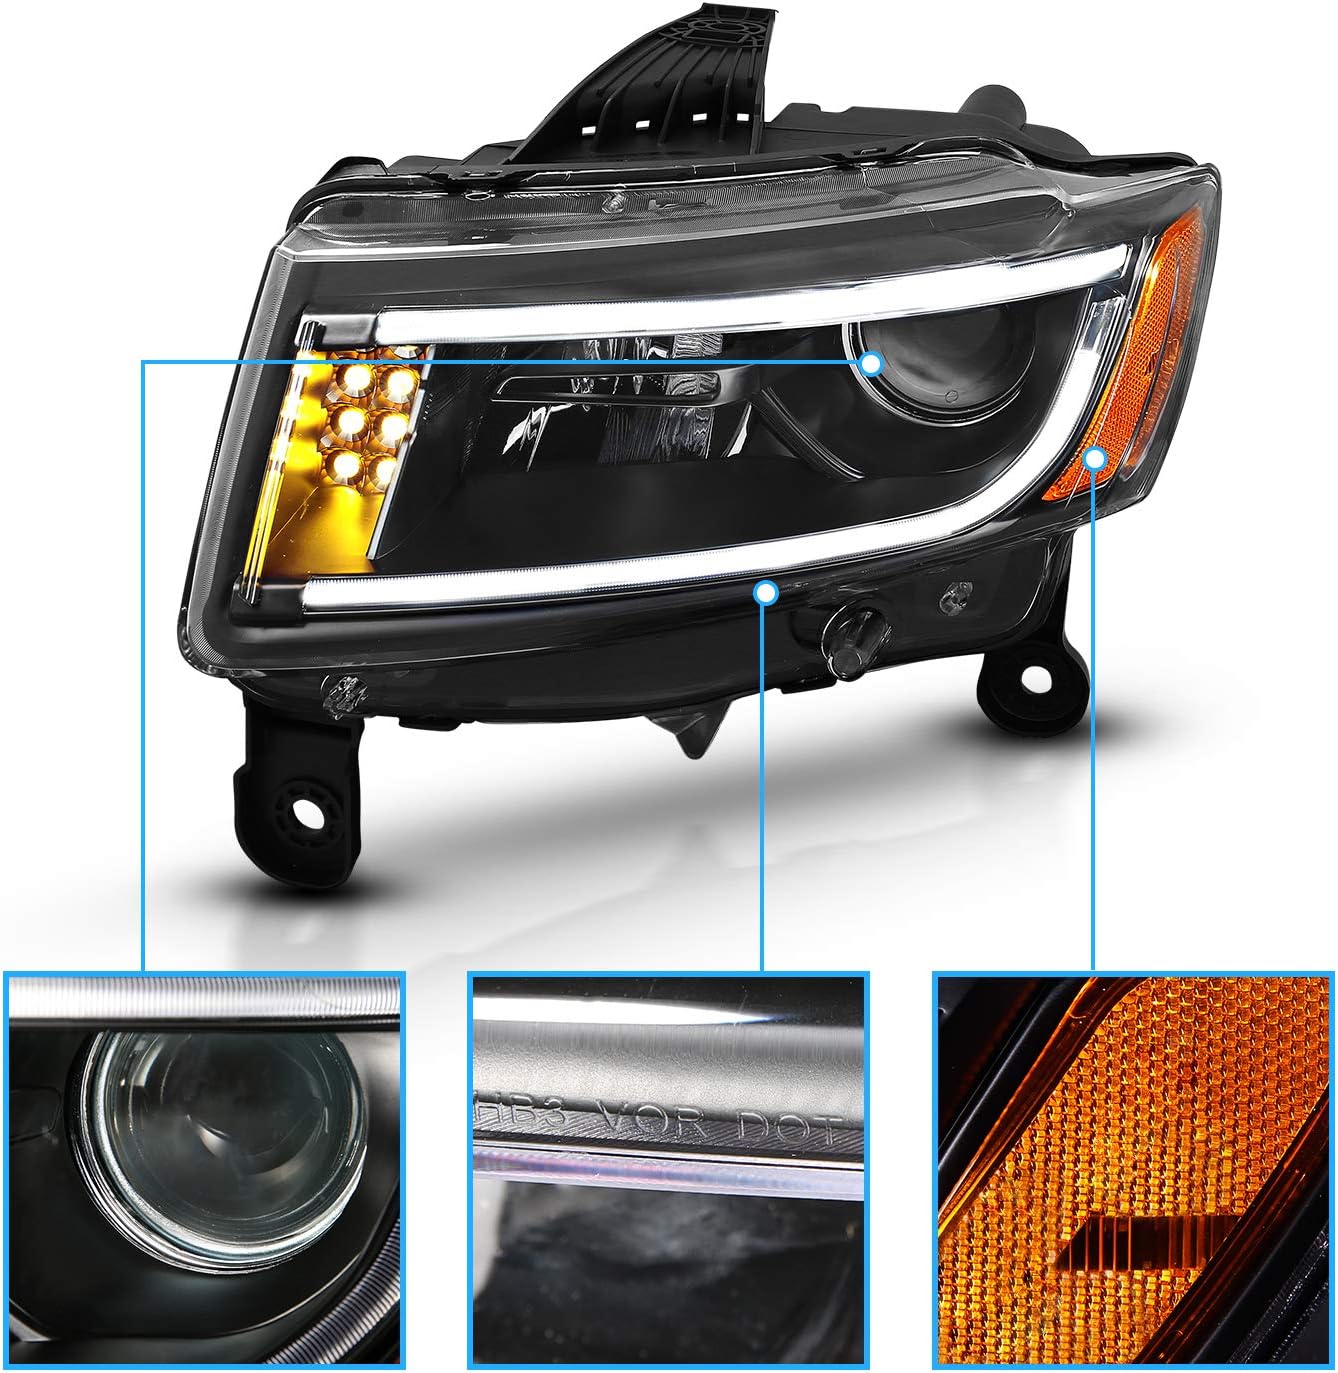
Figure 4.2: Projector Lens and Compliance Markings.
5. Installation Instructions
Professional installation is recommended. If you choose to install these headlights yourself, please follow these general steps. Specific vehicle disassembly instructions may vary and can often be found in your vehicle's service manual or online resources.
Required Tools:
- Socket wrench set (typically 10mm socket)
- Extension for socket wrench
- Plastic clip removal tool
- Flathead screwdriver (for prying clips)
Installation Steps:
- Safety First: Ensure the vehicle is turned off, the parking brake is engaged, and the battery is disconnected to prevent electrical shorts.
- Access Headlights: The front bumper typically needs to be partially or fully removed to access the headlight mounting bolts. This usually involves removing several plastic clips and bolts located under the bumper, in the wheel wells, and along the top edge under the hood.
- Remove Old Headlights: Once the bumper provides access, locate and remove the bolts securing the original headlight assemblies. Carefully disconnect all electrical connectors from the back of the old headlights.
- Prepare New Headlights: Install the provided 9005 high beam and H11 low beam halogen bulbs into the new AmeriLite headlight assemblies if they are not pre-installed. Ensure connections are secure.
- Connect New Headlights: Connect the electrical harnesses from your vehicle to the corresponding ports on the back of the new AmeriLite headlights. Ensure all connections are firm and correctly seated.
- Mount New Headlights: Carefully position the new headlight assemblies into their respective openings. Secure them with the original mounting bolts. Do not overtighten.
- Test Functionality: Before reassembling the bumper, reconnect the vehicle battery. Turn on the vehicle and test all headlight functions: low beams, high beams, turn signals, and LED running lights. Verify proper operation and alignment.
- Reassemble: If all functions are correct, proceed to reattach the front bumper and all removed clips and bolts.
- Final Adjustment: Perform a final headlight aim adjustment if necessary, following your vehicle's manufacturer guidelines or local regulations.

Figure 5.1: Rear view of headlight showing electrical connections.
6. Operation
The operation of these headlights integrates with your vehicle's existing lighting controls. Use your vehicle's headlight switch to control the low beams, high beams, and turn signals. The integrated LED bar typically functions as a daytime running light (DRL) or parking light, activating automatically with the vehicle's ignition or parking light setting, depending on your vehicle's wiring configuration.
7. Maintenance
To ensure the longevity and optimal performance of your AmeriLite headlights, follow these maintenance guidelines:
- Cleaning: Clean the headlight lenses regularly with a soft cloth and mild automotive soap or glass cleaner. Avoid abrasive cleaners or harsh chemicals that can damage the lens surface.
- Bulb Replacement: The high beam (9005) and low beam (H11) halogen bulbs are replaceable. If a bulb burns out, replace it with a new bulb of the same type and wattage. Refer to your vehicle's service manual for specific bulb replacement procedures, as access may require partial disassembly.
- Inspection: Periodically inspect the headlight assemblies for any signs of damage, cracks, or moisture intrusion. Ensure all electrical connections remain secure.
8. Troubleshooting
If you encounter issues with your headlights, consider the following troubleshooting steps:
| Problem | Possible Cause | Solution |
|---|---|---|
| Headlight not working | Blown fuse, loose connection, faulty bulb | Check vehicle fuses, inspect all electrical connections, replace bulb. |
| LED bar not illuminating | Loose connection, wiring issue, vehicle setting | Verify wiring harness connections. Check vehicle's DRL or parking light settings. |
| Condensation inside lens | Temperature changes, minor seal issue | Small amounts of condensation are normal and should dissipate. If excessive or persistent, check seals and ensure proper installation. Contact support if issue persists. |
| Improper light aim | Incorrect adjustment during installation | Adjust headlight aim using the adjustment screws on the assembly. Refer to vehicle manual for proper aiming procedure. |
9. Specifications
| Feature | Detail |
|---|---|
| Model Number | 02-AZ-JGC14-PBC-P-A |
| Vehicle Compatibility | 2014-2016 Jeep Grand Cherokee SUV (Halogen Type) |
| Housing Color | Black |
| Lens Color | Clear |
| Light Source Type | Halogen (for main beams), LED (for DRL/Turn Signal) |
| Low Beam Bulb Type | H11 Halogen |
| High Beam Bulb Type | 9005 Halogen |
| Voltage | 12 Volts (DC) |
| Special Features | Waterproof, Projector Lens, LED Bar, LED Turn Signal |
| Certifications | DOT & SAE Compliant |
10. Warranty and Support
AmeriLite stands behind the quality of its products. These headlights come with:
- 30-Day Money Back Guarantee: If you are not satisfied with your purchase, you may return it within 30 days for a refund.
- 90-Day Limited Warranty: Covers manufacturing defects for 90 days from the date of purchase.
For warranty claims, technical support, or any questions regarding your AmeriLite headlights, please contact AmeriLite customer service through the retailer where the product was purchased or visit the official AmeriLite website for contact information.