1. Introduction
Thank you for purchasing the WANGLX ST T200 Mini Portable Projector. This manual provides detailed instructions on how to set up, operate, and maintain your projector to ensure optimal performance and longevity. Please read this manual thoroughly before using the product and keep it for future reference.
Key features of your T200 projector include:
- Compact and Portable Design: Elegant appearance, easy to carry and store.
- Enhanced Cooling System: Features a new cooling system for quieter operation.
- Immersive Viewing Experience: Supports 1080P Full HD with 320x240P native resolution, offering a projection size from 15 to 100 inches.
- Multiple Connectivity Options: Equipped with HDMI, USB, DC, AV, and TF Card interfaces for broad device compatibility.
- Integrated Speaker: Built-in speakers provide audio, with an option to connect external speakers for enhanced sound.
2. Product Overview
2.1 Package Contents
Please check the package for the following items:
- 1 x T200 Mini Portable Projector
- 1 x Remote Control
- 1 x Power Cord
- 1 x Instruction Manual
2.2 Projector Components and Interfaces

Image: Front view of the T200 Mini Portable Projector, showcasing its compact design, lens, and control panel.

Image: Diagram illustrating the various input and output ports on the T200 projector, including TF card slot, 5V-2A input, USB input, AV input, Headphone output, DC input, and HDMI input. The remote control is also shown.
- TF Card Slot: For inserting a TF (Micro SD) memory card.
- 5V-2A Input: Power input for certain accessories or charging.
- USB Input: For connecting USB flash drives or other USB devices.
- AV Input: For connecting devices using an AV cable (e.g., older DVD players).
- Headphone Output: For connecting external headphones or speakers.
- DC Input: Main power input for the projector.
- HDMI Input: For connecting devices via HDMI cable (e.g., laptops, gaming consoles).

Image: Close-up of the projector's top panel, highlighting the touch-sensitive control buttons: Indicator light, Power switch, Select/OK, Menu, Aisle, and Return.
- Power Switch: Turns the projector on/off.
- Indicator Light: Shows the power status.
- Select / OK Buttons: For navigation and selection.
- Menu Button: Accesses the projector's settings menu.
- Aisle Button: (Function may vary, typically for source selection or specific menu navigation).
- Return Button: Goes back to the previous screen or menu.
3. Setup
3.1 Powering On
- Connect the power cord to the DC input port on the projector.
- Plug the other end of the power cord into a power outlet.
- Press the Power Switch button on the projector or the remote control to turn on the device. The indicator light will illuminate.
3.2 Connecting Devices
The T200 projector supports various input sources:
- HDMI: Connect your laptop, gaming console, or streaming device using an HDMI cable.
- USB: Insert a USB flash drive to play media files directly.
- AV: Use the AV cable to connect older devices like DVD players.
- TF Card: Insert a TF (Micro SD) card to access media files.
After connecting a device, use the 'Input' button on the remote control or the 'Aisle' button on the projector's control panel to select the correct input source.
3.3 Projection Adjustment

Image: A visual guide demonstrating the relationship between projection distance and screen size, showing how the T200 projector can achieve screen sizes from 15 inches (60cm distance) up to 100 inches (400cm distance).
- Focus Adjustment: Rotate the focus ring near the lens to achieve a clear image.
- Projection Distance: Adjust the distance between the projector and the screen to change the image size. The optimal projection distance is between 1.0 and 4.0 meters, yielding an image size from 15 to 100 inches.
- Keystone Correction: The projector features keystone correction to adjust for distorted images when the projector is not perfectly perpendicular to the screen. Refer to the on-screen menu for this adjustment.
4. Operating Instructions
4.1 Basic Operation
- Navigation: Use the arrow buttons on the projector or remote control to navigate through menus.
- Selection: Press the 'OK' button to confirm selections.
- Menu Access: Press the 'Menu' button to access system settings, picture settings, sound settings, etc.
4.2 Remote Control Usage
The included remote control provides convenient access to all projector functions. Ensure the remote control has working batteries and is pointed towards the projector's IR receiver.
4.3 Multimedia Playback
When playing media from USB or TF card, navigate to the respective media type (e.g., Video, Photo, Music) in the projector's interface and select your desired file. The projector supports various common media formats.

Image: An illustration depicting the built-in speaker of the T200 projector, emphasizing its sound capabilities.
The projector has a built-in speaker. For a more immersive audio experience, you can connect external speakers or headphones to the 3.5mm headphone output port.
5. Maintenance
5.1 Cleaning
- Lens: Use a soft, lint-free cloth specifically designed for optical lenses to gently wipe the projector lens. Do not use abrasive cleaners.
- Casing: Wipe the projector's casing with a soft, dry cloth. For stubborn dirt, a slightly damp cloth can be used, but ensure no liquid enters the device.
5.2 Storage
When not in use for extended periods, store the projector in a cool, dry place, away from direct sunlight and excessive dust. It is recommended to use the original packaging or a protective case.
5.3 Heat Dissipation
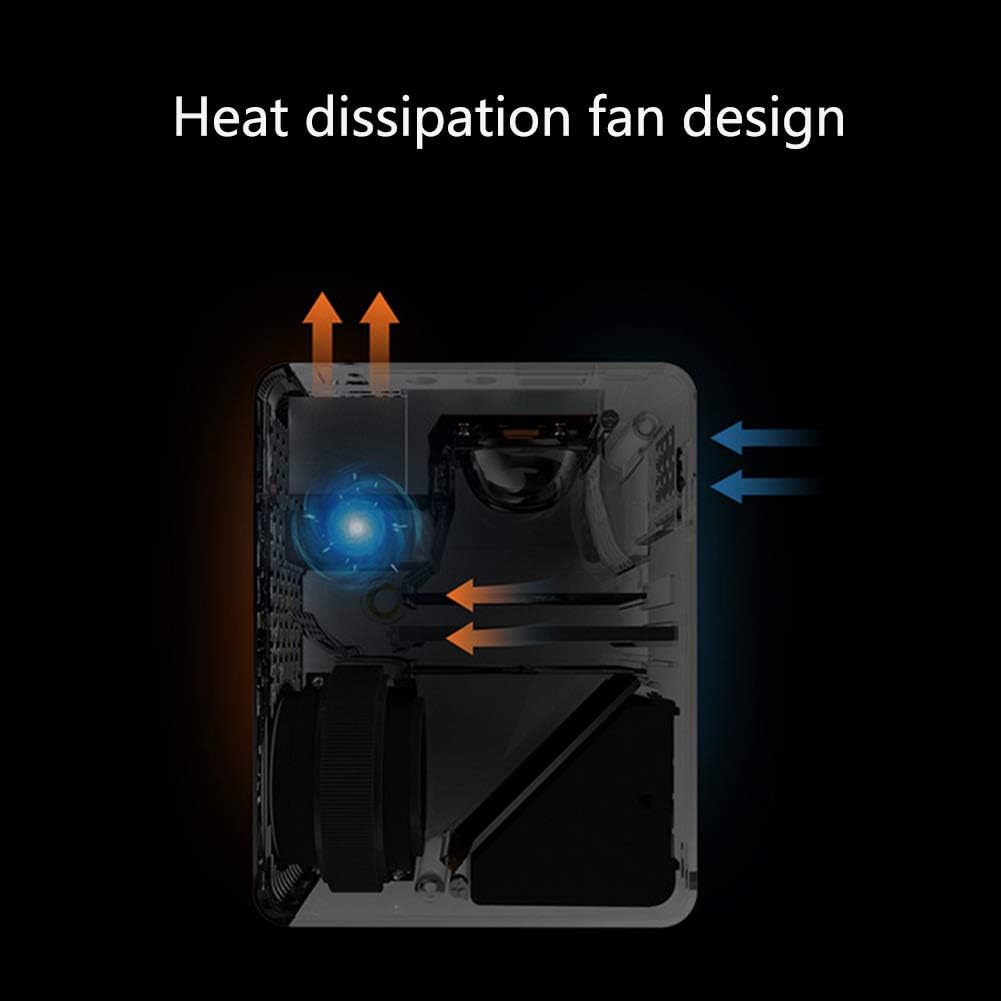
Image: A cutaway diagram illustrating the internal heat dissipation fan design of the T200 projector, showing airflow for cooling.
The projector features an efficient cooling system. To ensure proper heat dissipation and prevent overheating, do not block the ventilation openings on the projector. Allow sufficient space around the projector for airflow.
6. Troubleshooting
If you encounter issues with your projector, please refer to the following common problems and solutions:
| Problem | Possible Cause | Solution |
|---|---|---|
| No Power | Power cord not connected; Power outlet issue; Projector off. | Ensure power cord is securely connected. Test power outlet. Press power button. |
| No Image | Incorrect input source; Loose cable connection; Lens cap on. | Select correct input source. Check cable connections. Remove lens cap. |
| Blurry Image | Out of focus; Incorrect projection distance. | Adjust focus ring. Adjust projector distance to screen. |
| No Sound | Volume too low; Muted; External speakers not connected properly; Dolby audio. | Increase volume. Unmute. Check external speaker connection. Note: Does not support Dolby version movies. |
| Remote Control Not Working | Dead batteries; Obstruction; Not pointed at IR receiver. | Replace batteries. Remove obstructions. Point remote directly at projector. |
7. Specifications
| Feature | Specification |
|---|---|
| Display Type | DLP |
| Native Resolution | 320 x 240 Pixels |
| Brightness | 500 ANSI |
| Contrast Ratio | 400:1 |
| Throw Ratio | 1.2:1 |
| Projection Distance | 1.0 - 4.0 meters |
| Image Size | 15-100 inches |
| Aspect Ratio | 16:9, 4:3 |
| Interfaces | HDMI, USB, DC, AV, TF Card |
| Lamp Type | LED |
| Lamp Power | 20W |
| Power Supply | 110 - 240V / 50 - 60Hz |
| Built-in Speaker | Yes |
| Noise Level | 30dB |
| Control Method | Touch button, Remote control |
| Product Weight | 0.28 kg (280 g) |
| Product Dimensions | 106 x 83 x 48 mm |
| Color | Black |
8. Warranty and Support
WANGLX ST is committed to providing quality products and thoughtful customer service. For any product-related issues, questions, or support needs, please do not hesitate to contact our customer service team. We are ready to offer you a satisfactory solution at any time.
Please refer to your purchase documentation or the seller's information for specific warranty terms and contact details.


