1. Product Overview
The Godspeed Traction-S Performance Lowering Springs are engineered to enhance your vehicle's handling and aesthetic appeal. These springs are cold wound from high-quality SAE 9254 spring wire material, which undergoes specific heat treatments to ensure exceptional tensile strength and consistent spring rates. This meticulous manufacturing process prevents premature sagging and guarantees long-term durability.
Designed to work effectively with OEM shocks, these springs provide a noticeable drop in ride height while maintaining a comfortable daily driving experience. The precision testing and inspection of each spring ensure optimal handling, improved steering response, and enhanced cornering capabilities, contributing to a balanced suspension system.

Image 1.1: Godspeed Traction-S Performance Lowering Springs, shown in their retail packaging alongside the four individual springs.
Key Features:
- Compatible with Kia Stinger (CK) 2018-2021 All Models.
- Average Drop (Front/Rear): 1.2 inches / 1.3 inches.
- Spring Rate (Front/Rear): 4.25 kg/mm / 6.58-10.22 kg/mm.
- Enhances on-road vehicle performance, providing quicker turn-in, enhanced steering response, and improved cornering.
- Constructed from Multi Heat Treated SAE 9254 Wire, cold wound to prevent sag over time.
- Powder coat finished for corrosion protection.
- Engineered to ensure against rattling, clunking, or rubbing.
2. Safety Information
WARNING: Professional installation is highly recommended for this product. Improper installation can lead to serious injury, vehicle damage, or loss of vehicle control.
Always adhere to the following safety guidelines when working on your vehicle's suspension:
- Wear appropriate personal protective equipment (PPE), including safety glasses, gloves, and closed-toe shoes.
- Ensure the vehicle is securely supported on a level surface using jack stands. Never rely solely on a jack.
- Disconnect the vehicle's battery before beginning any electrical work or if there is a risk of accidental activation of vehicle systems.
- Use proper tools for the job. Do not use damaged or incorrect tools.
- Be aware of potential hazards such as compressed springs, hot engine components, and sharp edges.
- Consult your vehicle's service manual for specific torque specifications and procedures.
- Keep children and pets away from the work area.
Proposition 65 Warning:
This product may contain chemicals known to the State of California to cause cancer, birth defects, or other reproductive harm. Wash hands after handling.
3. Package Contents
Upon opening the product packaging, please verify that all components are present and undamaged. The package should contain:
- Four (4) Godspeed Traction-S Performance Lowering Springs (two front, two rear).

Image 3.1: The complete set of four Godspeed Traction-S Performance Lowering Springs.
4. Setup and Installation
Installation of lowering springs requires specialized tools and knowledge of automotive suspension systems. It is strongly recommended that this installation be performed by a certified professional mechanic.
The general procedure for installing lowering springs involves:
- Prepare the Vehicle: Park the vehicle on a flat, level surface. Engage the parking brake. Loosen the lug nuts on the wheels.
- Lift and Secure: Safely lift the vehicle using a hydraulic jack and place it securely on jack stands at all four corners. Ensure the vehicle is stable before proceeding. Remove the wheels.
- Disassemble Suspension: Depending on the vehicle's suspension design (MacPherson strut, double wishbone, etc.), carefully disconnect necessary components such as sway bar links, brake lines, ABS sensors, and control arms to allow the strut/shock assembly to be removed.
- Spring Removal: Using a spring compressor tool, carefully compress the original spring on the strut/shock assembly. Once compressed, remove the top hat nut and disassemble the strut/shock. Remove the OEM spring.
- Install New Spring: Place the Godspeed lowering spring onto the strut/shock. Use the spring compressor to compress the new spring sufficiently to reattach the top hat and secure the top nut. Ensure the spring is correctly seated in its perches.
- Reassemble Suspension: Reinstall the strut/shock assembly into the vehicle. Reconnect all previously disconnected components, ensuring all bolts are tightened to the manufacturer's specified torque settings.
- Repeat for All Wheels: Follow the same procedure for the remaining three wheels.
- Final Checks: Once all springs are installed and components are reassembled, lower the vehicle slowly. Torque the lug nuts to specification.
- Wheel Alignment: After installing lowering springs, a professional wheel alignment is absolutely critical. Lowering the vehicle changes suspension geometry, and an alignment will correct camber, caster, and toe settings to prevent premature tire wear and ensure proper handling.

Image 4.1: A single Godspeed Traction-S Performance Lowering Spring, highlighting its construction and finish.
5. Operating Characteristics
After installing Godspeed Traction-S Performance Lowering Springs, you will experience a noticeable change in your vehicle's driving dynamics. These springs are designed to:
- Improved Handling: Expect reduced body roll during cornering and more direct steering response due to the lower center of gravity and increased spring rates.
- Enhanced Aesthetics: The vehicle's stance will be lowered, providing a more aggressive and sporty appearance.
- Ride Comfort: While performance-oriented, these springs are engineered to maintain a comfortable ride for daily driving, avoiding excessive harshness.
It is important to drive cautiously after installation, especially until you become accustomed to the new handling characteristics. Be mindful of speed bumps, potholes, and steep driveways, as the reduced ground clearance may require adjustments to your driving habits.
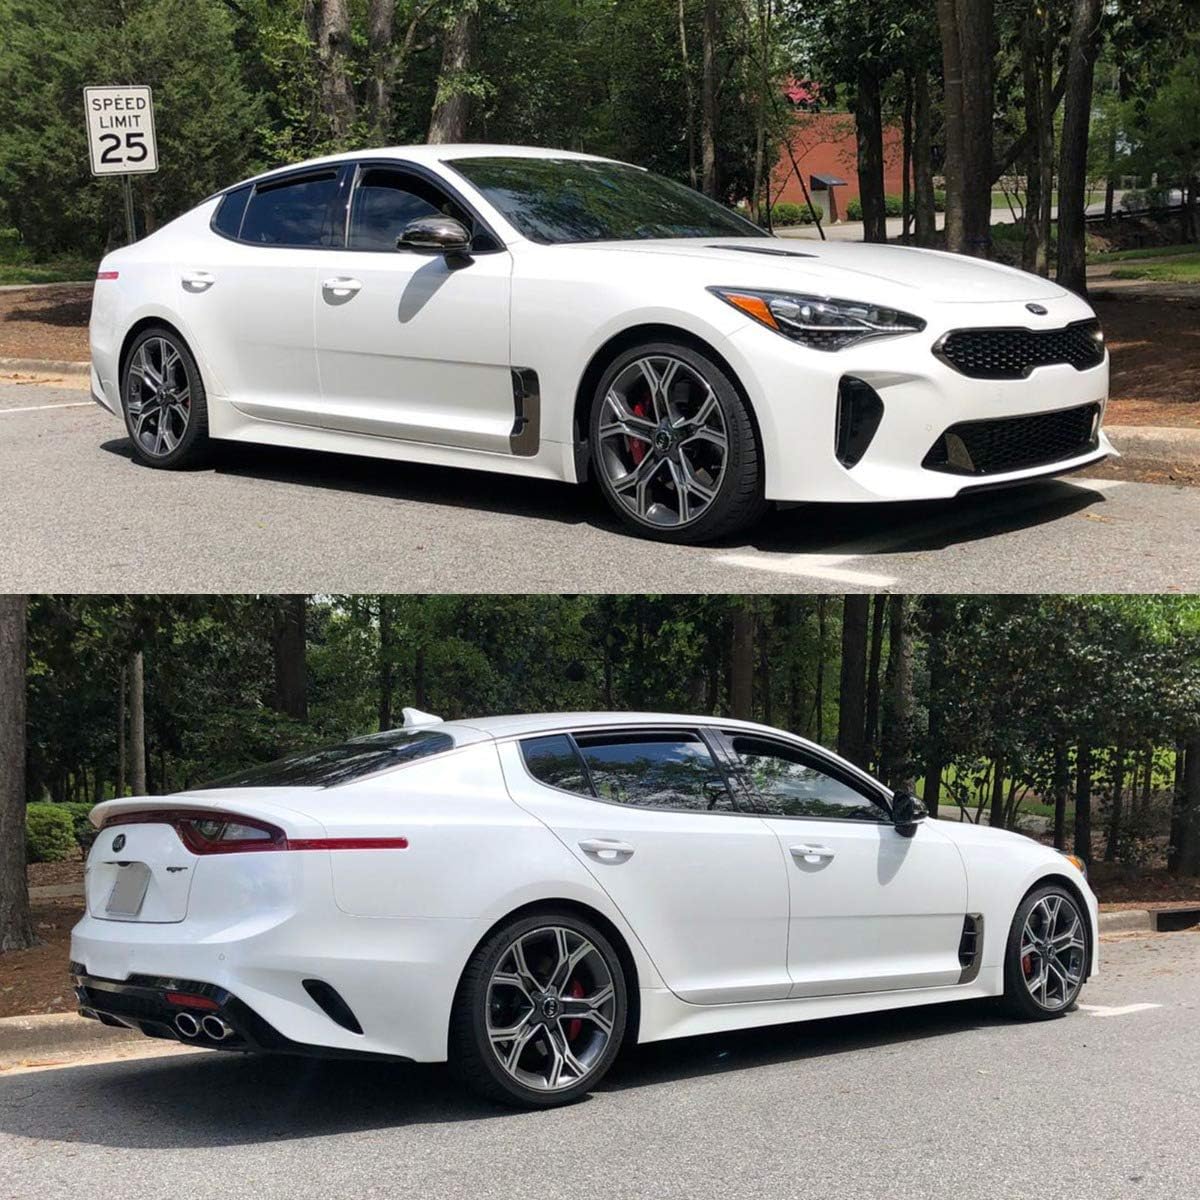
Image 5.1: A Kia Stinger showcasing the lowered stance achieved with Godspeed Traction-S Performance Lowering Springs (side view).

Image 5.2: A Kia Stinger showcasing the lowered stance achieved with Godspeed Traction-S Performance Lowering Springs (front three-quarter view).
6. Maintenance
Godspeed Traction-S Performance Lowering Springs are designed for durability and require minimal maintenance. However, regular inspection of your vehicle's suspension components is recommended as part of your routine vehicle maintenance schedule.
- Visual Inspection: Periodically inspect the springs for any signs of damage, corrosion, or cracking. Check the powder coat finish for integrity.
- Component Check: Ensure all bolts and nuts related to the suspension system remain tight. Check for any signs of wear on bushings, ball joints, and tie rod ends, as these components may experience increased stress with a lowered suspension.
- Alignment Check: It is advisable to have your wheel alignment checked periodically, especially if you notice uneven tire wear or changes in handling.
- Cleaning: Keep the springs clean from excessive dirt and road salt, which can accelerate corrosion.
7. Troubleshooting
If you encounter any issues after installing your Godspeed lowering springs, consider the following common troubleshooting steps:
| Symptom | Possible Cause | Solution |
|---|---|---|
| Uneven Ride Height | Incorrect spring installation; spring not fully seated; damaged spring. | Re-check installation to ensure springs are correctly oriented and seated. Inspect springs for damage. Professional inspection recommended. |
| Clunking/Rattling Noises | Loose suspension components; incorrect reassembly; spring not properly seated. | Verify all bolts are tightened to specification. Ensure spring is seated correctly. Check for clearance issues with other components. |
| Excessive Harshness/Bounciness | Worn OEM shocks/struts; incorrect spring rate for application (unlikely for specified model); improper alignment. | Consider upgrading to aftermarket performance shocks/struts designed for lowered vehicles. Get a professional alignment. |
| Premature Tire Wear | Incorrect wheel alignment (camber, toe). | Immediately get a professional four-wheel alignment. |
If troubleshooting steps do not resolve the issue, or if you are unsure about any aspect of the installation or performance, please consult a qualified automotive technician.
8. Specifications
| Attribute | Detail |
|---|---|
| Model Number | LS-TS-KA-0007 |
| Compatible Vehicle | Kia Stinger (CK) 2018, 2019, 2020, 2021 All Models |
| Average Drop (Front) | 1.2 inches |
| Average Drop (Rear) | 1.3 inches |
| Spring Rate (Front) | 4.25 kg/mm |
| Spring Rate (Rear) | 6.58-10.22 kg/mm |
| Material | SAE 9254 Spring Wire |
| Finish | Powder Coat |
| Item Weight | Approximately 35 pounds (total package) |
| Manufacturer | Godspeed Project |

Image 8.1: Detail of a Godspeed Traction-S Performance Lowering Spring, illustrating the coil design.
9. Warranty and Support
Godspeed Traction-S Performance Lowering Springs come with a Lifetime Limited Warranty on material defect and craftsmanship. This warranty covers defects in materials and workmanship under normal use and service.
For warranty claims, technical support, or any questions regarding your Godspeed product, please contact Godspeed Project directly through their official website or customer service channels. Please have your product model number (LS-TS-KA-0007) and proof of purchase available when contacting support.
For more information, visit the official Godspeed Project website or refer to the warranty documentation included with your purchase.