1. Introduction and Overview
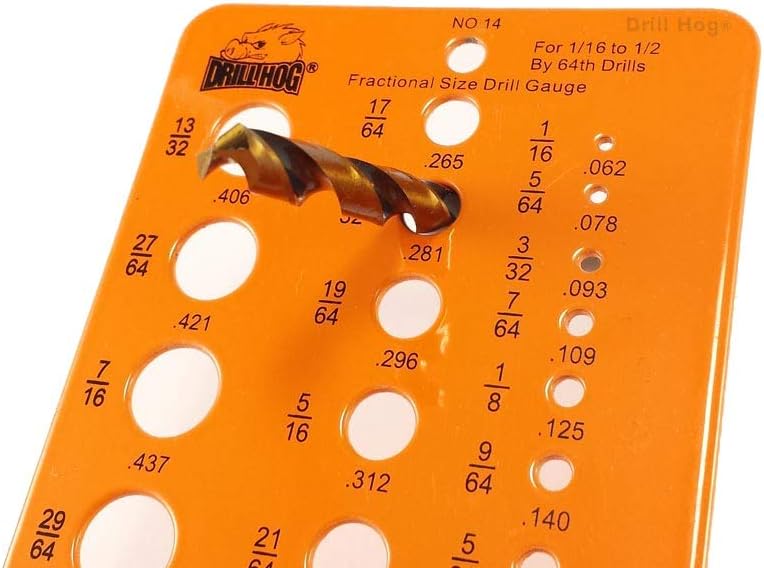
The Drill Hog Drill Gauge is a precision tool designed for accurately checking and measuring the size of drill bits and holes. Constructed from powder-coated alloy steel, this gauge provides a fast and reliable method for identifying drill sizes ranging from 1/16" to 1/2". Its high-visibility orange finish and clear black text markings ensure ease of use in various working conditions. This manual provides instructions for the proper use and care of your Drill Hog Drill Gauge.
2. Product Features
- Measures drill bits and hole sizes from 1/16" to 1/2".
- Features a durable powder-coated, high-visibility orange finish.
- Equipped with clear black text size markings for easy readability.
- Includes decimal equivalents for precise measurements.
- Constructed from robust alloy steel for longevity.
3. Setup
The Drill Hog Drill Gauge requires minimal setup. Follow these steps to prepare for use:
- Unpack: Carefully remove the drill gauge from its packaging.
- Inspect: Examine the gauge for any signs of damage or manufacturing defects.
- Clean: Ensure the gauge surface is clean and free of any dust, debris, or oils that could affect measurement accuracy. A dry, soft cloth is recommended for cleaning.
- Work Surface: Place the gauge on a flat, stable, and well-lit surface to ensure accurate readings.
4. Operating Instructions
The Drill Hog Drill Gauge is designed for straightforward operation. Use it to quickly determine the size of drill bits or to check the diameter of drilled holes.
4.1 Measuring Drill Bit Sizes
- Select Hole: Identify a hole on the gauge that appears to be close to the size of your drill bit. The gauge is marked with fractional sizes (e.g., 1/16, 1/8, 1/4) and their corresponding decimal equivalents (e.g., .062, .125, .250).
- Insert Bit: Gently insert the shank of the drill bit into the selected hole. Do not force the bit.
- Check Fit: The correct hole size is indicated when the drill bit fits snugly without any play, but also without requiring excessive force to insert or remove. If the bit is too loose, try a smaller hole. If it does not fit, try a larger hole.
- Read Measurement: Once a snug fit is achieved, read the fractional and decimal size marked next to that hole. This is the accurate size of your drill bit.
4.2 Checking Hole Sizes
To check the diameter of a pre-drilled hole, follow a similar process:
- Select Hole: Choose a hole on the gauge that you believe matches the size of the drilled hole.
- Insert Gauge: Carefully insert the selected gauge hole over the drilled hole.
- Check Fit: The correct size is indicated when the gauge hole fits precisely over the drilled hole without significant gaps or resistance.
- Read Measurement: The fractional and decimal size marked next to the fitting hole on the gauge represents the diameter of your drilled hole.

5. Maintenance
Proper maintenance will ensure the longevity and accuracy of your Drill Hog Drill Gauge.
- Cleaning: After each use, wipe the gauge clean with a dry, soft cloth to remove any metal shavings, dust, or fingerprints. Avoid abrasive cleaners or solvents that could damage the powder coating or markings.
- Storage: Store the drill gauge in a dry environment, away from excessive moisture or corrosive materials. Keeping it in a toolbox or drawer will protect it from physical damage and environmental exposure.
- Inspection: Periodically inspect the gauge for any signs of wear, damage, or fading of the markings. While designed for durability, extreme conditions can affect its appearance.
6. Troubleshooting
If you encounter issues with your Drill Hog Drill Gauge, consider the following common solutions:
- Inaccurate Readings:
- Ensure the gauge and the item being measured (drill bit or hole) are clean and free of debris.
- Verify that the drill bit is inserted straight and not at an angle.
- Confirm you are reading the correct markings for fractional or decimal sizes.
- Difficulty Reading Markings:
- Ensure adequate lighting in your workspace.
- Clean the surface of the gauge to remove any smudges or dirt obscuring the text.
7. Specifications
| Specification | Detail |
|---|---|
| Model | No. 14 Fractional Size Drill Gauge |
| Measurement Range | 1/16" to 1/2" (by 64ths) |
| Material | Alloy Steel |
| Finish Type | Powder Coated |
| Color | Orange |
| Item Weight | 0.32 ounces |
| Package Dimensions | 5.6 x 3.3 x 0.2 inches |
8. Warranty Information
The Drill Hog Drill Gauge is built to last and comes with a Lifetime Warranty, reflecting the manufacturer's commitment to quality and durability. This warranty ensures that your gauge will perform reliably for its intended purpose.
Additionally, Drill Hog provides a specific warranty for its drill bits: "We guarantee our drill bits against breakage during the lifetime you own them. Send any broken drill bits back, and we will replace them FREE of charge." While this manual is for the gauge, this information is provided for users who may also own Drill Hog drill bits.

9. Support and Contact
For further assistance, product inquiries, or warranty claims, please visit the official Drill Hog website or contact their customer service department. Refer to the product packaging or the Drill Hog website for the most current contact information.