1. Product Overview
The Quicktec Large Gun Safe-Digital is designed for secure storage of firearms and valuables. Its robust all-steel construction and advanced locking mechanisms provide enhanced security for your home or office. This safe features a digital keypad, biometric fingerprint access, and a separate internal lockbox for handguns and ammunition.
Key Features:
- All-steel construction with 5 steel deadbolts for pry resistance.
- Integrated lockbox for handguns, ammunition, and other valuables.
- High-security digital lock system with biometric fingerprint scanning (access in <1.5s).
- Capacity to store 5-6 rifles/shotguns, including those with scopes.
- Anti-tamper features: 3-wrong-code alarm and auto-lockout.
- Non-volatile memory retains fingerprints and PINs even after battery removal.
- Low voltage notification for timely battery replacement.


2. Safety Information
Read and understand all instructions before operating the safe. Failure to follow these guidelines may result in injury, property damage, or unauthorized access to firearms.
- Firearm Safety: Always store firearms unloaded and with the safety engaged. Keep ammunition in the separate lockbox or a different secure location.
- Child Safety: This safe is designed to keep firearms out of reach of children and unauthorized individuals. Ensure the safe is always locked when not in use.
- Confidentiality: Keep all access codes and registered fingerprints confidential. Do not share them with unauthorized persons. Store backup keys in a secure location away from the safe.
- Mounting: Securely mount the safe to the floor or wall using the provided hardware to prevent tipping or unauthorized removal.
- Inspection: Regularly inspect the safe for any signs of damage or tampering.
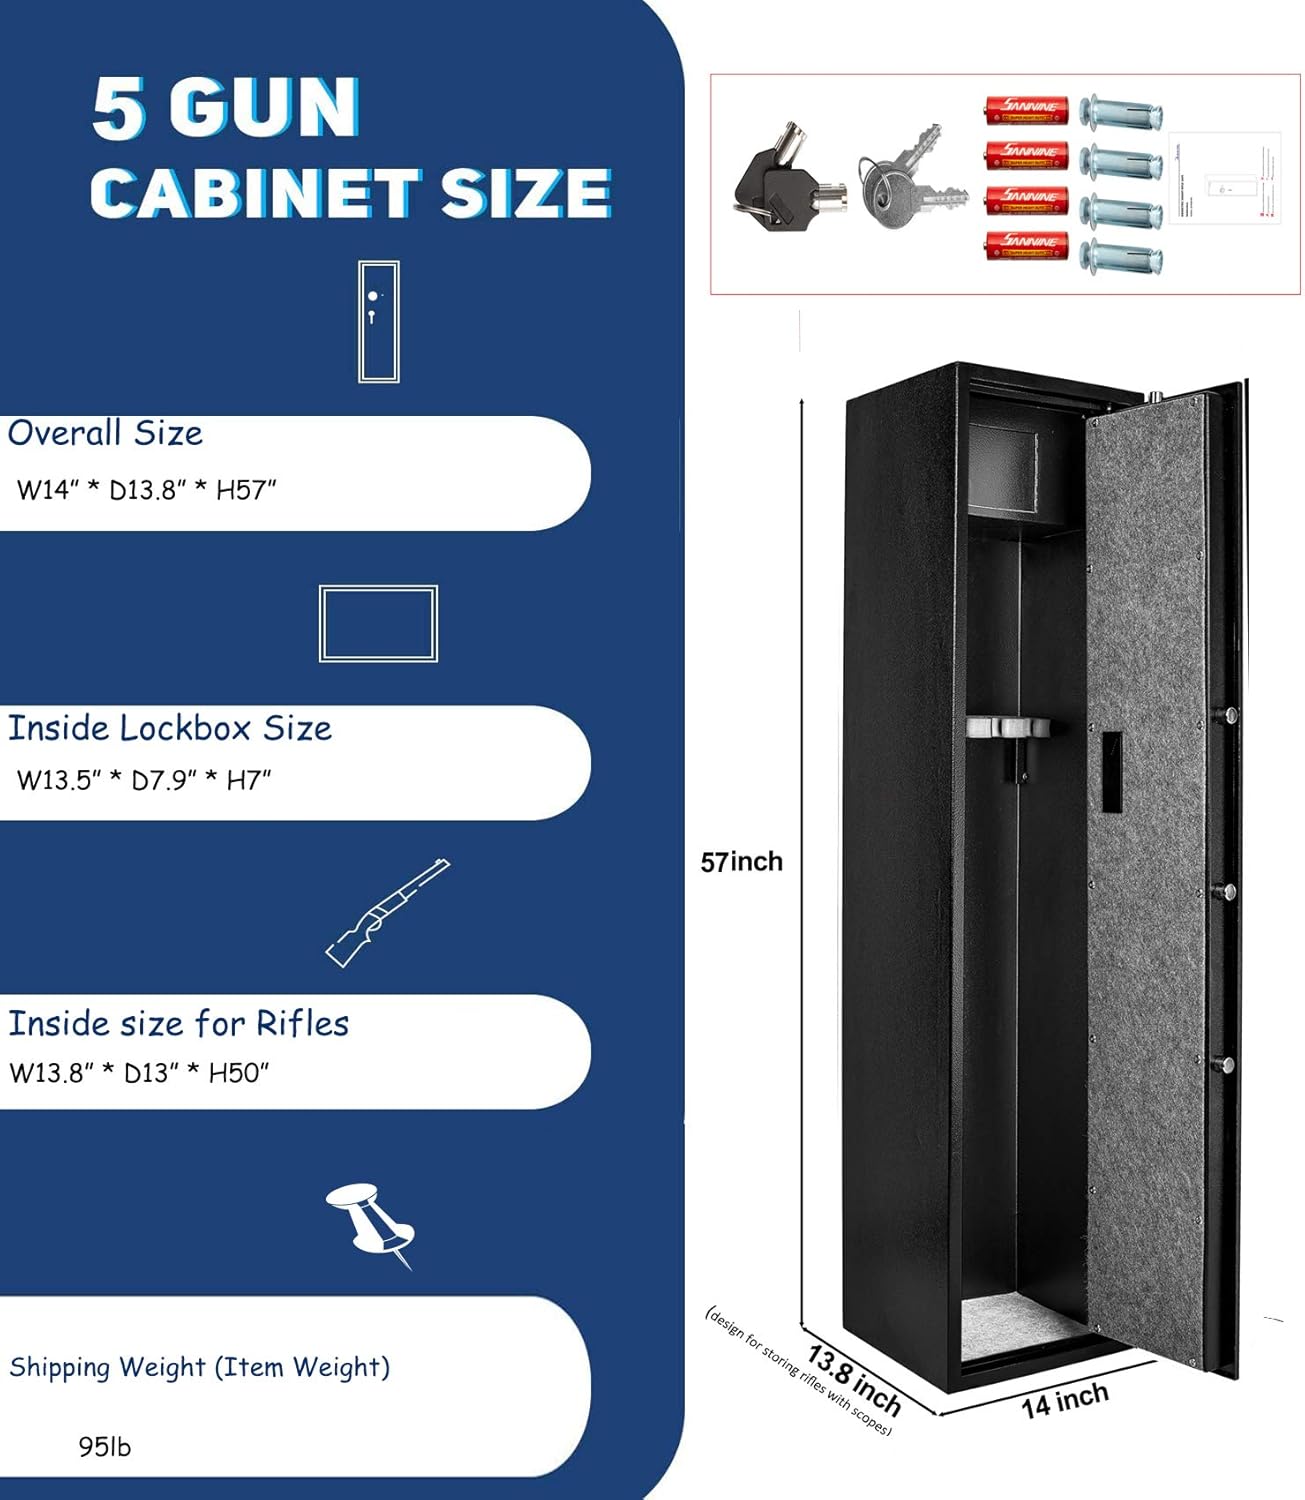
3. Package Contents
Verify that all components are present upon unpacking:
- 1 x Quicktec Large Gun Safe-Digital
- 4 x AA Batteries
- 2 x Spare Keys (for emergency access and internal lockbox)
- 4 x Mounting Bolts
- 1 x Instruction Manual (this document)
4. Setup
4.1 Unpacking
- Carefully remove the safe from its packaging.
- Inspect the safe for any shipping damage. If damage is found, contact customer support immediately.
- Remove all internal packing materials and accessories.
4.2 Battery Installation
The safe requires 4 AA batteries to power the digital lock system.
- Locate the battery compartment on the inside of the safe door.
- Open the battery compartment cover.
- Insert 4 AA batteries, ensuring correct polarity (+/-).
- Close the battery compartment cover securely.
4.3 Mounting the Safe
For optimal security, it is highly recommended to anchor the safe to a floor or wall.
- Choose a suitable location for the safe, ensuring it is level and stable.
- The safe has pre-drilled holes in the back and bottom. Mark the drilling points on the floor or wall through these holes.
- Drill pilot holes at the marked locations using an appropriate drill bit for your surface (concrete, wood, etc.).
- Position the safe over the holes and insert the provided mounting bolts.
- Tighten the bolts securely to firmly anchor the safe.


5. Operating Instructions
5.1 Initial Access (First Time Opening)
Upon first use, the safe can be opened using the backup keys.
- Locate the hidden keyhole, usually behind a removable cover near the digital keypad.
- Insert one of the provided backup keys and turn it to unlock.
- Turn the handle to open the safe door.
5.2 Setting Your Personal Identification Number (PIN)
- With the safe door open, press the internal reset button (usually a small red button on the inside of the door).
- The keypad will illuminate, indicating it is ready for programming.
- Enter your desired 3-8 digit PIN code.
- Press the '#' button to confirm. The safe will emit a confirmation sound.
- Test the new PIN with the door open to ensure it works correctly before closing the safe.
5.3 Registering Fingerprints
The safe can store up to 125 unique fingerprints.
- With the safe door open, press the internal reset button.
- Place your finger firmly on the fingerprint scanner. The scanner will light up.
- Lift and re-place your finger several times (typically 5-8 times) at slightly different angles until the safe confirms successful registration with a sound or light indicator.
- Repeat the process for additional fingers or users.
- Test each registered fingerprint with the door open to ensure proper recognition.


5.4 Opening the Safe
You can open the safe using your PIN, registered fingerprint, or the backup key.
- Using PIN: Enter your PIN code followed by '#'. If correct, the safe will unlock.
- Using Fingerprint: Place a registered finger on the scanner. If recognized, the safe will unlock.
- Using Backup Key: Follow instructions in Section 5.1.
Once unlocked, turn the handle clockwise to open the door.
5.5 Closing and Locking the Safe
- Close the safe door firmly.
- Turn the handle counter-clockwise to engage the locking bolts.
- The safe will automatically lock. Verify by attempting to open the door without entering a code or using a fingerprint.
5.6 Silent Mode
The safe features a silent mode for discreet operation. Refer to the specific instructions provided with your safe for activating and deactivating this feature, as procedures may vary.
5.7 Alarm System
The safe is equipped with an alarm system that activates after 3 consecutive incorrect PIN entries or fingerprint scans. This feature, along with auto-lockout, enhances security against tampering.
5.8 Low Voltage Notification
When the battery power is low, the safe will provide a visual or audible alert. Replace the batteries promptly to ensure continuous operation and security.
6. Maintenance
- Battery Replacement: Replace all 4 AA batteries when the low voltage notification appears. Use high-quality alkaline batteries.
- Cleaning: Clean the exterior of the safe with a soft, damp cloth. Avoid abrasive cleaners or solvents that could damage the finish or electronic components.
- Lock Mechanism: Do not lubricate the lock mechanism. If the lock feels stiff, contact customer support.
- Mounting Bolts: Periodically check the mounting bolts to ensure they remain tight and secure.
7. Troubleshooting
If you encounter issues with your Quicktec Large Gun Safe-Digital, refer to the following common problems and solutions:
| Problem | Possible Cause | Solution |
|---|---|---|
| Safe does not open with PIN/fingerprint. | Incorrect PIN, unregistered fingerprint, low batteries, electronic malfunction. | Verify PIN, re-register fingerprint, replace batteries, use backup key. |
| Keypad is unresponsive. | Dead batteries, electronic malfunction. | Replace batteries, use backup key. |
| Alarm sounds unexpectedly. | Multiple incorrect entries, tampering attempt. | Enter correct PIN/fingerprint to disarm. If tampering is suspected, investigate. |
| Low battery warning. | Batteries are running low. | Replace all 4 AA batteries immediately. |
If the issue persists after attempting these solutions, please contact Quicktec customer support for further assistance.
8. Specifications
| Feature | Detail |
|---|---|
| Brand | Quicktec |
| Model Number | Large Gun Safe-Digital |
| Product Dimensions (D x W x H) | 12.2" x 14" x 57.2" |
| Lock Type | Electronic Combination Lock, Biometric Fingerprint |
| Color | Black with Anti-scratch Rocky Finish |
| Material | Alloy Steel |
| Item Weight | 92 Pounds |
| Mounting Type | Floor or/and Wall Mount |
| Special Features | Alarm System, Anti-Theft, Biometric Fingerprint, Combination Lock, Scratch Resistant |
| Water Resistance Level | Water Resistant |
| UPC | 646040894188 |
9. Warranty & Support
9.1 Warranty Information
The Quicktec Large Gun Safe-Digital comes with a 2-year warranty from the date of purchase. This warranty covers manufacturing defects and malfunctions under normal use. Please retain your proof of purchase for warranty claims.
9.2 Customer Support
For technical assistance, troubleshooting, or warranty inquiries, please refer to the contact information provided on your product packaging or purchase documentation. Quicktec offers 24/7 expert support to assist you with any issues.