Product Overview
The Sunforce Motion Activated Security Light, Model 72101, is designed to provide reliable illumination for various outdoor areas such as entryways, garages, pathways, and sheds. This unit features 132 super bright LEDs and a motion sensor for enhanced security and convenience. Its weather-resistant design ensures durability in outdoor conditions.
- LED Technology: Equipped with 132 super bright LEDs for efficient lighting.
- Motion Activation: Automatically turns on when motion is detected.
- Adjustable Lamp Heads: Lamp heads can be moved upwards, downwards, and horizontally to direct light where needed.
- Dual Brightness Levels: Offers two brightness settings with dusk-to-dawn operation capability.
- Weather Resistant: Constructed to withstand various weather conditions.

Figure 1: Front view of the Sunforce Motion Activated Security Light.
Installation and Setup
This security light is designed for flush mount wall installation. Ensure power is disconnected before beginning installation.
Included Components:
- Security Light Unit
- Mounting Hardware (screws, wire nuts, mounting plate)
Installation Steps:
- Prepare Mounting Surface: Identify a suitable wall location for flush mounting. Ensure the electrical box is securely installed.
- Attach Mounting Plate: Secure the provided mounting plate to the electrical box using the appropriate screws.
- Wire Connections: Connect the household wiring to the security light's wiring. Typically, this involves connecting live to live, neutral to neutral, and ground to ground. Use wire nuts to secure connections.
- Mount the Light Fixture: Carefully align the security light unit with the mounting plate and secure it in place.
- Adjust Lamp Heads: Once mounted, adjust the lamp heads to cover the desired area.

Figure 2: Visual guide for the installation process, showing mounting plate attachment and fixture placement.
Operating Instructions
The Sunforce Motion Activated Security Light features adjustable settings for optimal performance.
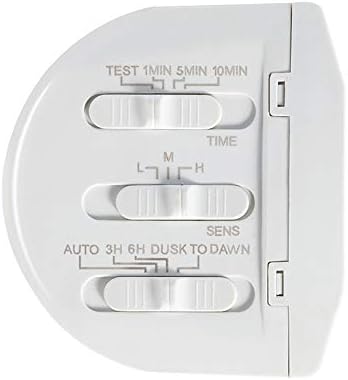
Figure 3: Control panel with adjustable settings for time, sensitivity, and operation mode.
Setting Adjustments:
- TIME: This dial controls how long the light remains on after motion is detected. Settings typically range from 1 minute to 10 minutes. Adjust to your preferred duration.
- SENS (Sensitivity): This dial adjusts the motion sensor's detection range. 'L' (Low) for shorter range, 'M' (Medium) for moderate, and 'H' (High) for maximum detection distance.
- MODE (Dusk to Dawn / Auto):
- AUTO: The light will only activate when motion is detected and ambient light levels are low (dusk to dawn).
- 3H / 6H: The light will stay on at a lower brightness for 3 or 6 hours after dusk, then switch to motion-activated mode.
- DUSK TO DAWN: The light will remain on at a lower brightness from dusk until dawn, without motion activation.
- TEST: Use this setting during installation to verify the motion sensor's coverage area and light activation. The light will turn on for a short period (e.g., 5-10 seconds) each time motion is detected, regardless of ambient light.
After adjusting settings, ensure the covers are securely closed to maintain weather resistance.
Maintenance
The Sunforce Motion Activated Security Light requires minimal maintenance due to its durable, weather-resistant construction and LED technology.
- Cleaning: Periodically clean the sensor lens and lamp heads with a soft, damp cloth to remove dirt or debris that may obstruct the sensor or reduce light output. Do not use abrasive cleaners.
- Inspection: Annually inspect the wiring and mounting for any signs of wear or damage. Ensure all connections remain secure.
- LEDs: The integrated LEDs are designed for long life and are not user-replaceable.
Troubleshooting
If your security light is not functioning as expected, refer to the following common issues and solutions:
| Problem | Possible Cause | Solution |
|---|---|---|
| Light does not turn on. | No power; sensor obstructed; incorrect settings. | Check circuit breaker. Ensure sensor lens is clean. Verify 'MODE' setting is not in 'OFF' or 'Dusk to Dawn' during daytime. Adjust 'SENS' setting. |
| Light stays on continuously. | Continuous motion detected; 'MODE' set to 'Dusk to Dawn' or '3H/6H' without motion. | Ensure no objects are causing constant motion detection. Check 'MODE' setting. Reduce 'SENS' if false triggers occur. |
| Light flickers or flashes. | Loose wiring; power fluctuations; internal component issue. | Check all wire connections for tightness (ensure power is off). If problem persists, contact customer support. |
| Detection range is too short or too long. | 'SENS' setting incorrect; sensor obstructed. | Adjust the 'SENS' dial. Clear any obstructions from the sensor's field of view. |
Specifications
| Feature | Detail |
|---|---|
| Model Number | 72101 |
| Brand | Sun Force |
| Light Source | 132 Super Bright LEDs |
| Power Source | Corded Electric |
| Voltage | 120 Volts |
| Wattage | 120 watts |
| Installation Type | Flush Mount (Wall Mount) |
| Color | White |
| Product Dimensions | 27.94 x 20.32 x 22.86 cm |
| Item Weight | 907 g |
| Weather Resistance | Fully weather resistant |
| Certifications | FCC and ETL certified |
Warranty and Support
For specific warranty details, please refer to the documentation included with your purchase or contact the retailer where the product was acquired. Warranty terms typically cover manufacturing defects for a limited period.
If you require technical assistance or have questions not covered in this manual, please contact Sun Force customer support. Contact information can usually be found on the product packaging or the manufacturer's official website.