Introduction
Thank you for choosing the ZIPRO Notus Treadmill. This manual provides essential information for the safe and efficient assembly, operation, and maintenance of your new fitness equipment. Please read this manual thoroughly before using the treadmill and keep it for future reference.
Important Safety Information
WARNING: To reduce the risk of serious injury, read all important precautions and instructions in this manual before using the treadmill.
- Always consult with a physician before beginning any exercise program.
- Keep children and pets away from the treadmill at all times.
- Place the treadmill on a level surface with at least 2 meters (6.5 feet) of clear space behind it and 0.6 meters (2 feet) on each side.
- Ensure the safety key is properly attached to your clothing before starting the treadmill.
- Do not operate the treadmill if it has a damaged power cord or plug, or if it is not working properly.
- Wear appropriate exercise clothing and athletic shoes.
- Do not exceed the maximum user weight capacity of 150 kg (330 lbs).
Setup and Assembly
The ZIPRO Notus Treadmill requires some assembly. Follow these steps carefully to ensure proper setup.
Unpacking and Placement
Carefully remove all components from the packaging. Place the main frame on a flat, stable surface. Ensure there is sufficient space around the treadmill for safe operation and assembly.

Figure 1: Fully assembled ZIPRO Notus Treadmill, showing its sleek black design and blue accents.
Assembly Steps
- Attach the Upright Posts: Securely fasten the upright posts to the main base using the provided bolts and tools.
- Install the Console: Mount the console onto the top of the upright posts. Connect all necessary cables from the console to the main frame.
- Attach Handrails: Secure the handrails to the upright posts, ensuring they are firm and stable.
- Connect Power: Once assembly is complete, plug the power cord into a grounded electrical outlet.

Figure 2: Detailed view of the treadmill's control console, featuring the LCD display, quick-select buttons, and safety key attachment point.
Operating Instructions
Console Overview
The treadmill console features an LCD display showing speed, time, distance, calories, and pulse. It also includes various control buttons for easy operation.

Figure 3: The treadmill console with a tablet securely placed in the integrated holder, demonstrating media integration during workouts.
Starting and Stopping the Treadmill
- Safety Key: Attach the safety key clip to your clothing and insert the safety key into its designated slot on the console. The treadmill will not operate without the safety key in place.
- Power On: Press the START button. The treadmill will begin at a low speed.
- Adjust Speed: Use the SPEED + and SPEED - buttons on the console or handrails to adjust your desired speed (1 to 18 km/h). Quick-select speed buttons are also available.
- Adjust Incline: Use the INCLINE + and INCLINE - buttons to change the incline level (up to 15 degrees).
- Stopping: Press the STOP button to gradually slow down and stop the treadmill. In an emergency, pull the safety key to immediately stop the belt.
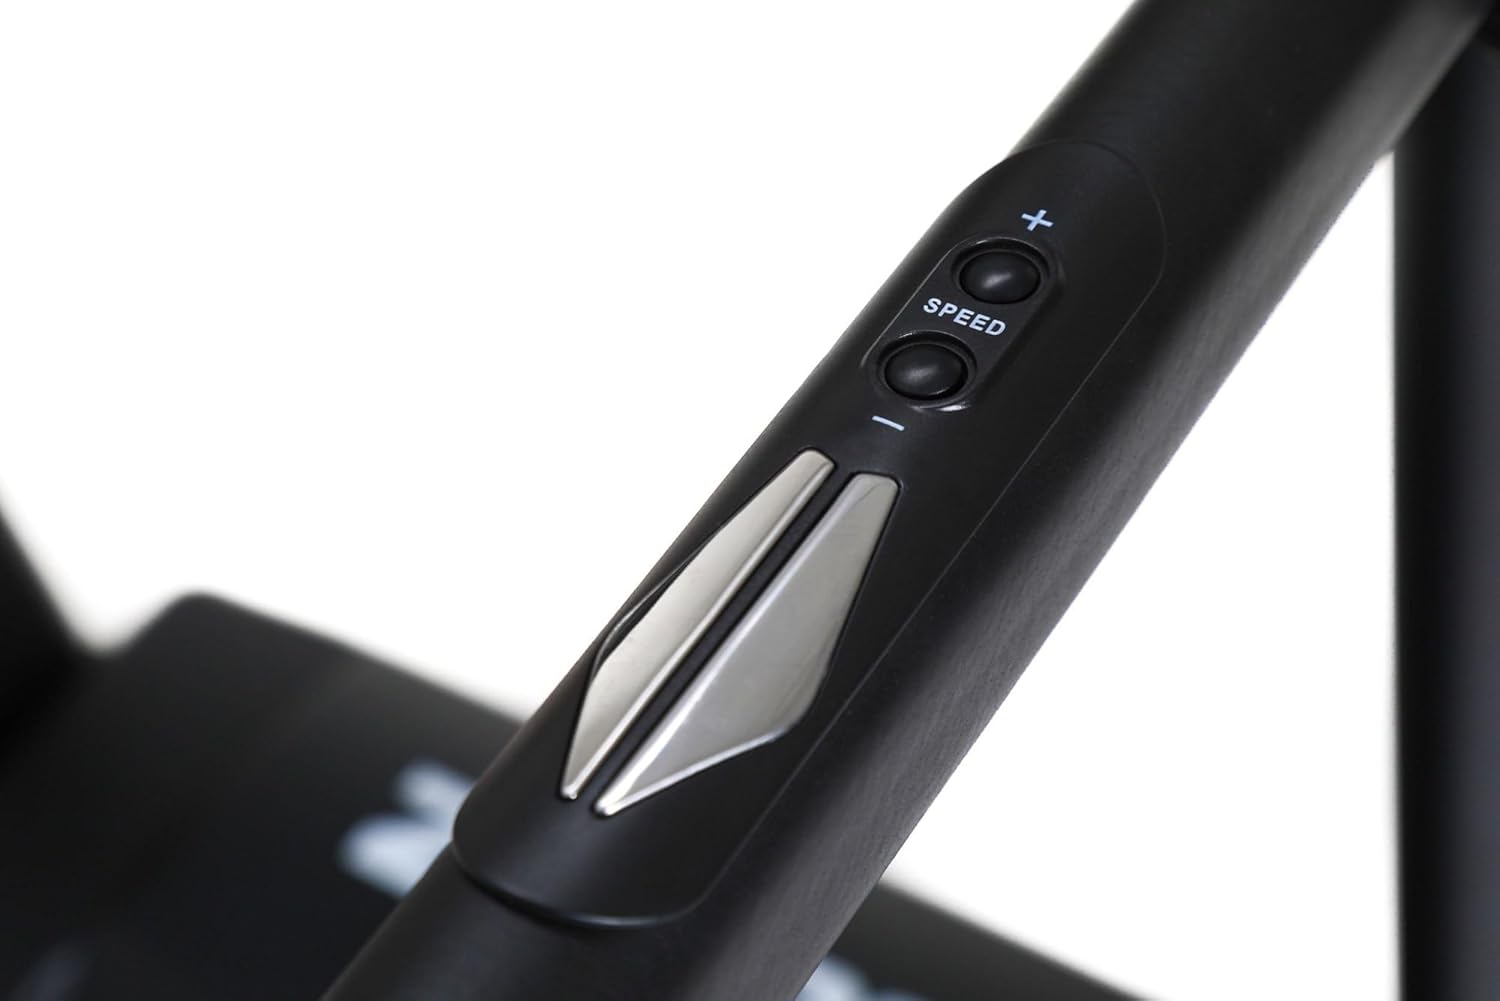
Figure 4: Ergonomic speed and incline control buttons located on the treadmill handrail for convenient adjustments during exercise.
Pre-set Programs
The treadmill comes with 12 pre-set training programs and 3 user-defined programs. To select a program:
- From the standby mode, press the PROGRAM button to cycle through the available programs (P1-P12).
- Press START to begin the selected program.
Bluetooth Connectivity
The treadmill supports Bluetooth connectivity for integration with fitness apps or for playing audio. Refer to your device's Bluetooth settings to pair with the treadmill.
Maintenance and Storage
Cleaning
- Regularly wipe down the treadmill with a damp cloth after each use to remove sweat and dust.
- Do not use abrasive cleaners or solvents.
Lubrication
The running belt requires periodic lubrication to ensure smooth operation and prolong its lifespan. Consult the specific instructions for your treadmill model regarding the type of lubricant and frequency of application.
Belt Tension and Alignment
Check the running belt tension and alignment regularly. If the belt feels loose or is drifting to one side, refer to the detailed instructions in the full manual for adjustment procedures.
Storage
The ZIPRO Notus Treadmill features a convenient folding design for easy storage, saving valuable space in your home.

Figure 5: The ZIPRO Notus Treadmill in its folded, upright storage position, highlighting its space-saving design.
- Ensure the treadmill is powered off and unplugged.
- Lift the running deck until it locks into the upright position.
- To unfold, gently push the release mechanism and lower the deck slowly to the floor.
Troubleshooting
| Problem | Possible Cause | Solution |
|---|---|---|
| Treadmill does not start. | Safety key not inserted; Power cord unplugged; Circuit breaker tripped. | Ensure safety key is fully inserted; Check power connection; Reset circuit breaker. |
| Running belt slips or hesitates. | Belt too loose; Belt needs lubrication. | Adjust belt tension (refer to full manual); Lubricate the running deck. |
| Unusual noise during operation. | Loose components; Motor issues; Belt friction. | Check all bolts and screws for tightness; Contact customer support if noise persists. |
Specifications
| Feature | Detail |
|---|---|
| Model | ZIPRO Notus (5304085) |
| Dimensions (L x W x H) | 166 x 77 x 132 cm |
| Weight | 65.8 Kilograms |
| Maximum User Weight | 150 Kilograms |
| Motor Power | 1800 Watt |
| Speed Range | 1 - 18 km/h |
| Incline Percentage Maximum | 15% |
| Number of Programs | 12 (pre-set) + 3 (user-defined) |
| Display Type | ACL (LCD) |
| Material | Plastic, Aluminum frame |
| Connectivity | Bluetooth |
| Assembly Required | Yes |
Warranty and Support
For warranty information, please refer to the documentation included with your purchase or visit the official ZIPRO website. If you encounter any issues not covered in this manual or require technical assistance, please contact ZIPRO customer support.
ZIPRO Customer Support:
- Website: www.zipro.pl (Example, actual URL may vary)
- Email: support@zipro.pl (Example)
- Phone: +XX XXX XXX XXX (Example)