ZIPRO Neon (Model 1592673)
ZIPRO Neon Magnetic Elliptical Trainer User Manual
Model: Neon (1592673)
1. Introduction
Thank you for choosing the ZIPRO Neon Magnetic Elliptical Trainer. This elliptical is designed for effective home workouts, allowing you to train endurance and strengthen muscles. Its compact size makes it ideal for smaller living spaces. The user-friendly computer tracks key workout parameters such as speed, distance, calories, and pulse. Featuring a robust construction, anti-slip footrests, and ergonomic handles, it ensures a comfortable and safe exercise experience. The internal magnetic mechanism provides smooth and quiet operation with 8 adjustable resistance levels to suit your individual training needs.

Image: The ZIPRO Neon Magnetic Elliptical Trainer, showcasing its sleek black design with green accents.
2. Important Safety Information
Please read all instructions carefully before using this product. Failure to follow these instructions may result in injury or damage to the equipment.
- Consult a physician before starting any exercise program, especially if you have pre-existing health conditions.
- Keep children and pets away from the equipment during operation.
- Place the elliptical trainer on a flat, stable surface with adequate clearance around it.
- Wear appropriate exercise clothing and athletic footwear. Avoid loose clothing that could get caught in moving parts.
- Before each use, ensure all bolts, nuts, and connections are securely tightened.
- Do not exceed the maximum user weight capacity of 120 kg (264 lbs).
- If you experience dizziness, chest pain, or any other abnormal symptoms, stop your workout immediately and consult a physician.
- Do not attempt to service the elliptical trainer beyond the maintenance steps described in this manual. Contact customer support for assistance.
3. Package Contents
Verify that all components are present before beginning assembly. If any parts are missing or damaged, please contact customer support.
| Item | Quantity |
|---|---|
| Main Frame Assembly | 1 |
| Front Stabilizer Bar | 1 |
| Rear Stabilizer Bar | 1 |
| Moving Handlebars | 2 |
| Fixed Handlebar Post | 1 |
| Foot Pedals | 2 |
| Console Unit | 1 |
| Water Bottle Holder | 1 |
| Hardware Kit (Bolts, Washers, Nuts, Tools) | 1 set |
| User Manual | 1 |
4. Assembly and Setup
4.1 Unpacking
Carefully remove all components from the packaging. Lay them out on a clean, flat surface to ensure all parts are accounted for and to prevent scratching.
4.2 Assembly Steps
- Attach Stabilizer Bars: Secure the front and rear stabilizer bars to the main frame using the provided bolts and washers. Ensure they are firmly tightened for stability.
- Install Pedal Arms and Moving Handlebars: Connect the pedal arms to the main crank assembly and then attach the moving handlebars to the pedal arms. Pay attention to left and right markings.
- Mount Console Post and Fixed Handlebars: Attach the console post to the main frame. Then, secure the fixed handlebars to the console post. Ensure all wiring for the console is routed correctly and connected.
- Attach Console Unit: Carefully connect the sensor wires from the console post to the back of the console unit. Then, mount the console onto its designated bracket on the console post.
- Install Foot Pedals: Secure the foot pedals to the pedal arms. Ensure they are oriented correctly and tightened to prevent wobbling during use.
- Attach Water Bottle Holder: Mount the water bottle holder to the designated spot on the frame.
- Final Check: Review all connections and ensure all bolts are tightened. Test the elliptical for smooth movement and stability. Adjust the leveling caps on the stabilizer bars if the unit is uneven.
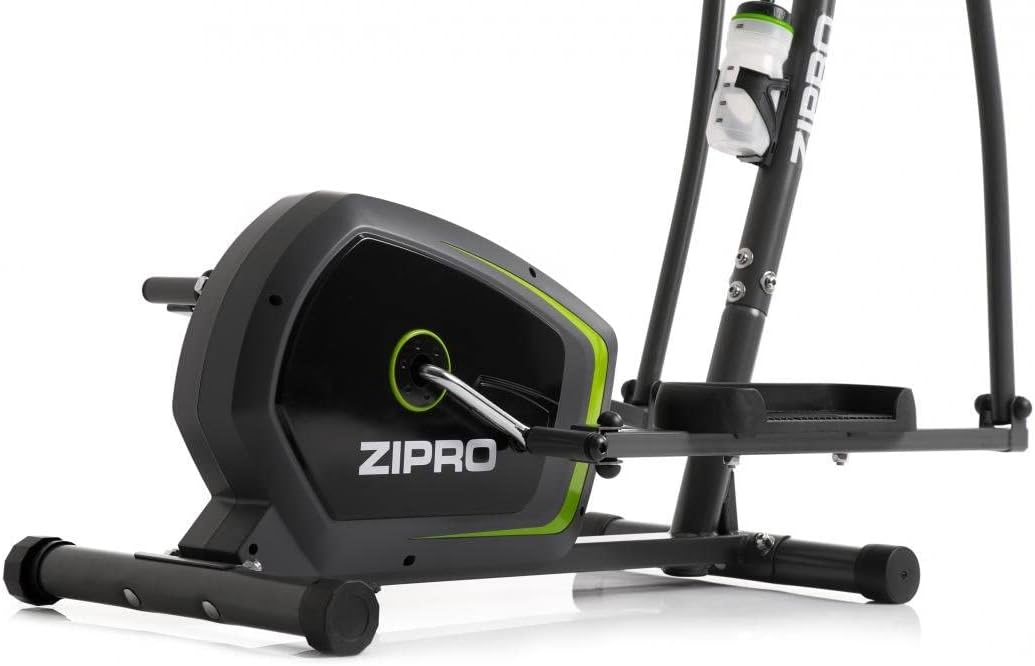
Image: Detail of the sturdy base and flywheel housing.

Image: Side profile of the elliptical, showing the pedal arms and handlebars.

Image: Front view, highlighting the console post and handlebars.

Image: Detail of the textured, anti-slip foot pedal surface.

Image: The integrated water bottle holder on the elliptical frame.

Image: The rear stabilizer bar with built-in transport wheels for easy relocation.
5. Operating Instructions
5.1 Console Functions
The integrated console provides real-time feedback on your workout. It typically displays:
- TIME: Duration of your workout.
- SPEED: Current speed in km/h or mph.
- DISTANCE: Total distance covered during the workout.
- CALORIES: Estimated calories burned.
- PULSE: Your heart rate (measured via hand pulse sensors on fixed handlebars).
- SCAN: Automatically cycles through all display functions.
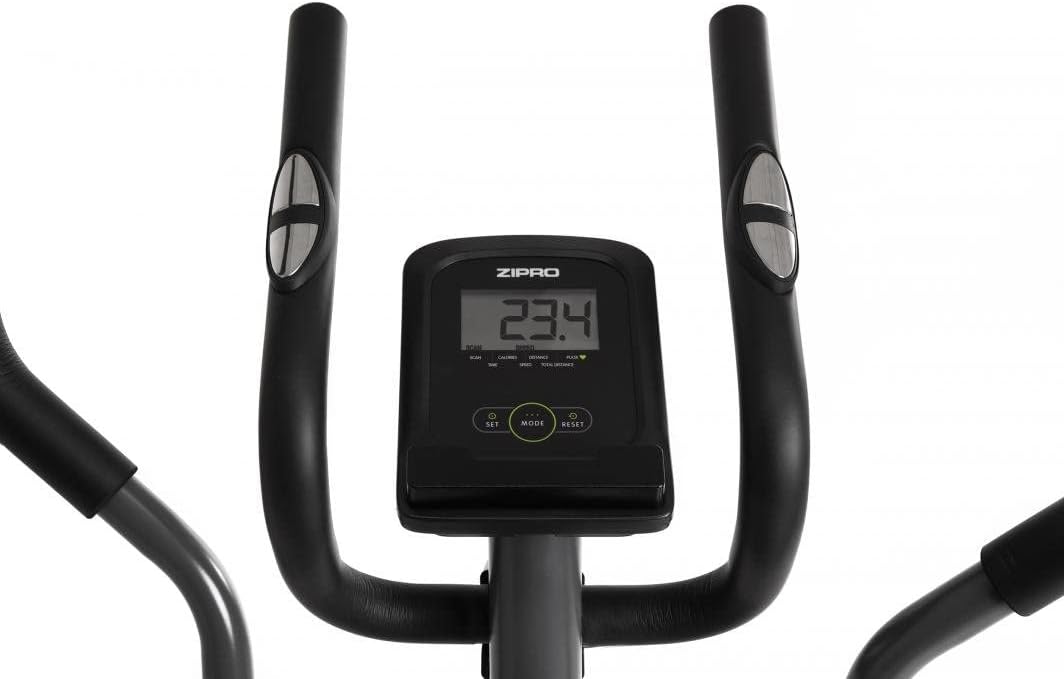
Image: The digital console displaying workout metrics.
Use the 'MODE' button to select a specific display function or 'SCAN' mode. 'RESET' will clear all workout data.
5.2 Adjusting Resistance
The ZIPRO Neon Elliptical Trainer features 8 levels of magnetic resistance. To adjust the resistance, turn the tension control knob located on the main frame. Turn clockwise to increase resistance for a more challenging workout, and counter-clockwise to decrease resistance for an easier workout.

Image: The resistance control knob with settings from 1 to 8.
5.3 Using the Device Holder
The elliptical is equipped with a convenient shelf for mobile devices, allowing you to place your smartphone or tablet while exercising. This is located just below the console.

Image: The device holder, capable of holding a tablet or smartphone for entertainment during workouts.
5.4 Workout Guidelines
- Warm-up: Begin each workout with 5-10 minutes of light exercise and stretching.
- Workout: Maintain a steady pace and resistance level for 20-30 minutes, or as recommended by your fitness plan.
- Cool-down: Finish with 5-10 minutes of slower pedaling and stretching.
- Hydration: Use the integrated bottle holder to keep water accessible and stay hydrated during your workout.
6. Maintenance and Care
Regular maintenance will extend the life of your elliptical trainer.
- Cleaning: Wipe down the equipment with a damp cloth after each use to remove sweat and dust. Do not use abrasive cleaners or solvents.
- Lubrication: Periodically check moving parts for friction. Apply a silicone-based lubricant to pivot points and joints if squeaking occurs.
- Tighten Fasteners: Regularly inspect all bolts, nuts, and screws to ensure they are tight. Tighten as necessary to prevent noise and ensure stability.
- Storage: Store the elliptical in a dry, cool place away from direct sunlight and extreme temperatures.
7. Troubleshooting
If you encounter issues with your elliptical trainer, refer to the table below for common problems and solutions.
| Problem | Possible Cause | Solution |
|---|---|---|
| Squeaking or grinding noise | Loose bolts; lack of lubrication; worn parts. | Tighten all visible bolts. Apply silicone lubricant to pivot points. If noise persists, contact support. |
| Console not displaying data | Batteries low or dead; loose sensor connection. | Replace console batteries. Check all sensor cables are securely connected. |
| Resistance not changing | Resistance cable disconnected or damaged. | Inspect the resistance cable connection to the knob and the flywheel mechanism. Reconnect if loose. |
| Elliptical feels unstable/wobbly | Uneven surface; loose stabilizer bar bolts. | Adjust the leveling caps on the stabilizer bars. Ensure all stabilizer bar bolts are tightened. |
8. Technical Specifications
| Feature | Specification |
|---|---|
| Model Name | Neon |
| Brand | ZIPRO |
| Color | Black |
| Product Dimensions (L x W x H) | 107 x 67 x 152 cm (42.1 x 26.4 x 59.8 inches) |
| Item Weight | 29.8 kg (65.7 lbs) |
| Material | Durable Steel Frame, Plastic Components |
| Resistance Mechanism | Magnetic |
| Maximum Weight Recommendation | 120 kg (264 lbs) |
| Maximum Stride Length | 27 cm (10.6 inches) |
| Number of Resistance Levels | 8 |
| Included Components | Elliptical Trainer, Water Bottle Holder |
| Batteries Included | Yes |
| Manufacturer | Morele.net Sp. z o.o. |
| Model Number | 1592673 |
9. Warranty and Support
Your ZIPRO Neon Magnetic Elliptical Trainer comes with a standard manufacturer's warranty covering defects in materials and workmanship. Please refer to the warranty card included in your package for specific terms and conditions, including the warranty period.
For technical support, replacement parts, or warranty claims, please contact ZIPRO customer service. Have your model number (1592673) and proof of purchase ready when contacting support.
Contact Information:
Please visit the official ZIPRO website for the most up-to-date contact details for your region.
Ask a question about this manual
Ask about setup, troubleshooting, compatibility, parts, safety, or missing instructions. Manuals+ will review the question and use this page’s manual context to help answer it.