Airton 409612
Airton Portable Air Conditioner User Manual
Model: 409612
Introduction
Thank you for choosing the Airton Portable Air Conditioner. This manual provides important information for the safe operation, installation, maintenance, and troubleshooting of your appliance. Please read this manual thoroughly before using the product and keep it for future reference.
This versatile unit offers cooling, heating, fan, and dehumidification functions, designed to provide comfort in various environments.
Safety Information
Always follow basic safety precautions when using electrical appliances to reduce the risk of fire, electric shock, and injury to persons.
- Ensure the power supply matches the voltage specified on the appliance's rating label (220 Volt).
- Do not operate the unit with a damaged cord or plug. If the supply cord is damaged, it must be replaced by the manufacturer, its service agent, or similarly qualified persons to avoid a hazard.
- Do not block air inlets or outlets. Maintain a minimum distance from walls and other objects for proper airflow.
- Do not insert fingers or foreign objects into the air inlets or outlets.
- This appliance is not intended for use by persons (including children) with reduced physical, sensory or mental capabilities, or lack of experience and knowledge, unless they have been given supervision or instruction concerning use of the appliance by a person responsible for their safety.
- Children should be supervised to ensure that they do not play with the appliance.
- Always unplug the unit before cleaning or performing any maintenance.
- Do not use the appliance in wet or damp environments, such as bathrooms or laundry rooms.
- The appliance contains R290 refrigerant gas. R290 is a natural gas with low environmental impact. Do not puncture or damage the refrigerant circuit.
Product Overview
Familiarize yourself with the components of your Airton Portable Air Conditioner.

Figure 1: Front view of the Airton Portable Air Conditioner, showing the air outlet grille and control panel.

Figure 2: Back view of the unit, showing the air intake grilles and exhaust port.
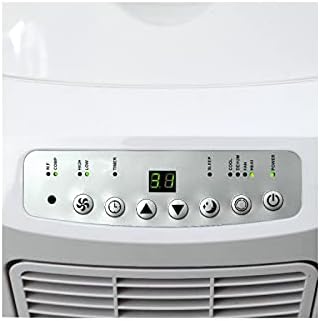
Figure 3: Detailed view of the digital control panel with various function buttons and display.
Included Components:
- Portable Air Conditioner Unit
- Remote Control (requires 2 AA batteries, included)
- Exhaust Duct (1.5 m)
- Exhaust Duct Connector
- Sliding Window Installation Panel
- Condensate Tube (0.6 m)
- Wheels (pre-installed)
Setup and Installation
Proper installation is crucial for the efficient operation of your air conditioner.
1. Positioning the Unit:
Place the unit on a flat, stable surface. Ensure there is at least 30 cm (12 inches) of space around the unit for proper air circulation. The unit is portable and equipped with wheels for easy movement.

Figure 4: Example placement of the portable air conditioner in a room, demonstrating its compact size.
2. Exhaust Duct Installation:
- Attach the exhaust duct connector to the exhaust port on the back of the unit.
- Extend the 1.5-meter exhaust duct and connect it to the window installation panel.
- Adjust the sliding window installation panel to fit your window opening and secure it. Ensure the hot air is expelled outdoors to maximize cooling efficiency.
3. Condensate Drainage:
For continuous drainage in dehumidifier mode, connect the 0.6-meter condensate tube to the drainage port and lead it to a suitable drain or container. In cooling mode, the unit typically self-evaporates condensate, but manual drainage may be required if the internal tank fills up.
4. Power Connection:
Plug the power cord into a grounded 220 Volt electrical outlet. The unit uses a Type C plug (French type).
Operating Instructions
Your Airton Portable Air Conditioner can be operated using the control panel on the unit or the included remote control.
Control Panel Overview:
Figure 5: Control panel with digital display and function buttons.
- Power Button: Turns the unit ON/OFF.
- Mode Button: Cycles through Cooling, Heating, Fan, and Dehumidifier modes.
- Temperature Up/Down Buttons: Adjusts the desired temperature.
- Fan Speed Button: Selects fan speed (High/Low).
- Timer Button: Sets the auto ON/OFF timer (up to 24 hours).
- Sleep Mode Button: Activates sleep mode for quieter operation and gradual temperature adjustment during the night.
Operating Modes:
- Cooling Mode: Ideal for hot days. Set desired temperature (e.g., 24-27 m² coverage). The unit provides 2600W cooling power.
- Heating Mode: For colder days. The unit provides 2000W heating power.
- Fan Mode: Circulates air without cooling or heating.
- Dehumidifier Mode: Removes excess moisture from the air. Ensure continuous drainage is set up for this mode.
Remote Control:
The remote control allows convenient operation from a distance. Ensure the 2 AA batteries are correctly installed. Point the remote control directly at the unit's receiver.
Maintenance
Regular maintenance ensures optimal performance and extends the lifespan of your air conditioner.
1. Cleaning the Air Filter:
The air filter should be cleaned every two weeks or more frequently depending on usage and air quality. A dirty filter reduces efficiency and airflow.
- Unplug the unit from the power outlet.
- Locate and remove the air filter (usually at the back or side of the unit).
- Wash the filter with warm, soapy water. Rinse thoroughly and allow it to air dry completely before reinserting.
2. Draining Condensate:
While the unit has a self-evaporation system in cooling mode, the internal water tank may fill up, especially in high humidity or during dehumidifier operation. The unit will stop operating and display an error code when the tank is full.
- Unplug the unit.
- Place a shallow pan or tray under the drainage port at the bottom of the unit.
- Remove the drain plug and allow all water to drain out.
- Replace the drain plug securely.
3. Cleaning the Unit Exterior:
Wipe the exterior of the unit with a soft, damp cloth. Do not use harsh chemicals, abrasives, or solvents.
4. Storage:
If storing the unit for an extended period, ensure it is completely drained of water, cleaned, and the power cord is neatly wrapped. Store in a dry, cool place.
Troubleshooting
Before contacting customer support, please refer to the following common issues and solutions.
| Problem | Possible Cause | Solution |
|---|---|---|
| Unit does not turn on. | No power; power cord unplugged; circuit breaker tripped; full water tank. | Check power connection; reset circuit breaker; drain water tank. |
| Unit not cooling/heating effectively. | Dirty air filter; blocked air intake/outlet; room too large; windows/doors open; exhaust hose not properly installed. | Clean air filter; ensure clear airflow; close windows/doors; verify exhaust hose installation. |
| Unit is noisy (above 65 dB). | Unit not on a flat surface; internal components vibrating. | Ensure unit is on a flat, stable surface. Some operational noise is normal. |
| Water leaking from unit. | Drain plug loose; continuous drainage hose not properly connected. | Check and secure drain plug; ensure continuous drainage hose is properly connected and not kinked. |
Specifications
| Brand | Airton |
| Model Number | 409612 |
| Product Dimensions | 32 x 37 x 73 cm |
| Item Weight | 23 kg |
| Color | White |
| Power Type | Corded |
| Voltage | 220 Volt |
| Wattage | 2100 W |
| Amperage Capacity | 16 Ampere |
| Cooling Power | 7000 BTU (2600W) |
| Heating Power | 2000 W |
| Airflow | 380 m³/h |
| Noise Level | 65 dB |
| Energy Efficiency Class | A |
| Refrigerant | R290 (100% natural hydrocarbon) |
| Special Features | Heating and cooling function, Fan, Dehumidifier, Digital Display, Remote Control, 24-hour Timer, Sleep Mode |
| Included Batteries | 2 AA Alkaline batteries for remote control |

Figure 6: Energy efficiency label for the Airton Portable Air Conditioner, indicating Class A efficiency and noise levels.
Warranty and Support
For warranty information and customer support, please refer to the documentation provided with your purchase or visit the official Airton website. Keep your proof of purchase for warranty claims.
If you encounter issues not covered in the troubleshooting section, please contact Airton customer service for assistance.