
1. Introduction
Thank you for choosing the HOMEFUN Ergonomic Office Chair. This manual provides detailed instructions for the assembly, operation, and maintenance of your new chair. Please read this manual thoroughly before assembly and use to ensure proper function and safety. Keep this manual for future reference.
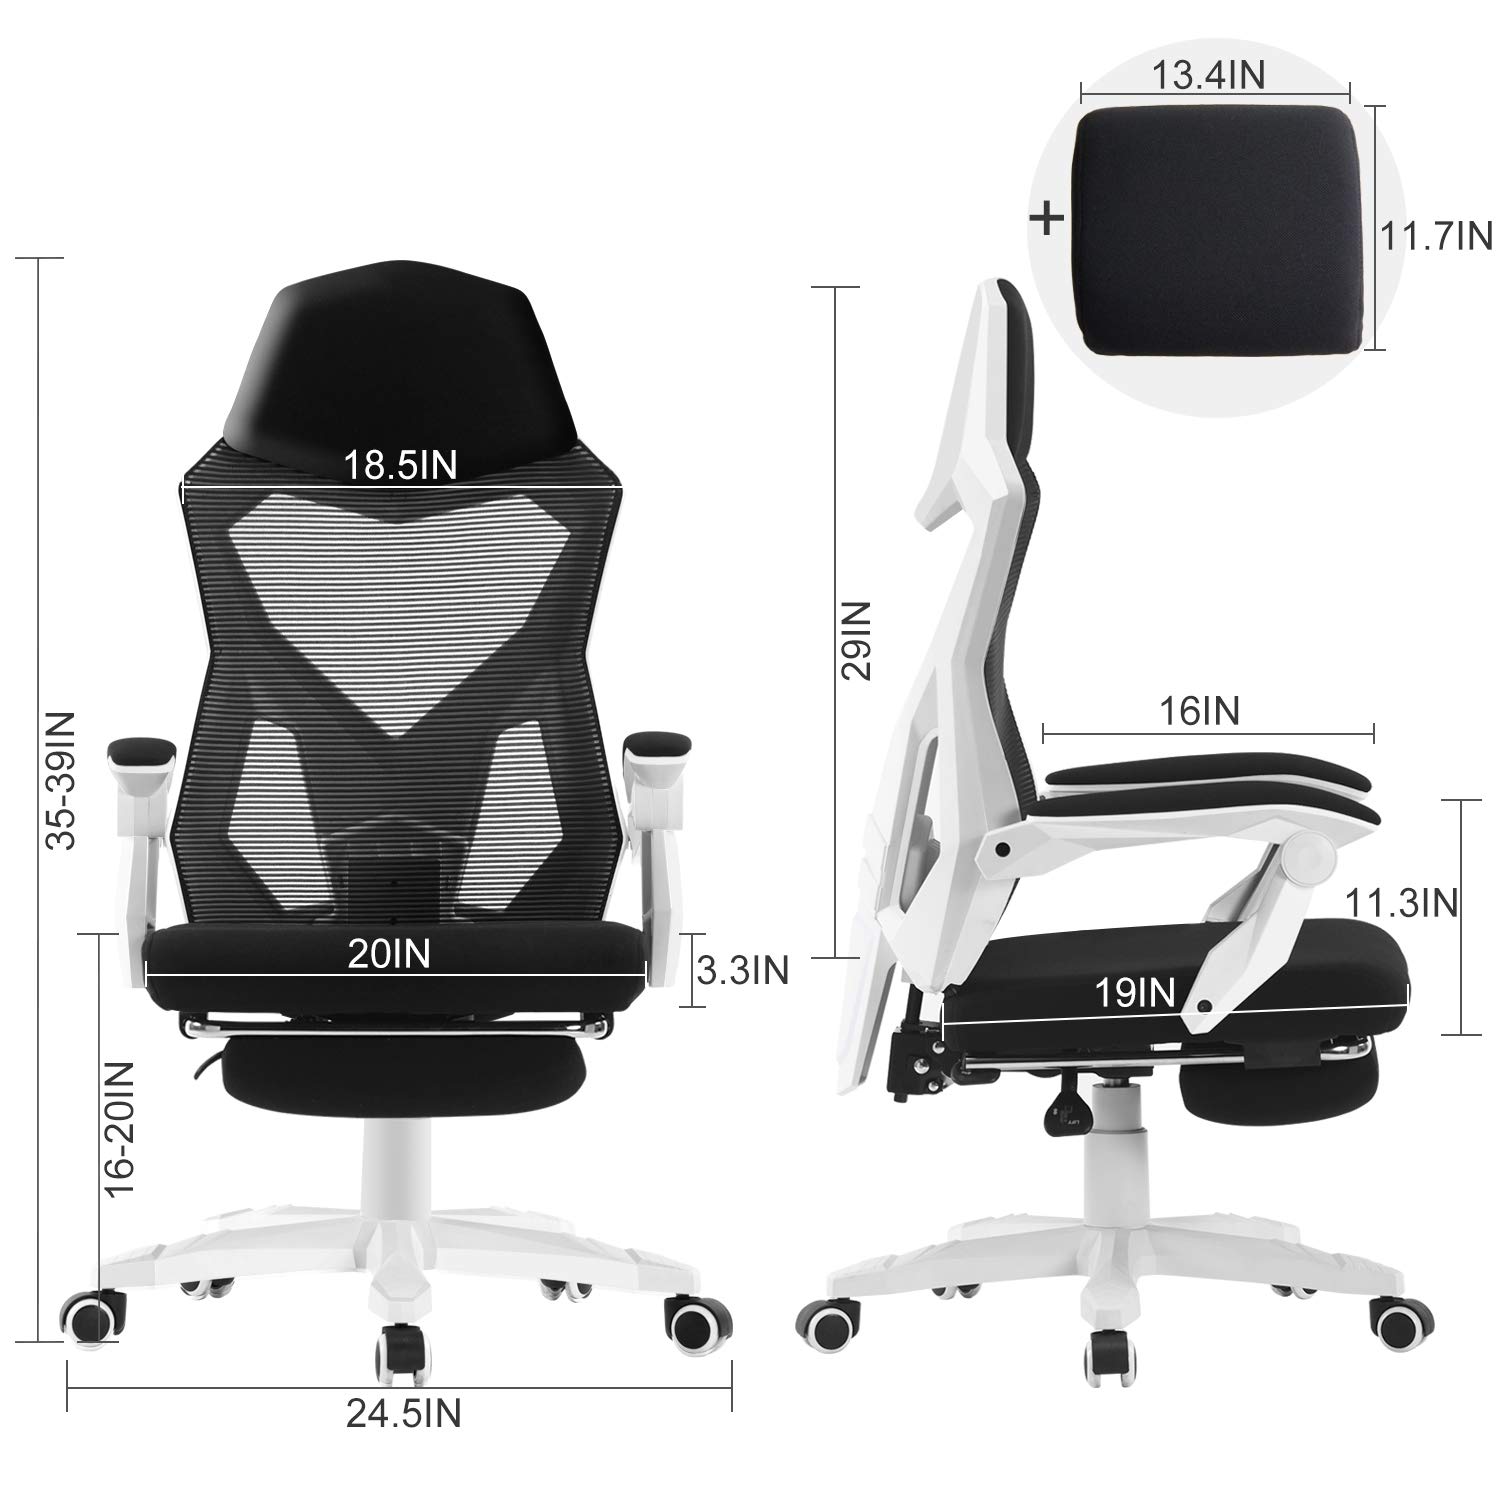
Image 1.1: HOMEFUN Ergonomic Office Chair in use, demonstrating recline and footrest.
2. Safety Information
- Ensure all screws and bolts are securely tightened before using the chair. Periodically check and re-tighten as necessary.
- Do not stand on the chair or use it as a step stool.
- Do not exceed the maximum weight capacity of 250 lbs (113 kg).
- Keep children and pets away from the chair during assembly.
- Use the chair on a level surface to prevent tipping.
- Avoid exposing the chair to direct sunlight or extreme temperatures for prolonged periods.
3. Package Contents
Before assembly, verify that all components are present and undamaged. If any parts are missing or damaged, please contact customer support.
- Chair Backrest
- Seat Cushion
- Armrests (2)
- Footrest Assembly
- Gas Lift Cylinder
- Chair Base
- Casters (5)
- Mechanism Plate
- Hardware Pack (screws, washers, Allen wrench)
- Lumbar Support Cushion
4. Assembly Instructions
Follow these steps to assemble your HOMEFUN Ergonomic Office Chair. It is recommended to assemble the chair on a soft, clean surface to prevent damage.
- Attach Casters to Base: Insert each of the five casters into the holes at the end of each leg of the chair base until they click securely into place.
- Insert Gas Lift: Place the gas lift cylinder into the center hole of the chair base.
- Attach Mechanism Plate to Seat: Align the mechanism plate with the pre-drilled holes on the underside of the seat cushion. Secure it with the provided screws, ensuring the front of the mechanism faces the front of the seat.
- Attach Armrests to Seat: Secure the armrests to the sides of the seat cushion using the designated screws. Ensure they are oriented correctly.
- Attach Backrest to Seat: Connect the backrest to the seat assembly using the remaining screws. Ensure a firm connection.
- Attach Footrest: Slide the footrest assembly into the designated slot under the seat.
- Connect Seat Assembly to Gas Lift: Carefully place the assembled seat onto the gas lift cylinder, ensuring the tapered end of the gas lift fits into the mechanism plate.

Image 4.1: Chair dimensions and component overview, useful for assembly reference.
5. Operating Instructions
Familiarize yourself with the chair's adjustable features to optimize your comfort and support.
- Height Adjustment: To adjust the seat height (from 16 inches to 20 inches), pull the lever located under the right side of the seat upwards while applying or releasing body weight. Release the lever at the desired height.
- Recline Function: The chair offers a recline range of 90 to 135 degrees. Pull the lever on the left side of the seat to unlock the recline. Lean back to the desired angle and push the lever down to lock it in place.
- Footrest Operation: To extend the footrest, pull it out from under the seat. To retract, push it back in until it is fully stored.
- Lumbar Support: The chair includes an adjustable lumbar support cushion. Position it to provide optimal support for your lower back.
- 360-Degree Swivel: The chair is designed to swivel 360 degrees for easy movement and access to your workspace.

Image 5.1: Visual representation of the chair's recline capability.

Image 5.2: Key operational features including swivel, gas lift, and lumbar support.
6. Maintenance
Proper maintenance ensures the longevity and performance of your chair.
- Cleaning: Wipe clean with a damp cloth. Avoid harsh chemicals or abrasive cleaners that may damage the mesh or other materials.
- Screw Tightness: Periodically check all screws and bolts, especially those connecting the backrest and armrests, and re-tighten them to maintain stability and prevent squeaking.
- Caster Care: Keep casters free of hair and debris to ensure smooth rolling.

Image 6.1: Detail of the breathable mesh back and high-density foam seat, highlighting materials for care.
7. Troubleshooting
Refer to this section for common issues and their solutions.
| Problem | Possible Cause | Solution |
|---|---|---|
| Chair feels unstable or wobbly. | Loose screws or bolts. | Check and re-tighten all assembly screws, especially those connecting the backrest and armrests. |
| Chair makes squeaking noises. | Loose connections or lack of lubrication. | Re-tighten all screws. Apply a small amount of silicone lubricant to moving parts if necessary. |
| Gas lift not adjusting height. | Lever not engaged or gas lift malfunction. | Ensure the height adjustment lever is fully pulled up. If the issue persists, the gas lift may need replacement. |
| Casters not rolling smoothly. | Debris caught in casters. | Remove any hair, dust, or debris from the caster wheels. |
8. Specifications
| Feature | Detail |
|---|---|
| Brand | HOMEFUN |
| Model Number | ee3f52ca-6182-4770-8191-95fc6af0b208 |
| Material | Mesh (back), Foam (seat) |
| Color | White (frame), Black (mesh/seat) |
| Product Dimensions (D x W x H) | 58.4D x 58.4W x 94H Centimeters |
| Item Weight | 15.42 kg |
| Maximum Weight Recommendation | 250 Pounds (approx. 113 kg) |
| Adjustable Height Range | 16 inches to 20 inches |
| Reclining Position Count | 2 (90-135 degree inclination) |
| Special Features | Adjustable Height, Arm Rest, Ergonomic Design, Footrest, Lumbar Support, 360-degree Swivel |
| Frame Material | Wood (internal), Powder Coated (finish) |
| Included Components | Arm Pad, Caster |
9. Warranty and Support
For warranty information or technical support, please refer to the purchase documentation or contact HOMEFUN customer service directly. Ensure you have your model number (ee3f52ca-6182-4770-8191-95fc6af0b208) and proof of purchase available when contacting support.
We are committed to providing quality products and support. If you have any questions or concerns, please do not hesitate to reach out.