1. Introduction
This manual provides detailed instructions for the installation, operation, and maintenance of your Sonew Password RFID Card Reader Door Access Control System. This system is designed to enhance security for various environments, including homes, offices, and other facilities, by offering multiple secure access methods.

Image 1.1: Front view of the Sonew RFID Card Reader Door Access Control System.
2. Features
- Supports multiple door opening modes: ID card, password, or a combination of card and password.
- Integrated RFID card reader for contactless access.
- Keypad for password entry.
- High security and reliability with strong anti-interference capabilities.
- User capacity: Supports up to 1000 standard users.
- Easy management for adding and deleting user cards and passwords.
- Quick and sensitive response for access requests.
- Wiegand 26-bit interface for compatibility with other security systems.
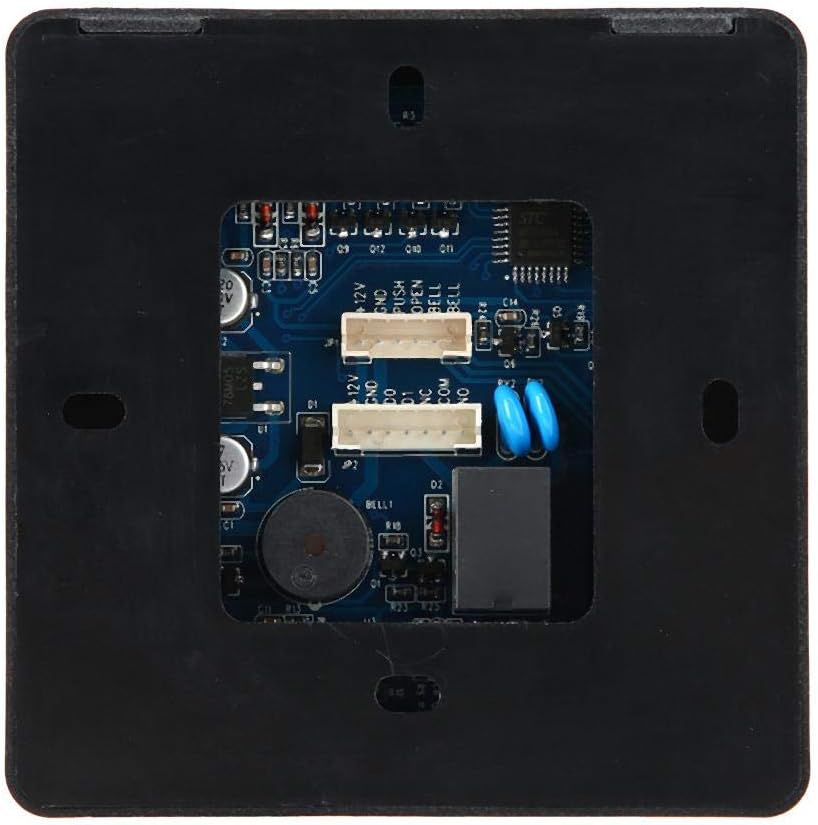
Image 2.1: The access control unit features a waterproof design, suitable for outdoor installation.
3. Specifications
| Model Number | Sonew61a8gwdcib |
| Shell Material | ABS |
| Color | Black, Silver |
| Storage Capacity | 1000 cards |
| Password Length | 3-6 digits |
| Interface | Wiegand 26 bits |
| Card Type | ID card |
| Working Voltage | 12V |
| Card Reading Distance | 1-10 cm |
| Opening Modes | Card, Password, Card + Password |
| Item Dimensions (L x W x H) | 10 x 10 x 2 cm (3.94 x 3.94 x 0.79 inches) |
| Item Weight | 0.12 Kilograms |

Image 3.1: Physical dimensions of the access control unit.
4. Package Contents
Verify that all items are present in the package:
- 1 x Door Access Control Unit
- 1 x Wiring Harness
- 1 x User Manual (this document)
- 5 x ID Cards
5. Setup and Installation
5.1 Physical Installation
Mount the access control unit in the desired location. Ensure it is securely fastened and positioned for optimal card reading and keypad access. Consider the waterproof design for outdoor applications.
5.2 Wiring Diagram
Connect the wiring harness to the access control unit and your door lock system, power supply, and optional doorbell according to the diagram below. Professional installation is recommended for electrical wiring.

Image 5.1: Back view of the access control unit with wiring terminals.

Image 5.2: The unit can be connected to a doorbell system via its Wiegand 26 interface.
6. Operating Instructions
The system supports three primary unlocking methods: card, password, or a combination of both.

Image 6.1: Visual representation of the three available unlocking methods.
6.1 Entering Programming Mode
- Press #.
- Enter the default administrator password (e.g., 123456).
- Press # again to confirm. The indicator light will change, indicating entry into programming mode.
6.2 Adding User Cards
- Enter Programming Mode (Section 6.1).
- Press 1 to add a user card.
- Present the ID card to the reader. The unit will beep to confirm.
- To add more cards, repeat step 3.
- Press # to exit adding cards mode, then * to exit Programming Mode.

Image 6.2: Unlocking the door using an ID card.
6.3 Adding User Passwords
- Enter Programming Mode (Section 6.1).
- Press 2 to add a user password.
- Enter a 3-6 digit password.
- Press # to confirm. The unit will beep.
- To add more passwords, repeat steps 3-4.
- Press # to exit adding passwords mode, then * to exit Programming Mode.
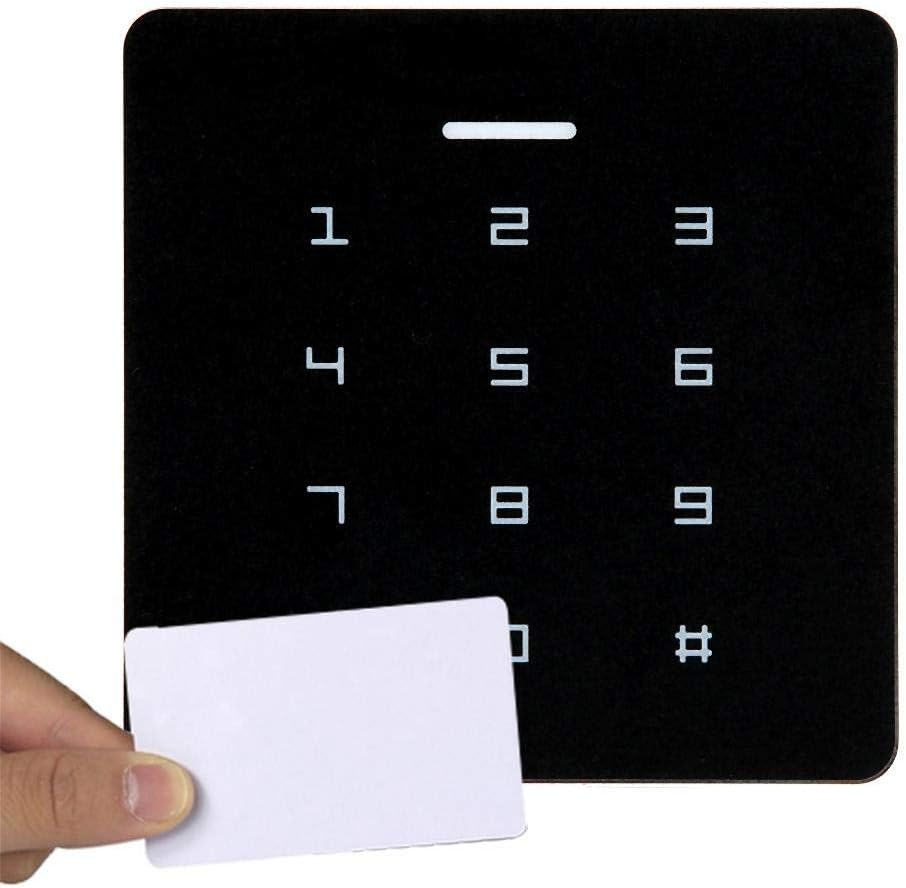
Image 6.3: Unlocking the door by entering a password.
6.4 Adding User Cards + Passwords
- Enter Programming Mode (Section 6.1).
- Press 3 to add a user card + password.
- Present the ID card to the reader.
- Enter a 3-6 digit password.
- Press # to confirm. The unit will beep.
- To add more card+password combinations, repeat steps 3-5.
- Press # to exit adding mode, then * to exit Programming Mode.
6.5 Deleting Users
- Enter Programming Mode (Section 6.1).
- Press 4 to delete a user.
- Present the ID card to be deleted, or enter the password to be deleted.
- Press # to confirm. The unit will beep.
- To delete more users, repeat step 3.
- Press # to exit deleting mode, then * to exit Programming Mode.
6.6 Changing Administrator Password
- Enter Programming Mode (Section 6.1).
- Press 5 to change the administrator password.
- Enter the new 3-6 digit administrator password.
- Press # to confirm. The unit will beep.
- Press * to exit Programming Mode.
7. Maintenance
To ensure the longevity and optimal performance of your access control system, follow these maintenance guidelines:
- Cleaning: Use a soft, dry cloth to clean the surface of the unit. Avoid abrasive cleaners, solvents, or excessive moisture.
- Power Supply: Ensure a stable 12V power supply. Fluctuations can affect performance.
- Wiring: Periodically check all wiring connections for tightness and signs of wear or damage.
- Environmental Conditions: While the unit has a waterproof design, extreme temperatures or prolonged exposure to harsh weather conditions should be minimized if possible.
- Software/Firmware: Keep track of any potential firmware updates from the manufacturer, though this device typically does not require user-level updates.
8. Troubleshooting
| Problem | Possible Cause | Solution |
|---|---|---|
| Unit does not power on. | No power supply or incorrect wiring. | Check power connections and ensure 12V supply. Verify wiring according to the diagram. |
| Card not recognized. | Card not programmed, damaged card, or incorrect card type. | Ensure the card is an ID card and has been properly added to the system. Try another card. |
| Password not accepted. | Incorrect password entered, or password not programmed. | Verify the password. Ensure the password has been correctly added to the system. |
| Door does not unlock. | Lock mechanism issue, incorrect wiring to lock, or insufficient power to lock. | Check the door lock's functionality independently. Verify wiring between the access unit and the lock. Ensure the power supply is adequate for the lock. |
| Cannot enter Programming Mode. | Incorrect administrator password. | Ensure the correct administrator password is used. If forgotten, consult the manufacturer for reset procedures (if available). |
9. Warranty and Support
For warranty information and technical support, please contact your retailer or the manufacturer, Sonew. Keep your purchase receipt as proof of purchase for any warranty claims.
Manufacturer: Sonew