Sylvan HX-5000
Sylvan HX-5000 Hydroxyl & Ozone Generator User Manual
Model: HX-5000
1. Introduction
The Sylvan HX-5000 is an industrial-grade hydroxyl and ozone generator designed for air purification and odor elimination in large spaces. This unit offers the flexibility to operate in hydroxyl-only mode for occupied environments, ozone-only mode for unoccupied environments, or a combination of both for advanced treatment. It is intended for professional use in restoration and industrial applications.
This manual provides essential information for the safe and effective operation, setup, and maintenance of your HX-5000 unit. Please read it thoroughly before initial use.
2. Important Safety Information
- WARNING: DO NOT USE THE OZONE FUNCTION IN OCCUPIED SPACES. Ozone is a powerful oxidizer and can be harmful to humans, pets, and plants. Ensure the treatment area is completely vacant during ozone generation and for a sufficient period afterward (typically 24 hours) to allow ozone to dissipate.
- Always operate the unit in a well-ventilated area when using the hydroxyl function.
- The hydroxyl function requires an external air mover (sold separately) to effectively distribute hydroxyl molecules.
- Do not operate the unit if the power cord is damaged or if the unit shows signs of malfunction.
- Keep the unit away from water and moisture. Do not immerse in liquids.
- Ensure the unit is placed on a stable, level surface.
- Unplug the unit from the power outlet before performing any maintenance or cleaning.
- This appliance is not intended for use by persons (including children) with reduced physical, sensory or mental capabilities, or lack of experience and knowledge, unless they have been given supervision or instruction concerning use of the appliance by a person responsible for their safety.
3. Product Overview
The Sylvan HX-5000 combines hydroxyl and ozone generation capabilities in a single robust unit. It features a control panel for selecting operating modes and adjusting ozone output.
3.1 Unit Components
- Main Unit: Houses the hydroxyl optic assemblies and ozone generator.
- Control Panel: For power, mode selection, and ozone adjustment.
- Air Outlet: Where treated air exits the unit.
- Power Inlet: For connecting the power cord.
- Handle: For portability.

Figure 3.1: Front view of the Sylvan HX-5000 unit, showing the handle and the air outlet with internal components visible.
3.2 Control Panel
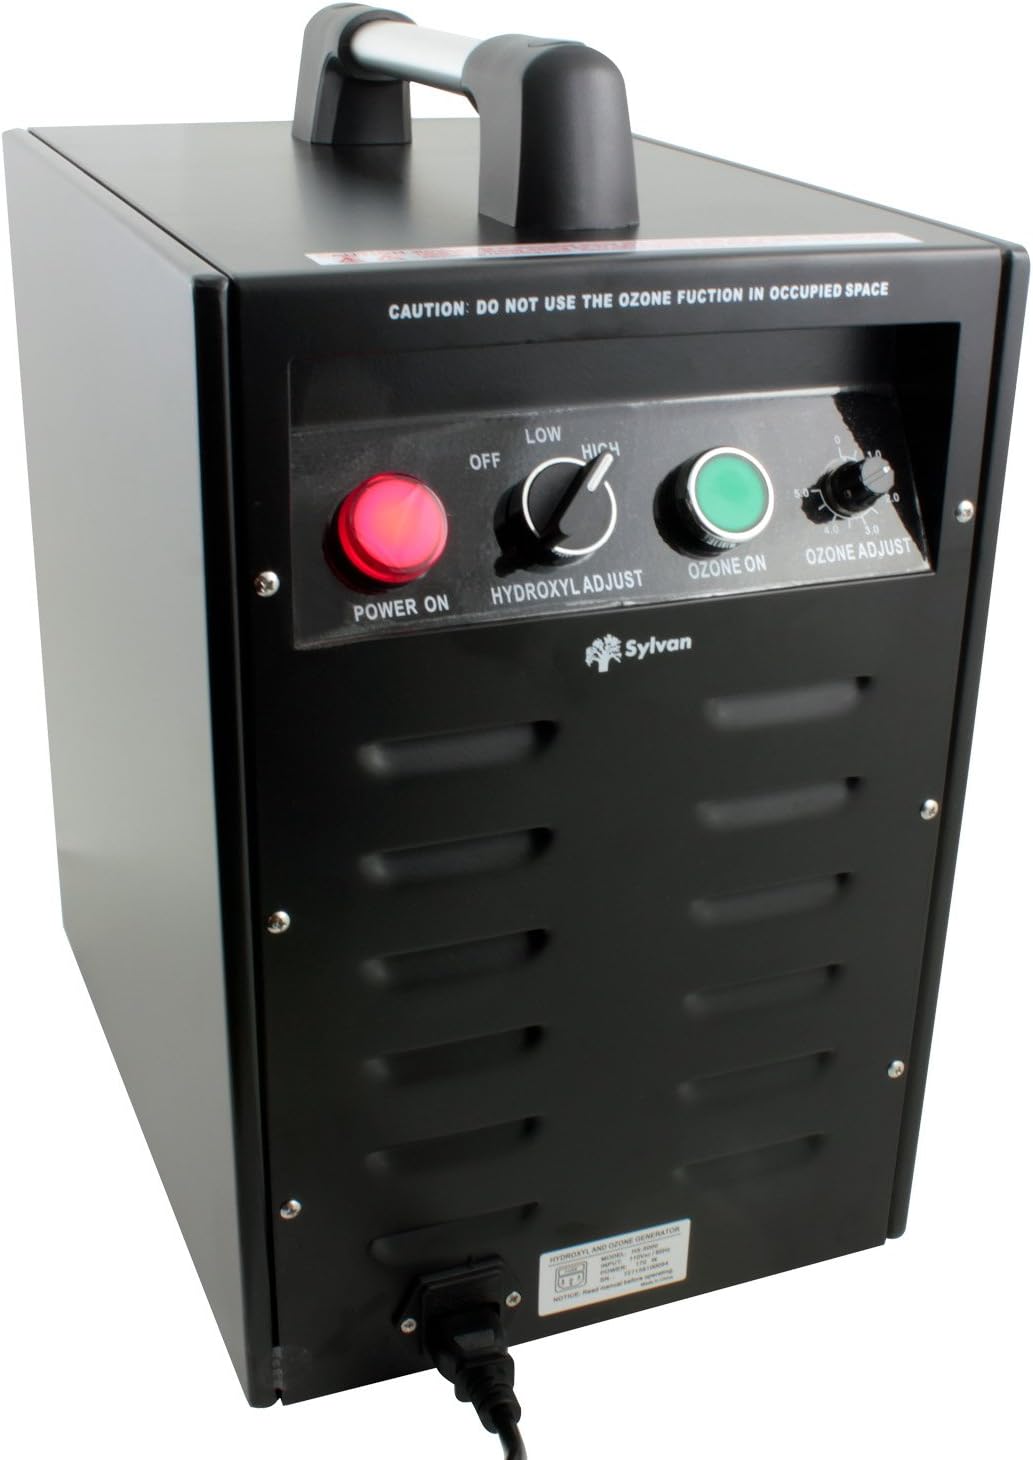
Figure 3.2: Detailed view of the control panel.
- POWER ON (Red Button): Activates the unit.
- HYDROXYL ADJUST (Toggle Switch): Selects between OFF, LOW, and HIGH hydroxyl output.
- OZONE ON (Green Button): Activates the ozone generation function.
- OZONE ADJUST (Rotary Knob): Adjusts ozone output from 0 to 5000 mg/hr.
- CAUTION Label: "DO NOT USE THE OZONE FUNCTION IN OCCUPIED SPACE"
4. Setup and Installation
- Unpack the Unit: Carefully remove the HX-5000 from its packaging. Inspect for any shipping damage.
- Placement: Place the unit on a stable, level surface in the area to be treated. Ensure adequate clearance around the air inlet and outlet for proper airflow.
- Connect Air Mover (for Hydroxyl Function): For effective distribution of hydroxyl molecules, connect an external air mover (sold separately) to the air outlet of the HX-5000. The air mover helps circulate the treated air throughout the space.
- Power Connection: Plug the power cord into the unit's power inlet, then into a standard electrical outlet (AC power).
- Area Preparation:
- For Hydroxyl-only treatment: Ensure the area is well-ventilated if occupied.
- For Ozone treatment (or combined Hydroxyl + Ozone): Evacuate all humans, pets, and plants from the treatment area. Close windows and doors to contain the ozone.

Figure 4.1: Sylvan HX-5000 connected to an external air mover for hydroxyl distribution.
5. Operating Instructions
The HX-5000 offers three operating modes: Hydroxyl-only, Ozone-only, and Combined Hydroxyl + Ozone.
5.1 Hydroxyl-Only Operation (Occupied Spaces)
This mode is suitable for continuous air purification in occupied environments.
- Ensure an air mover is connected and operating to distribute hydroxyls effectively.
- Press the POWER ON (red) button.
- Set the HYDROXYL ADJUST toggle switch to LOW or HIGH, depending on the treatment intensity required.
- Ensure the OZONE ON (green) button is OFF and the OZONE ADJUST knob is set to 0.
- Allow the unit to operate for the desired duration. Hydroxyl treatment typically requires longer periods (36-48 hours for small rooms) compared to ozone.
5.2 Ozone-Only Operation (Unoccupied Spaces)
CRITICAL: Ensure the treatment area is completely vacant of humans, pets, and plants before activating ozone.
- Ensure the area is evacuated and sealed (windows/doors closed).
- Press the POWER ON (red) button.
- Set the HYDROXYL ADJUST toggle switch to OFF.
- Press the OZONE ON (green) button.
- Adjust the OZONE ADJUST rotary knob to the desired output level (0-5000 mg/hr).
- Allow the unit to operate for the required treatment time (e.g., 24 hours for small rooms).
- After treatment: Turn off the unit, unplug it, and ventilate the area thoroughly for at least 24 hours before re-entry.
5.3 Combined Hydroxyl + Ozone Operation (Unoccupied Spaces)
CRITICAL: This mode is highly oxidizing. Ensure the treatment area is completely vacant of humans, pets, and plants before activating.
- Ensure an air mover is connected and operating.
- Ensure the area is evacuated and sealed.
- Press the POWER ON (red) button.
- Set the HYDROXYL ADJUST toggle switch to LOW or HIGH.
- Press the OZONE ON (green) button.
- Adjust the OZONE ADJUST rotary knob to the desired output level.
- Allow the unit to operate for the required treatment time.
- After treatment: Turn off the unit, unplug it, and ventilate the area thoroughly for at least 24 hours before re-entry.
6. Maintenance
Regular maintenance ensures optimal performance and longevity of your HX-5000 unit.
- Cleaning the Exterior: Wipe the exterior of the unit with a soft, damp cloth. Do not use abrasive cleaners or solvents. Ensure the unit is unplugged before cleaning.
- Air Filter Maintenance: The unit uses an Activated Carbon filter. Regularly check and clean or replace the air filter as needed to maintain airflow and efficiency. Refer to the filter manufacturer's instructions for specific cleaning or replacement intervals.
- Hydroxyl Optic Assemblies: The hydroxyl optic assemblies (UV lamps) have a limited lifespan. If hydroxyl output diminishes, they may need replacement. Contact Sylvan customer support for replacement parts and instructions.
- Ozone Plates: Ozone generation relies on ceramic plates. If ozone output diminishes, these plates may need cleaning or replacement. Contact Sylvan customer support for replacement parts and instructions.
7. Troubleshooting
| Problem | Possible Cause | Solution |
|---|---|---|
| Unit does not power on. | No power supply. Power button not pressed. | Check power cord connection and wall outlet. Press the red POWER ON button. |
| No hydroxyl output. | Hydroxyl switch OFF. Optic assemblies worn out. | Set HYDROXYL ADJUST to LOW or HIGH. Contact Sylvan support for replacement optic assemblies. |
| No ozone output. | Ozone button OFF. Ozone adjust knob set to 0. Ozone plates dirty/worn. | Press the green OZONE ON button. Adjust OZONE ADJUST knob to desired level. Contact Sylvan support for cleaning/replacement of ozone plates. |
| Reduced airflow. | Blocked air inlet/outlet. Dirty air filter. | Ensure no obstructions. Clean or replace the Activated Carbon filter. |
If troubleshooting steps do not resolve the issue, please contact Sylvan customer support.
8. Specifications
- Model: HX-5000
- Brand: Sylvan
- Product Dimensions (D x W x H): 17" x 10" x 15"
- Item Weight: 35 Pounds
- Power Source: AC
- Control Method: Touch, Button Control
- Filter Type: Activated Carbon
- Floor Area Coverage: Up to 2500 Square Feet
- Ozone Output: 0 - 5000 mg/hr (Adjustable)
- Special Features: Hydroxyl and Ozone Generator Combo with Adjustable Ozone Output

Figure 8.1: Dimensions of the Sylvan HX-5000 unit.
9. Warranty and Support
For warranty information, technical support, or to order replacement parts, please contact Sylvan customer service. Refer to your purchase documentation for specific warranty terms and contact details.
Manufacturer: SYLVAN
Ask a question about this manual
Ask about setup, troubleshooting, compatibility, parts, safety, or missing instructions. Manuals+ will review the question and use this page’s manual context to help answer it.