
Introduction
This manual provides instructions for the Pyle PDWM1988B Compact UHF Wireless Microphone System. This system is designed for clear audio transmission in various applications, including home use, PA systems, and presentations. It features a single-channel UHF selectable frequency design, a USB-powered receiver, and includes both headset and lavalier microphones for versatile use.
What's in the Box

Image: All components included in the Pyle PDWM1988B package, laid out for clear viewing.
- Microphone Receiver Base
- Belt-Pack Transmitter
- Headset Microphone
- Lavalier Microphone
- (2) 'AA' Batteries
- USB Cable
Key Features
- Wireless belt-pack microphone system
- Single Channel, UHF selectable frequency design
- Lab-tested distortion-free audio performance
- USB powered microphone Receiver base
- Compact tabletop receiver design
- Adjustable volume setting
- Receiver base with digital LCD display
- Digital AF/RF audio signal indicators and frequency readout
- Dual antenna for extended wireless range (up to 165 ft)
- Integrated low noise circuitry
- 1/4'' unbalanced audio output jack
- XLR (3-pin) balanced audio input connector
- Power on/off control

Image: Illustration of the system's wireless range, indicating connectivity up to 165 feet.
Video: An overview of the Pyle Compact UHF Wireless Microphone System, highlighting its features such as wide compatibility, powerful wireless range, and adjustable volume control.
Setup Instructions
1. Receiver Placement and Power
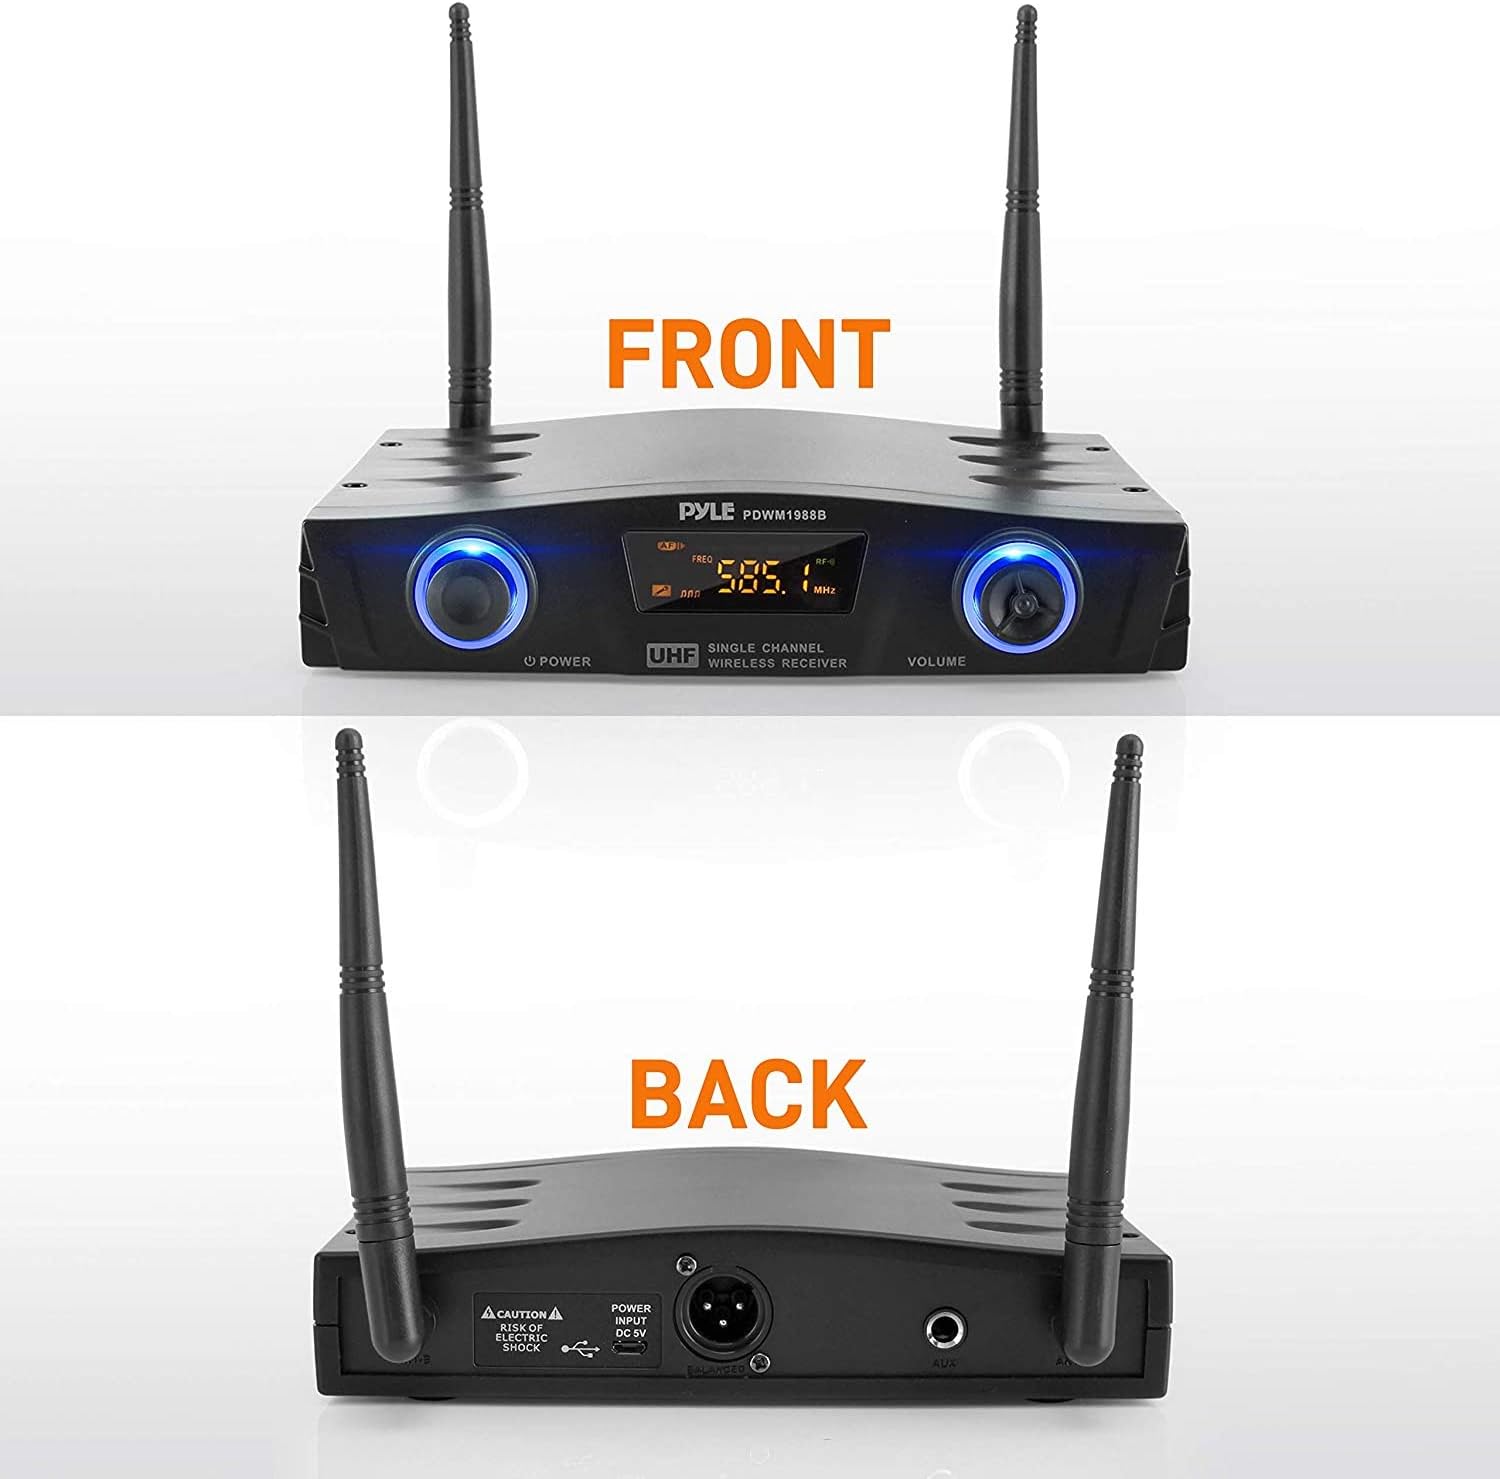
Image: Detailed views of the receiver's front panel with controls and LCD, and the rear panel with input/output ports.
- Place the receiver base on a stable, flat surface. Ensure it is within the desired operating range (up to 165 feet) of where the transmitter will be used.
- Connect the USB cable to the receiver's Micro USB port and plug the other end into a DC 5V USB power source (e.g., a USB wall adapter, computer USB port).
- Extend the dual antennas on the receiver for optimal signal reception.
- Press the POWER button on the receiver to turn it on. The digital LCD display will illuminate.
2. Transmitter and Microphone Setup
- Open the battery compartment of the belt-pack transmitter and insert the two 'AA' batteries, observing correct polarity. Close the compartment securely.
- Choose your preferred microphone:
- For the Headset Microphone: Plug the 3.5mm connector into the input jack on the belt-pack transmitter. Position the headset comfortably on your head with the microphone near your mouth.
- For the Lavalier Microphone: Plug the 3.5mm connector into the input jack on the belt-pack transmitter. Clip the lavalier microphone to your clothing, approximately 6-8 inches from your mouth.
- Turn on the belt-pack transmitter using its power switch. The display on the transmitter should illuminate.
3. Connecting to an Audio System

Image: A close-up of a hand connecting a 1/4-inch audio jack to the receiver's output port.

Image: Visual representation of the Pyle system's compatibility with different audio equipment, including PA systems, amplifiers, mixers, and karaoke setups.
The receiver offers two output options:
- 1/4'' Unbalanced Audio Output Jack: Use a standard 1/4'' audio cable to connect the receiver to the input of a PA system, amplifier, mixer, or karaoke machine.
- XLR (3-pin) Balanced Audio Input Connector: For professional audio setups, use an XLR cable to connect the receiver to an XLR input on a mixer or audio interface.
Ensure the volume on your connected audio system is initially set to a low level before proceeding.
Operating Instructions
1. Power On
After completing the setup, ensure both the receiver and the belt-pack transmitter are powered on. The LCD displays on both units should be active.
2. Frequency Selection
The system features a selectable UHF frequency design. The receiver's LCD will display the current operating frequency. If you experience interference, you can change the frequency on the receiver. Refer to the receiver's controls for specific frequency adjustment buttons (usually labeled 'CH' or with arrow icons). Ensure the transmitter automatically syncs or is manually set to the same frequency as the receiver.
3. Volume Adjustment
The receiver has an adjustable volume knob. Start with the volume at a low setting and gradually increase it to a comfortable listening level. Adjust the volume on your connected audio system as needed. Avoid setting the volume too high to prevent feedback or distortion.
4. Monitoring Signal Indicators
The receiver's digital LCD display includes AF (Audio Frequency) and RF (Radio Frequency) signal indicators.
- RF Indicator: Shows the strength of the wireless signal from the transmitter. A strong, stable RF signal is crucial for clear audio.
- AF Indicator: Shows the presence and level of the audio signal being received from the microphone.
Maintenance
- Cleaning: Use a soft, dry cloth to clean the exterior of the receiver and transmitter. Do not use liquid cleaners or solvents.
- Battery Replacement: Replace the 'AA' batteries in the belt-pack transmitter when the low battery indicator appears or when audio quality degrades. Always use fresh batteries.
- Storage: When not in use for extended periods, remove batteries from the transmitter and store the system in a cool, dry place away from direct sunlight and extreme temperatures.
- Cable Care: Avoid sharp bends or kinks in the microphone and USB cables to prevent damage.
Troubleshooting
| Problem | Possible Cause | Solution |
|---|---|---|
| No sound from microphone |
|
|
| Interference or static noise |
|
|
| Weak or distorted audio |
|
|
Technical Specifications
| Feature | Detail |
|---|---|
| Wireless System Type | UHF (Ultra High Frequency) Band |
| Selectable Channels | 16 Channels |
| Wireless Operation Range | Up to 165 ft. |
| Audio Frequency Response | 30-20kHz |
| Image and Spurious Rejection | >70 dB |
| Audio Output Level | +/- 300 mv |
| Output Impedance | 600 ohm |
| Frequency Stability | +/- 0.005% |
| Maximum Deviation | +/- 15 kHz |
| Total Harmonic Distortion (T.H.D) | 0.03% |
| Sensitivity | -96dBm |
| Construction Material | Engineered ABS Housing |
| Power Consumption | <85mA |
| USB Interface | Micro USB |
| Belt-pack Power | (2) x 'AA' Batteries (included) |
| Receiver Power Supply | USB, DC 5V |
| Belt-pack Dimensions (L x W x H) | 3.94'' x 2.46'' x 0.87'' Inches |
| Receiver Base Dimensions (L x W x H) | 8.08'' x 6.97'' x 1.72'' Inches |
Warranty & Support
For warranty information and technical support, please refer to the documentation provided with your purchase or visit the official Pyle website. Specific warranty terms may vary by region and retailer.


