
1. Introduction
Thank you for choosing the Hotpoint HSFC 3T127 C compact dishwasher. This manual provides essential information for the safe and efficient use of your appliance. Please read these instructions carefully before installation and operation, and keep them for future reference.

Figure 1.1: Front view of the Hotpoint HSFC 3T127 C Dishwasher.
2. Safety Information
Always adhere to the following safety precautions to prevent personal injury or damage to the appliance.
- Electrical Safety: Ensure the dishwasher is connected to a properly grounded outlet. Do not use extension cords. Disconnect power before any maintenance or cleaning.
- Water Connection: Connect the dishwasher to a cold water supply using new hose sets. Do not reuse old hose sets.
- Child Safety: Keep children away from the dishwasher, especially when it is operating or when the door is open. Detergents are corrosive.
- Loading: Load sharp items (knives, forks) with the handles up to prevent injury. Do not overload the dishwasher.
- Detergents: Use only detergents, rinse aids, and salts specifically designed for automatic dishwashers.
- Installation: Installation should be performed by a qualified technician. Ensure the appliance is level and stable.
3. Setup and Installation
The Hotpoint HSFC 3T127 C is a freestanding dishwasher designed for easy integration into your kitchen.
3.1 Unpacking and Positioning
Carefully remove all packaging materials. Position the dishwasher on a firm, level floor. Adjust the leveling feet to ensure stability and proper door alignment.

Figure 3.1: The dishwasher positioned within a kitchen environment.
3.2 Water and Electrical Connections
Connect the water inlet hose to a cold water tap with a 3/4" thread. Ensure the drain hose is properly connected to a suitable drain or sink trap, preventing kinks. Plug the power cord into a grounded 220V electrical outlet.
3.3 First Use Preparations
Before the first wash cycle, fill the salt dispenser and rinse aid dispenser.
- Salt Dispenser: Unscrew the cap of the salt dispenser (usually located at the bottom of the dishwasher tub). Using the funnel provided, pour dishwasher salt until the dispenser is full. Refill with water if it's the first time. Screw the cap back on tightly.
- Rinse Aid Dispenser: Open the rinse aid dispenser cap (located next to the detergent dispenser). Fill with rinse aid up to the maximum level indicator. Close the cap securely.

Figure 3.2: Location of the detergent and rinse aid dispensers.
4. Operating Instructions
4.1 Control Panel Overview
The control panel features intuitive buttons and an LED display for program selection and monitoring.

Figure 4.1: Detailed view of the control panel with LED display.
- Power Button: Turns the dishwasher on/off.
- Program Selector (P): Cycles through available wash programs.
- LED Display: Shows remaining time, error codes, and selected program.
- Delay Start: Sets a delayed start time for the wash cycle.
- Start/Pause Button: Starts or pauses the selected wash program.
4.2 Loading the Dishwasher
Proper loading ensures optimal cleaning performance. The HSFC 3T127 C is designed for 10 place settings.
- Scrape off large food particles from dishes.
- Place larger items (pots, pans, plates) in the lower basket.
- Place glasses, cups, and smaller plates in the upper basket.
- Arrange cutlery in the cutlery basket, ensuring sharp ends face downwards.
- Ensure spray arms can rotate freely and are not blocked by dishes.

Figure 4.2: Interior view showing the upper and lower racks.

Figure 4.3: Interior view with a focus on the cutlery basket.
4.3 Adding Detergent
Add the appropriate amount of dishwasher detergent to the dispenser before each cycle. Refer to the detergent packaging for dosage recommendations.
4.4 Program Selection and Start
- Press the Power button to turn on the dishwasher.
- Press the Program Selector (P) button repeatedly to choose your desired wash program. The LED display will show the program duration. Available cycles include:
- Normal
- Intensive
- Rapid (27-minute cycle, may not include drying)
- Economic (Eco)
- And other specialized cycles (total of 6 options)
- Close the dishwasher door firmly.
- Press the Start/Pause button to begin the cycle.
To pause a cycle, open the door slightly or press the Start/Pause button. To resume, close the door and press Start/Pause again.
5. Maintenance and Care
Regular maintenance ensures the longevity and optimal performance of your dishwasher.
5.1 Cleaning Filters
The filter system (coarse filter, fine filter, microfilter) should be cleaned regularly to prevent blockages and ensure effective cleaning.
- Turn off and unplug the dishwasher.
- Remove the lower spray arm.
- Twist and lift out the filter assembly from the bottom of the tub.
- Rinse the filters under running water to remove food particles. Use a brush if necessary.
- Reassemble the filters and place them back into the dishwasher, ensuring they click into place.
5.2 Refilling Salt and Rinse Aid
Monitor the indicator lights on the control panel for salt and rinse aid levels. Refill as described in Section 3.3 when the indicators illuminate.
5.3 Cleaning the Exterior and Interior
- Wipe the exterior surfaces with a soft, damp cloth. Do not use abrasive cleaners.
- Clean the door seal regularly with a damp cloth to remove food residue.
- Run a dishwasher cleaning cycle periodically using a specialized dishwasher cleaner to remove grease and limescale buildup.
6. Troubleshooting
Before contacting customer service, refer to the following table for common issues and their solutions.
| Problem | Possible Cause | Solution |
|---|---|---|
| Dishwasher does not start | Power cord not plugged in; door not closed properly; fuse blown. | Check power connection; ensure door is latched; check household fuse/breaker. |
| Dishes not clean | Improper loading; clogged spray arms; insufficient detergent; dirty filters. | Reload dishes correctly; clean spray arm nozzles; add more detergent; clean filters. |
| Dishes not drying properly | Insufficient rinse aid; selected program does not include drying; plastic items. | Refill rinse aid; select a program with drying cycle; plastic items naturally retain water. Consider opening door after cycle. |
| Excessive noise during operation | Dishes rattling; foreign object in pump; dishwasher not level. | Rearrange dishes; check for foreign objects; adjust leveling feet. |
| Water not draining | Clogged drain hose or filter; drain pump malfunction. | Clean filters; check drain hose for kinks or blockages. |
7. Specifications
Key technical specifications for the Hotpoint HSFC 3T127 C Dishwasher.
| Parameter | Value |
|---|---|
| Model Name | HSFC 3T127 C |
| Dimensions (L x W x H) | 59 x 45 x 85 cm |
| Weight | 39.5 Kilograms |
| Voltage | 220 Volts |
| Place Settings Capacity | 10 |
| Water Consumption (Eco program) | 9 Litres |
| Noise Level | 47 dB |
| Energy Efficiency Class | E |
| Cycle Options | Normal, Intensive, Rapid, Economic (Eco), 6 total cycles |
| Display Type | LED |
| Material | Stainless Steel (interior), White (exterior) |
| Installation Type | Freestanding |
| Special Feature | Compact |
| EPREL Product Database Link | View on EPREL |
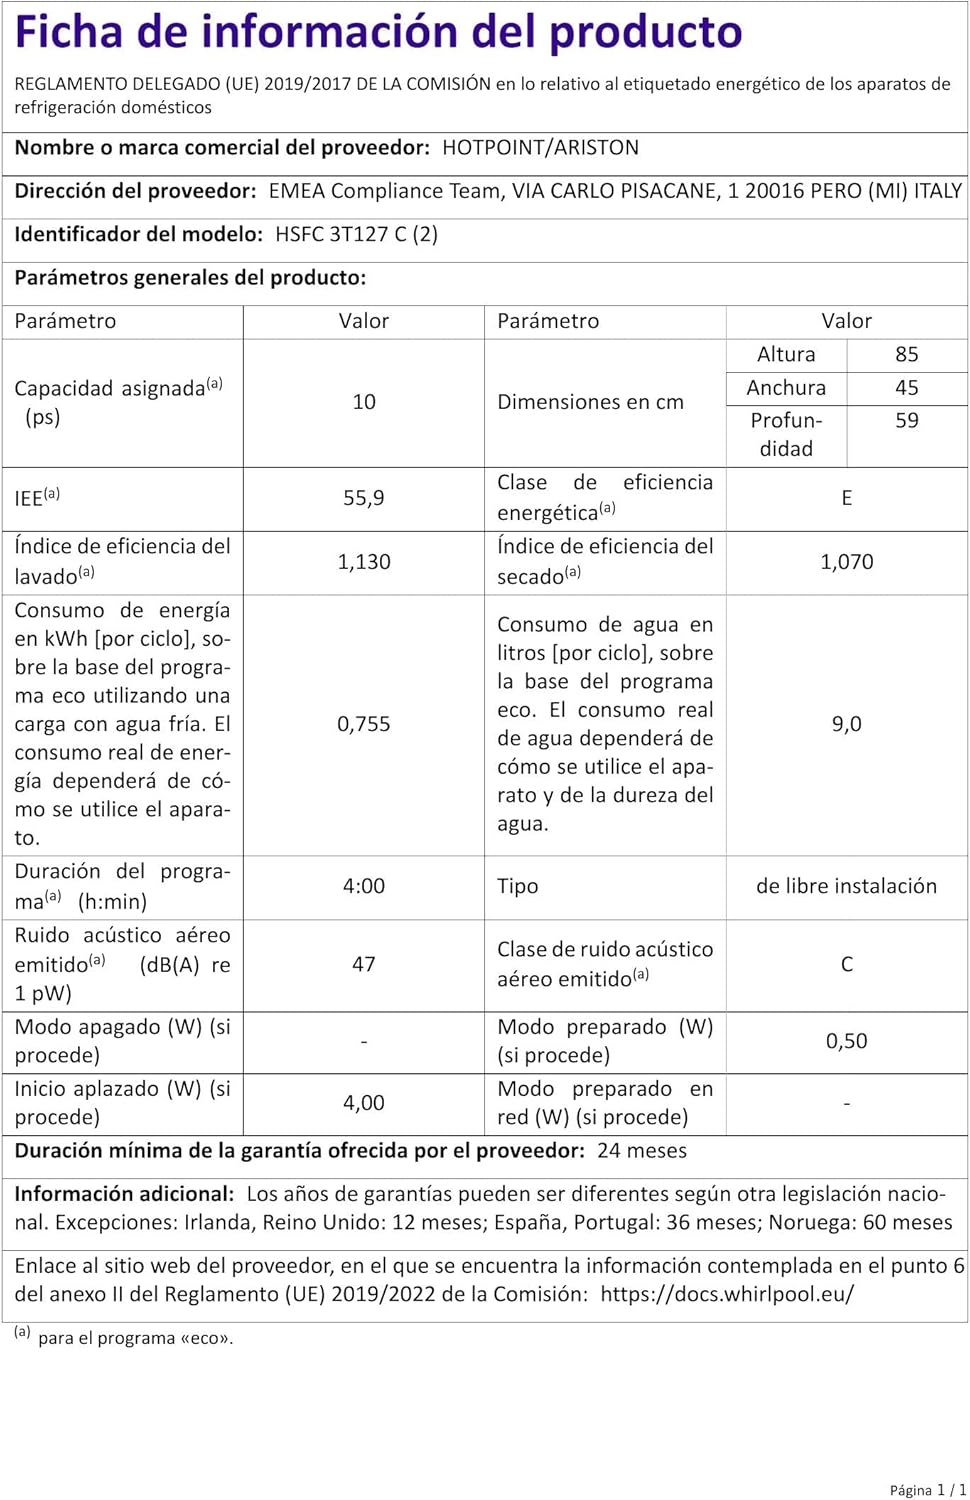
Figure 7.1: Energy efficiency label for the Hotpoint HSFC 3T127 C.

Figure 7.2: Dimensional drawing with measurements in millimeters.
8. Warranty and Support
The Hotpoint HSFC 3T127 C Dishwasher comes with a minimum warranty period of 24 months from the date of purchase. This warranty covers manufacturing defects and ensures proper functioning under normal use.
For warranty claims, technical assistance, or spare parts, please contact Hotpoint customer support. Keep your proof of purchase for warranty validation.
You can find more information and support on the official Hotpoint website or through your local authorized service center.


