1. Introduction
Thank you for choosing the Starax Under-Counter Round Trash Can. This product is designed for convenient waste disposal, integrating seamlessly into your kitchen or utility cabinet. Its unique mechanism allows the trash can to slide out and the lid to open automatically when the cabinet door is opened, eliminating the need to manually pull out the bin or lift the lid. Constructed from durable stainless steel, this 10-liter (2.6-gallon) capacity bin offers both practicality and a sleek appearance.
2. Product Overview
The Starax Under-Counter Trash Can features a robust stainless steel body and a mechanism that links its movement and lid opening to your cabinet door. It is designed for installation on either the left or right side of your cabinet interior.
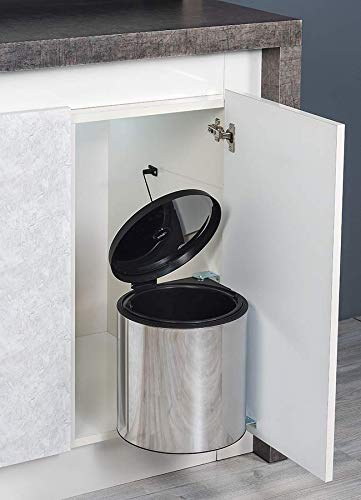
Figure 1: The Starax Under-Counter Round Trash Can with its lid open, showcasing the internal bucket and stainless steel exterior.
3. Specifications
| Brand | Starax |
| Capacity | 10 Liters (2.6 Gallons) |
| Material | Stainless Steel |
| Shape | Round |
| Finish Type | Stainless Steel |
| Item Weight | 5 Pounds |
| Dimensions (Approx.) | Refer to Figure 2 for detailed measurements. |

Figure 2: Dimensional drawing showing the top-down view of the trash can with width (208mm) and depth (208mm) indicated, and a side view illustrating its placement within a cabinet.
4. Setup and Installation
Proper installation ensures optimal functionality of your Starax trash can. It can be installed on either the left or right side of your cabinet. Ensure you have adequate space within your cabinet for the bin to fully extend and the lid to open.
Required Tools:
- Measuring Tape
- Pencil
- Drill
- Screwdriver
Installation Steps:
- Determine Placement: Choose the desired side (left or right) inside your cabinet for installation. Ensure there is enough clearance for the bin and its lid to operate without obstruction.
- Position the Base: Place the trash can assembly inside the cabinet at the desired location. Mark the screw holes for the base plate on the cabinet floor.
- Secure the Base: Drill pilot holes if necessary, then secure the base plate to the cabinet floor using the provided screws.
- Attach the Door Mechanism: With the cabinet door open, extend the trash can assembly. Align the connecting arm with the inside of the cabinet door. Mark the screw holes for the door attachment bracket.
- Secure the Door Mechanism: Drill pilot holes if necessary, then secure the door attachment bracket to the inside of the cabinet door using the provided screws.
- Test Operation: Gently open and close the cabinet door to ensure the trash can slides out smoothly and the lid opens and closes correctly. Adjust the position of the door attachment bracket slightly if needed to optimize movement.

Figure 3: Top-down view illustrating the trash can's movement within the cabinet. The diagram shows the bin retracted, partially extended with the lid opening, and fully extended with the lid fully open, demonstrating the automatic mechanism.
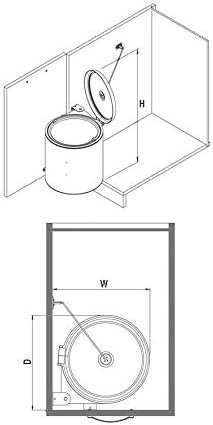
Figure 4: Front view diagram showing the trash can installed inside a cabinet. It highlights the height (H), width (W), and depth (D) considerations for proper fit and operation, along with the attachment points for the mechanism.
5. Operating Instructions
Using your Starax Under-Counter Trash Can is straightforward:
- Open Cabinet Door: Gently pull open the cabinet door to which the trash can is attached.
- Automatic Extension and Lid Opening: As the door opens, the trash can will slide out from the cabinet, and its lid will automatically lift, providing access to the bin.
- Dispose of Waste: Place your waste into the inner bucket.
- Close Cabinet Door: Push the cabinet door closed. The trash can will retract back into the cabinet, and the lid will automatically close, sealing the contents.
6. Maintenance and Care
To ensure the longevity and hygiene of your trash can, follow these maintenance guidelines:
- Cleaning the Exterior: Wipe the stainless steel exterior with a soft, damp cloth and a mild, non-abrasive cleaner. Dry thoroughly to prevent water spots. Avoid harsh chemicals or abrasive scrubbers that can damage the finish.
- Cleaning the Inner Bucket: The inner bucket can be removed for easy cleaning. Wash it with warm, soapy water, rinse thoroughly, and dry completely before returning it to the main unit.
- Mechanism Check: Periodically check the sliding mechanism and the lid opening arm for any debris or obstructions. Ensure all screws remain tight.
- Odor Control: For persistent odors, sprinkle baking soda in the bottom of the inner bucket or use odor-absorbing packets.
7. Troubleshooting
If you encounter any issues with your Starax trash can, refer to the following common problems and solutions:
- Problem: Trash can does not slide out smoothly.
Solution: Check the sliding rails for any obstructions or debris. Ensure the installation screws are not overtightened, which could impede movement. Verify that the cabinet floor is level. - Problem: Lid does not open or close completely.
Solution: Inspect the connecting arm between the bin and the cabinet door for any bends or disconnections. Ensure the lid mechanism is free of debris. Re-check the alignment of the door attachment bracket. - Problem: Bin feels loose or wobbly.
Solution: Tighten all installation screws on both the base plate and the door attachment bracket. - Problem: Excessive noise during operation.
Solution: Lubricate the sliding rails with a silicone-based lubricant if friction is the cause. Ensure no parts are rubbing against the cabinet interior.
8. Warranty and Support
For warranty information or technical support, please contact Starax customer service through the retailer where the product was purchased or visit the official Starax website. Please have your product model number and purchase date available when contacting support.