JOYO Gem Box III
JOYO GEM BOX III Multi Effect Guitar Processor User Manual
Model: Gem Box III
Product Overview
The JOYO GEM BOX III is a flagship multi-effects guitar processor designed for guitarists seeking a comprehensive and versatile sound solution. It features advanced reversed modeling technology, offering a wide array of effects and amplifier simulations.

Figure 1: Front view of the JOYO GEM BOX III, showcasing its display, control knobs, and footswitches.
Key features include:
- 61 high-quality preamp modulations for diverse tonal options.
- 9 effects modules with a total of 157 effect types, allowing for extensive sound shaping.
- 26 built-in cabinet modulations, with support for third-party Impulse Responses (IRs) for realistic cabinet simulations.
- 300 preset tones for immediate playability and inspiration.
- Adjustable signal chain settings, providing flexibility to arrange internal effects as desired.
- Integrated looper with 52-second recording time, drum machine, USB audio recording capabilities, Aux In, and headphone output.
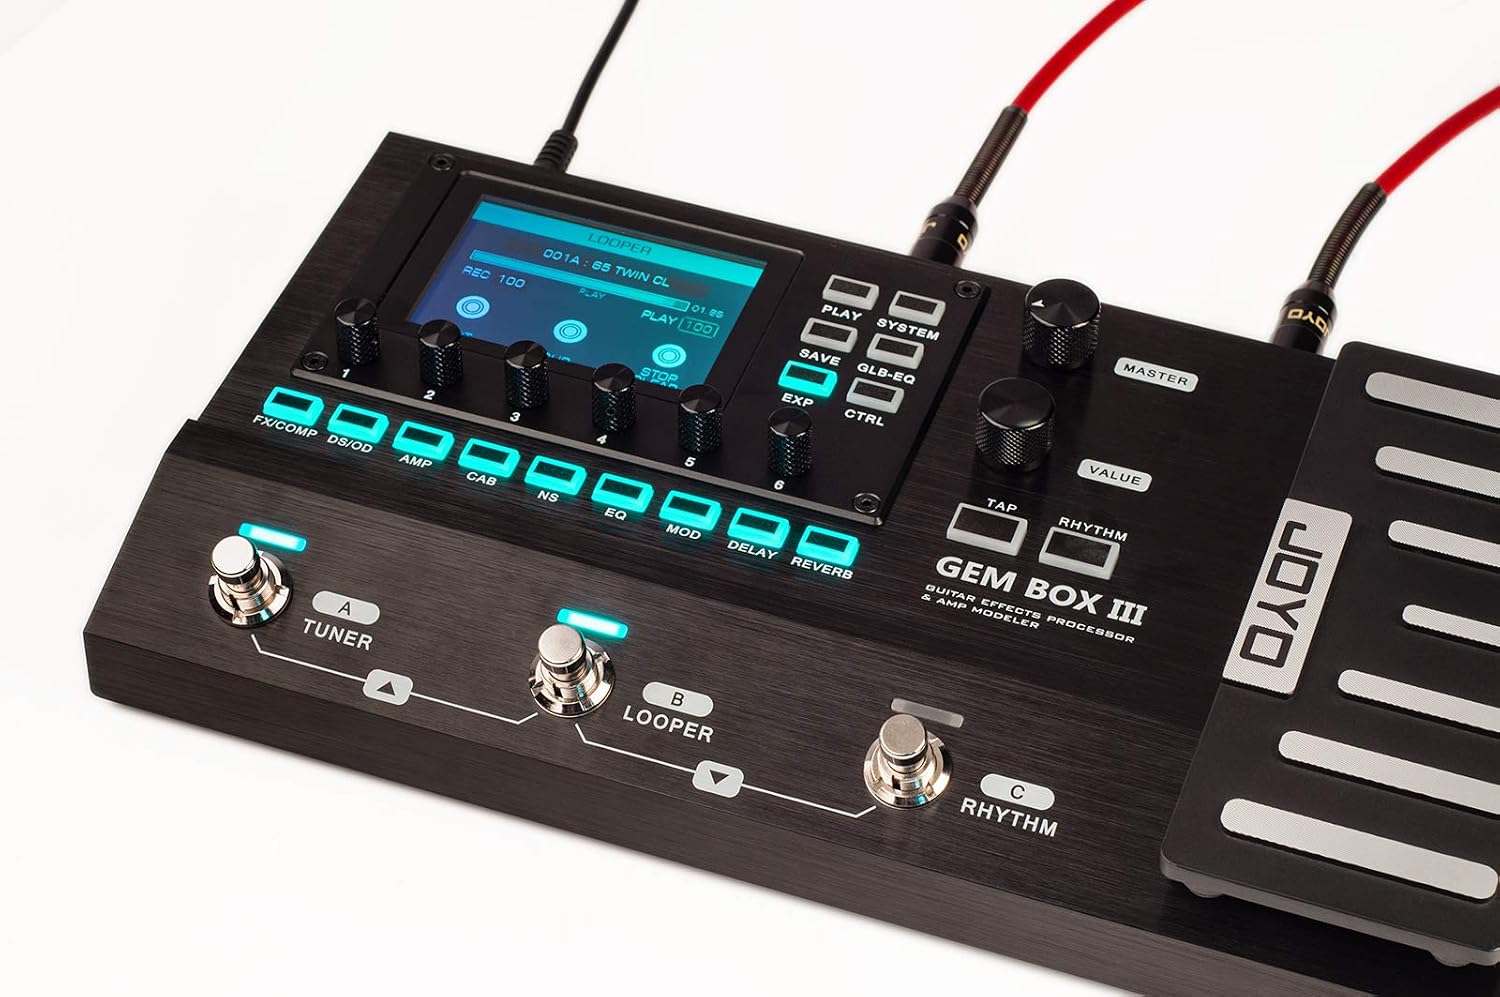
Figure 2: Top view of the GEM BOX III, highlighting the clear display and intuitive control layout.
Setup and Connections
Before operating your JOYO GEM BOX III, ensure all connections are made correctly. The unit offers various input and output options to integrate seamlessly into your setup.
Power Connection
Connect the provided power adapter to the DC9V 1A input on the rear panel of the GEM BOX III. Ensure the power source matches the specified voltage (240 Volts, as per specifications) to prevent damage.
Instrument and Audio Connections
The GEM BOX III provides multiple ways to connect your guitar, amplifiers, mixers, and other audio devices.

Figure 3: Detailed view of the rear panel, showing various input/output ports including EXP2, AUX IN, IN, OUT XLR, OUTPUT, USB, and DC9V.
- Standard Setup (Guitar to Amp/Mixer):
Connect your guitar to the IN jack. For output, use the OUTPUT (MONO) L jack to connect to your guitar amplifier or the OUT XLR L/R jacks for direct connection to a mixer or audio interface.

Figure 4: Comprehensive connection diagram for the GEM BOX III, illustrating connections to guitar, amplifier, mixer, headphones, and computer.
- Connecting to a Guitar Amplifier:
For a simple connection to a guitar amplifier, connect your guitar to the IN jack of the GEM BOX III, and then connect the OUTPUT (MONO) L jack to the input of your amplifier.

Figure 5: Basic connection from guitar through GEM BOX III to a guitar amplifier.
- 4-Cable Method (for Amp's Effects Loop):
To utilize your amplifier's preamp and the GEM BOX III's effects simultaneously, use the 4-cable method. This involves connecting the GEM BOX III into your amp's effects loop (Send/Return).

Figure 6: 4-Cable Method setup, integrating the GEM BOX III with an amplifier's effects loop.
- USB Audio Recording and Monitoring:
Connect the GEM BOX III to your computer via the USB port for direct audio recording. You can monitor your sound through headphones connected to the Headphone Out jack.
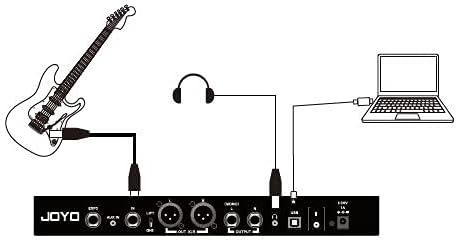
Figure 7: USB audio recording and headphone monitoring setup.
- Connecting to a Mixer:
For direct connection to a mixing console, use the balanced OUT XLR L/R outputs. This provides a clean, professional signal for live sound or studio recording.
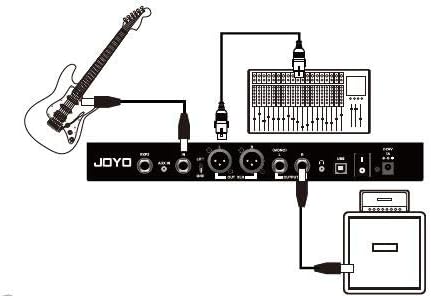
Figure 8: Connection to a mixing console using the XLR outputs.
Operating Instructions
The JOYO GEM BOX III is designed for intuitive operation, allowing quick access to its vast array of features.
Navigating Presets and Effects
The unit features a clear display and 9 buttons for easy navigation and control. Use the main rotary encoder and surrounding buttons to select and adjust parameters.

Figure 9: Close-up of the GEM BOX III's control surface, showing the display, knobs, and illuminated buttons.
- Preset Selection: Rotate the VALUE knob to scroll through the 300 available preset tones. Press the PLAY button to confirm selection or enter play mode.
- Effect Modules: The 9 effects modules (FX/COMP, DS/OD, AMP, CAB, NS, EQ, MOD, DELAY, REVERB) can be individually activated or bypassed using their dedicated footswitches.
- Parameter Adjustment: Once an effect module is selected, use the smaller rotary knobs below the display to fine-tune parameters such as gain, tone, and level.
- Signal Chain Adjustment: The GEM BOX III allows you to customize the order of effects within the signal chain. Refer to the on-screen menu (accessible via the SYSTEM button) for detailed signal chain editing.
Looper and Drum Machine
- Looper: Activate the looper function using its dedicated footswitch. The looper supports up to 52 seconds of recording time, allowing for multi-layered performances.
- Drum Machine: The built-in drum machine offers various rhythm patterns. Use the RHYTHM button to access and select drum patterns for practice or performance.
Expression Pedal and Tuner
- Expression Pedal: The integrated expression pedal can be assigned to control various parameters, such as Wah, Volume, or other effect parameters, providing dynamic real-time control.
- Tuner: Engage the built-in tuner by pressing the TUNER footswitch. The display will guide you to accurately tune your instrument.
JOYO STUDIO Software
The GEM BOX III is compatible with JOYO STUDIO software, which can be used to upload AMP models, manage presets, and perform firmware updates. Connect the unit to your computer via USB and launch the software for advanced customization.
Maintenance
To ensure the longevity and optimal performance of your JOYO GEM BOX III, follow these maintenance guidelines:
- Cleaning: Use a soft, dry cloth to clean the exterior of the unit. Avoid using abrasive cleaners, solvents, or waxes, as they may damage the finish or internal components.
- Storage: When not in use, store the GEM BOX III in a cool, dry place away from direct sunlight, extreme temperatures, and high humidity.
- Handling: Handle the unit with care. Avoid dropping it or subjecting it to strong impacts, which can damage internal circuitry or external controls.
- Power Supply: Always use the original or a compatible power adapter (DC9V 1A) to prevent electrical damage.
Troubleshooting
If you encounter issues with your JOYO GEM BOX III, refer to the following common troubleshooting steps:
| Problem | Possible Cause | Solution |
|---|---|---|
| No power | Incorrect power adapter; loose connection; power outlet issue. | Ensure correct DC9V 1A adapter is used. Check all power connections. Try a different power outlet. |
| No sound output | Incorrect cable connections; volume levels too low; effect bypassed. | Verify all audio cables are securely connected to the correct input/output jacks. Check Master volume and individual effect levels. Ensure desired effects are active. |
| Distorted or poor sound quality | Input level too high; incorrect impedance; faulty cable. | Adjust input gain to prevent clipping. Ensure impedance matches connected equipment. Try a different audio cable. |
| Footswitches unresponsive | Temporary software glitch. | Power cycle the unit (turn off, wait 10 seconds, turn on). If issue persists, consider a factory reset (refer to advanced settings in the full manual). |
If the problem persists after attempting these solutions, please contact JOYO customer support for further assistance.
Specifications
| Feature | Detail |
|---|---|
| Brand | JOYO |
| Model Number | Gem Box III |
| Item Weight | 1 Pounds (0.45 kg) |
| Product Dimensions | 3 x 3 x 3 inches (7.62 x 7.62 x 7.62 cm) |
| Color | Black |
| Power Source | Corded Electric |
| Voltage | 240 Volts |
| Hardware Interface | USB |
| Signal Format | Analog |
| Preamp Modulations | 61 |
| Effect Modules | 9 |
| Total Effect Types | 157 |
| Built-in Cabinet Models | 26 (supports 3rd party IR) |
| Preset Tones | 300 |
| Looper Recording Time | 52 seconds |
| Features | Looper, Drum Machine, USB Audio Recording, Aux In, Headphone Out, Expression Pedal, Tuner |
Warranty and Support
JOYO TECHNOLOGY is committed to providing high-quality products and excellent customer service.
Return Policy
This product is eligible for a return within 30 days of purchase for a refund or replacement, subject to the retailer's terms and conditions.
Customer Support
For any product issues or technical assistance, please contact the seller directly through your order details. JOYO is dedicated to providing the best service to resolve any concerns you may have.
For more information or to explore other JOYO products, please visit the Official JOYO Store.
Ask a question about this manual
Ask about setup, troubleshooting, compatibility, parts, safety, or missing instructions. Manuals+ will review the question and use this page’s manual context to help answer it.