1. Introduction
This manual provides essential instructions for the safe and effective use of your LP EN-EL10 Battery Charger Pack. Please read this manual thoroughly before using the product and retain it for future reference. This pack includes two 1200mAh EN-EL10 rechargeable lithium-ion batteries and one MH-63 charger.
2. Product Overview
The LP EN-EL10 Battery Charger Pack is designed to provide reliable power for your compatible Nikon Coolpix cameras. The batteries are engineered for a sustained lifespan, capable of 300-500 charge/discharge cycles without memory effect. The charger is designed for worldwide use with a broad input voltage range.
2.1 Components
- 2 x LP EN-EL10 1200mAh Lithium-Ion Batteries
- 1 x LP MH-63 Dual Battery Charger
- 1 x Micro-USB Cable
2.2 Safety Features
The EN-EL10/MH-63 battery charger set incorporates multiple safety protections to ensure secure operation:
- Overcharge Protection
- Over-discharge Protection
- Short-circuit Protection
- Surge Protection
- Overvoltage Protection
- Overcurrent Protection
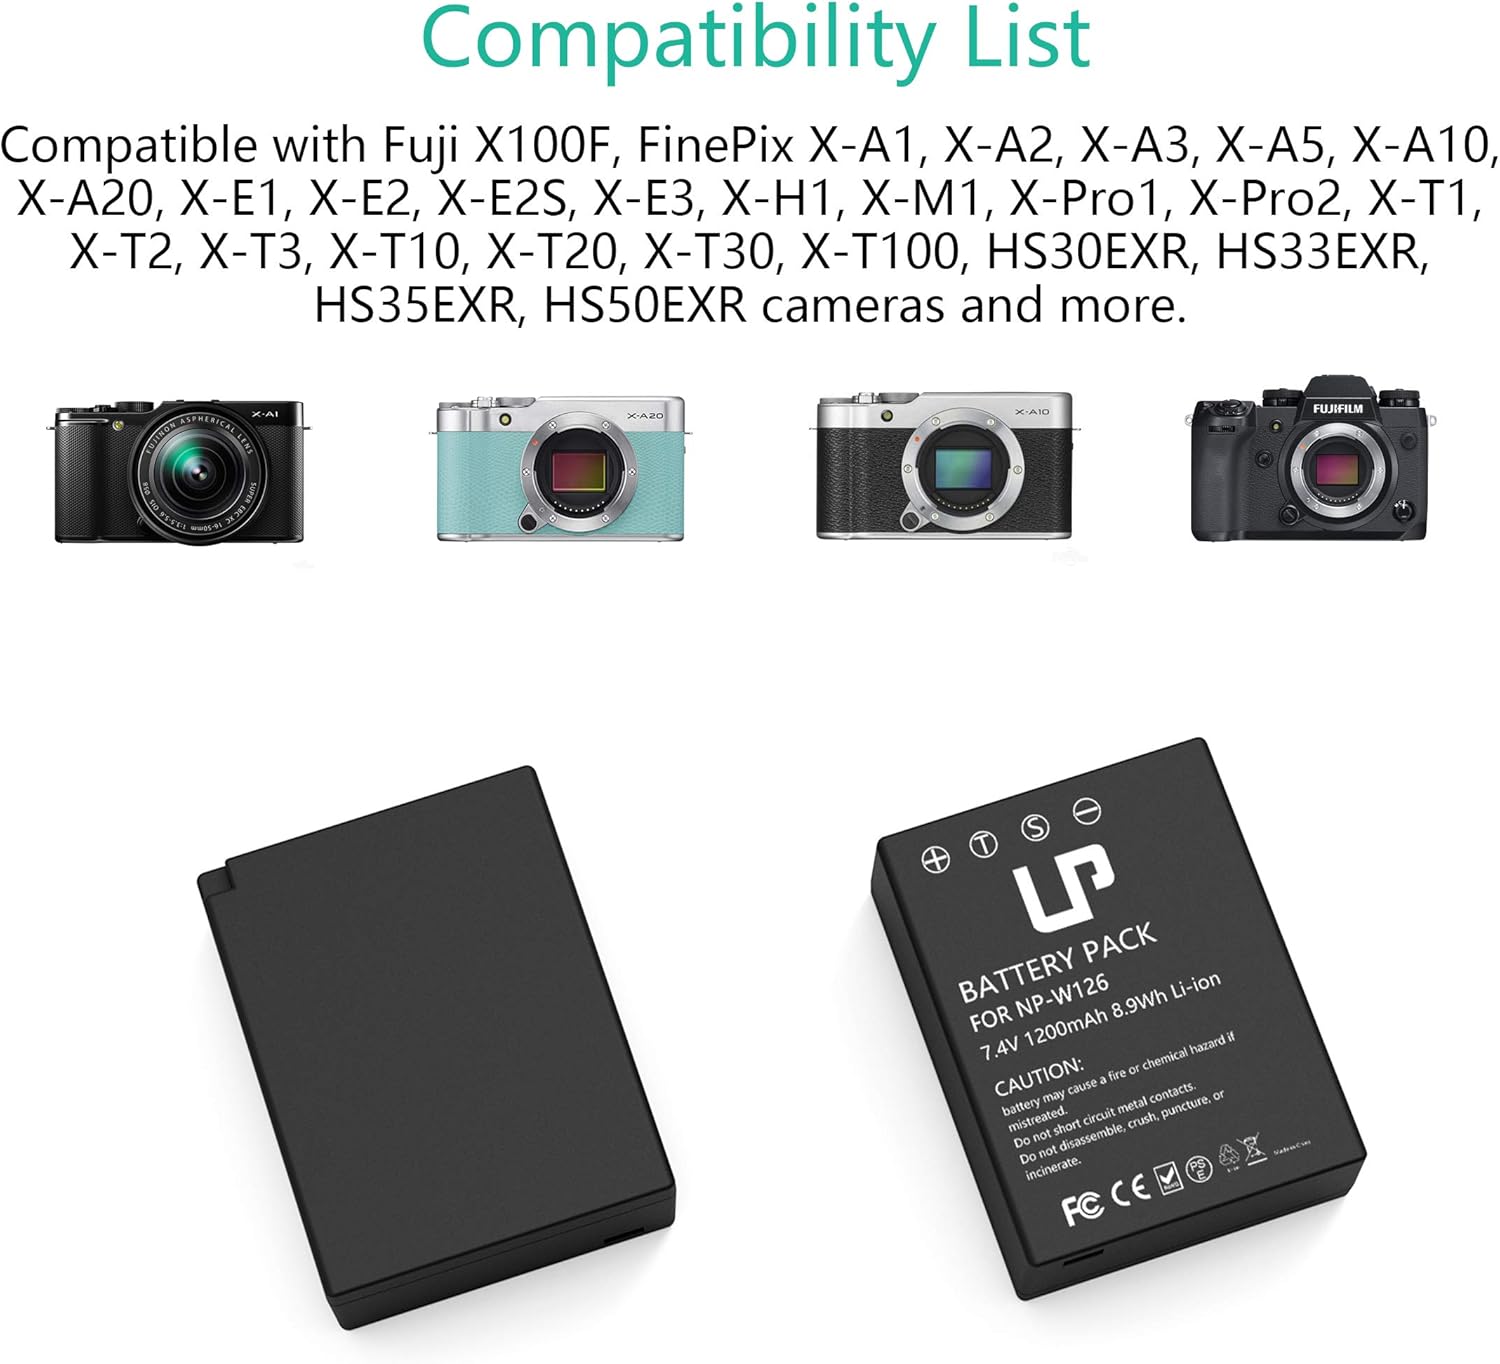
Image: The LP EN-EL10 Battery Charger Pack, showing the dual charger and two EN-EL10 batteries.

Image: Visual representation of the comprehensive safety features, including overcharge, short-circuit, and overheat protection.
3. Compatibility
The LP EN-EL10 batteries and MH-63 charger are fully compatible with the following Nikon Coolpix camera models:
- Coolpix S60
- Coolpix S80
- Coolpix S200
- Coolpix S203
- Coolpix S210
- Coolpix S220
- Coolpix S230
- Coolpix S500
- Coolpix S510
- Coolpix S520
- Coolpix S570
- Coolpix S600
- Coolpix S700
- Coolpix S3000
- Coolpix S4000
- Coolpix S5100
4. Setup
Follow these steps to prepare your batteries for charging:
- Insert Battery: Gently insert one or two EN-EL10 batteries into the designated slots on the MH-63 charger. Ensure the battery contacts align correctly with the charger pins.
- Connect Micro-USB Cable: Connect the provided Micro-USB cable to the charger's input port.
- Connect to Power Source: Plug the other end of the Micro-USB cable into a compatible USB power source (e.g., wall adapter, car charger, power bank, or computer USB port).

Image: A four-step visual guide demonstrating how to insert batteries into the charger, connect the Micro-USB cable, plug into a power source, and observe the charging indicator lights.
5. Operating Instructions
5.1 Charging Process
Once connected to a power source, the charger will begin charging the inserted batteries:
- Charging Indicator: The LED indicator light(s) on the charger will turn red to indicate that charging is in progress.
- Full Charge Indicator: When the battery is fully charged, the LED indicator light(s) will turn green.
- Charging Time: A full charge typically takes approximately 4 hours, depending on the power source and battery depletion level.
5.2 Power Sources
The MH-63 charger supports various USB power sources:
- Standard USB Wall Adapter (AC100-240V input)
- Car Charger (USB output)
- Power Bank
- Computer USB Port
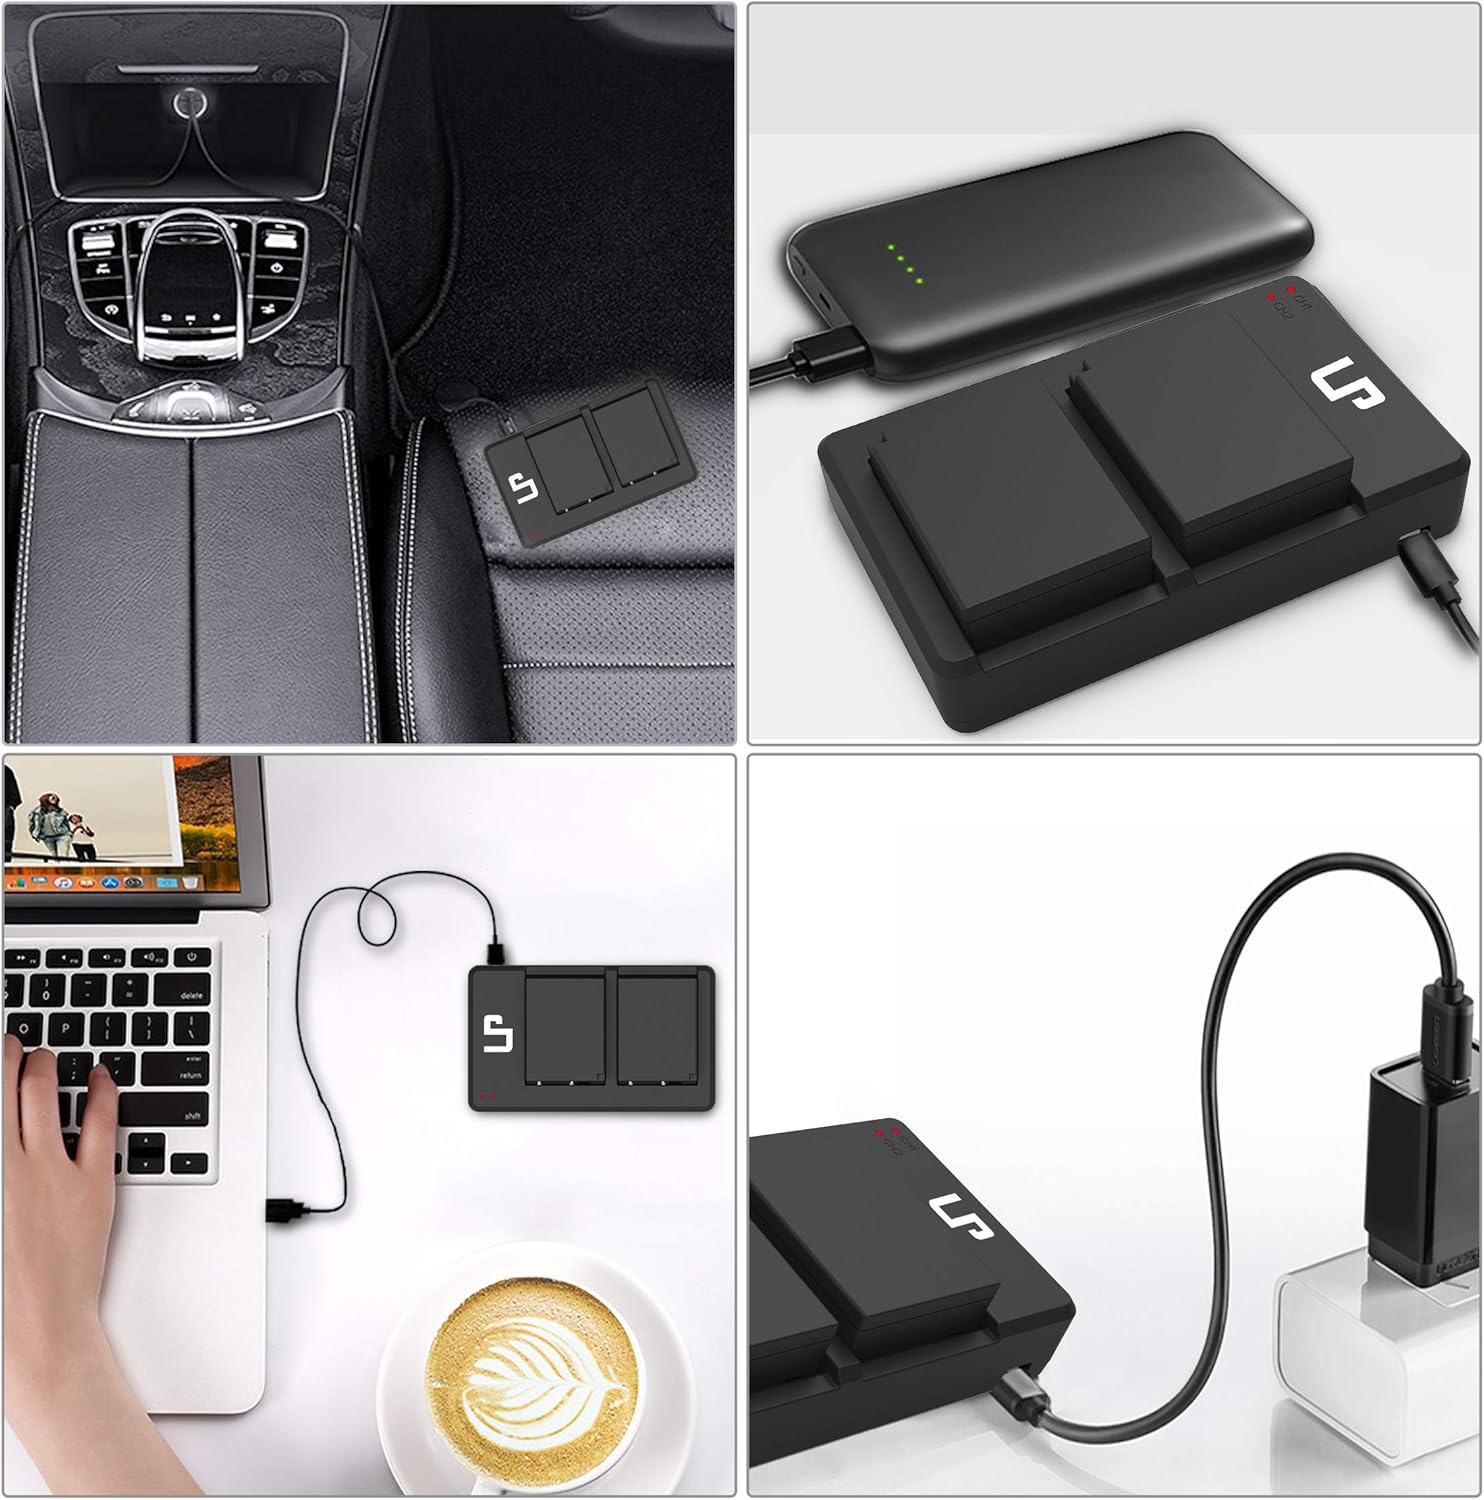
Image: The LP dual battery charger being powered by various sources including a car charger, a portable power bank, a laptop, and a wall adapter.
6. Maintenance
- Cleaning: Use a soft, dry cloth to clean the charger and battery contacts. Do not use liquid cleaners or solvents.
- Storage: Store batteries and charger in a cool, dry place away from direct sunlight and extreme temperatures. For long-term storage, charge batteries to approximately 50% capacity.
- Disposal: Dispose of depleted batteries according to local regulations. Do not incinerate or expose to high temperatures.
- Avoid Damage: Do not disassemble, crush, puncture, or short-circuit the batteries or charger.
7. Troubleshooting
7.1 Charger Indicator Not Lighting Up
- Ensure the Micro-USB cable is securely connected to both the charger and the power source.
- Verify that the power source is active and providing power (e.g., wall outlet is working, car engine is on, power bank is charged).
- Check if the battery is inserted correctly into the charger with contacts aligned.
- Try a different Micro-USB cable or power source to rule out cable/source issues.
7.2 Battery Not Charging Fully
- Ensure the charger is connected to a stable power source for the recommended charging duration.
- Verify that the battery contacts are clean and free of debris.
- If the battery is very old or has been stored improperly, its capacity may have degraded.
7.3 Battery Swelling or Overheating
Immediately discontinue use if you observe any swelling, excessive heat, or unusual odors from the battery or charger. Contact customer support for assistance. Do not attempt to use or charge a swollen battery.
8. Specifications
| Component | Specification |
|---|---|
| Battery Type | Lithium-Ion |
| Battery Capacity | 1200mAh |
| Battery Voltage | 3.4V |
| Charger Input | AC100-240V |
| Charger Output | DC8.4V 600mA |
| Package Dimensions | 6.38 x 5.12 x 1.1 inches |
| Item Weight | 8.8 ounces (250 Grams) |
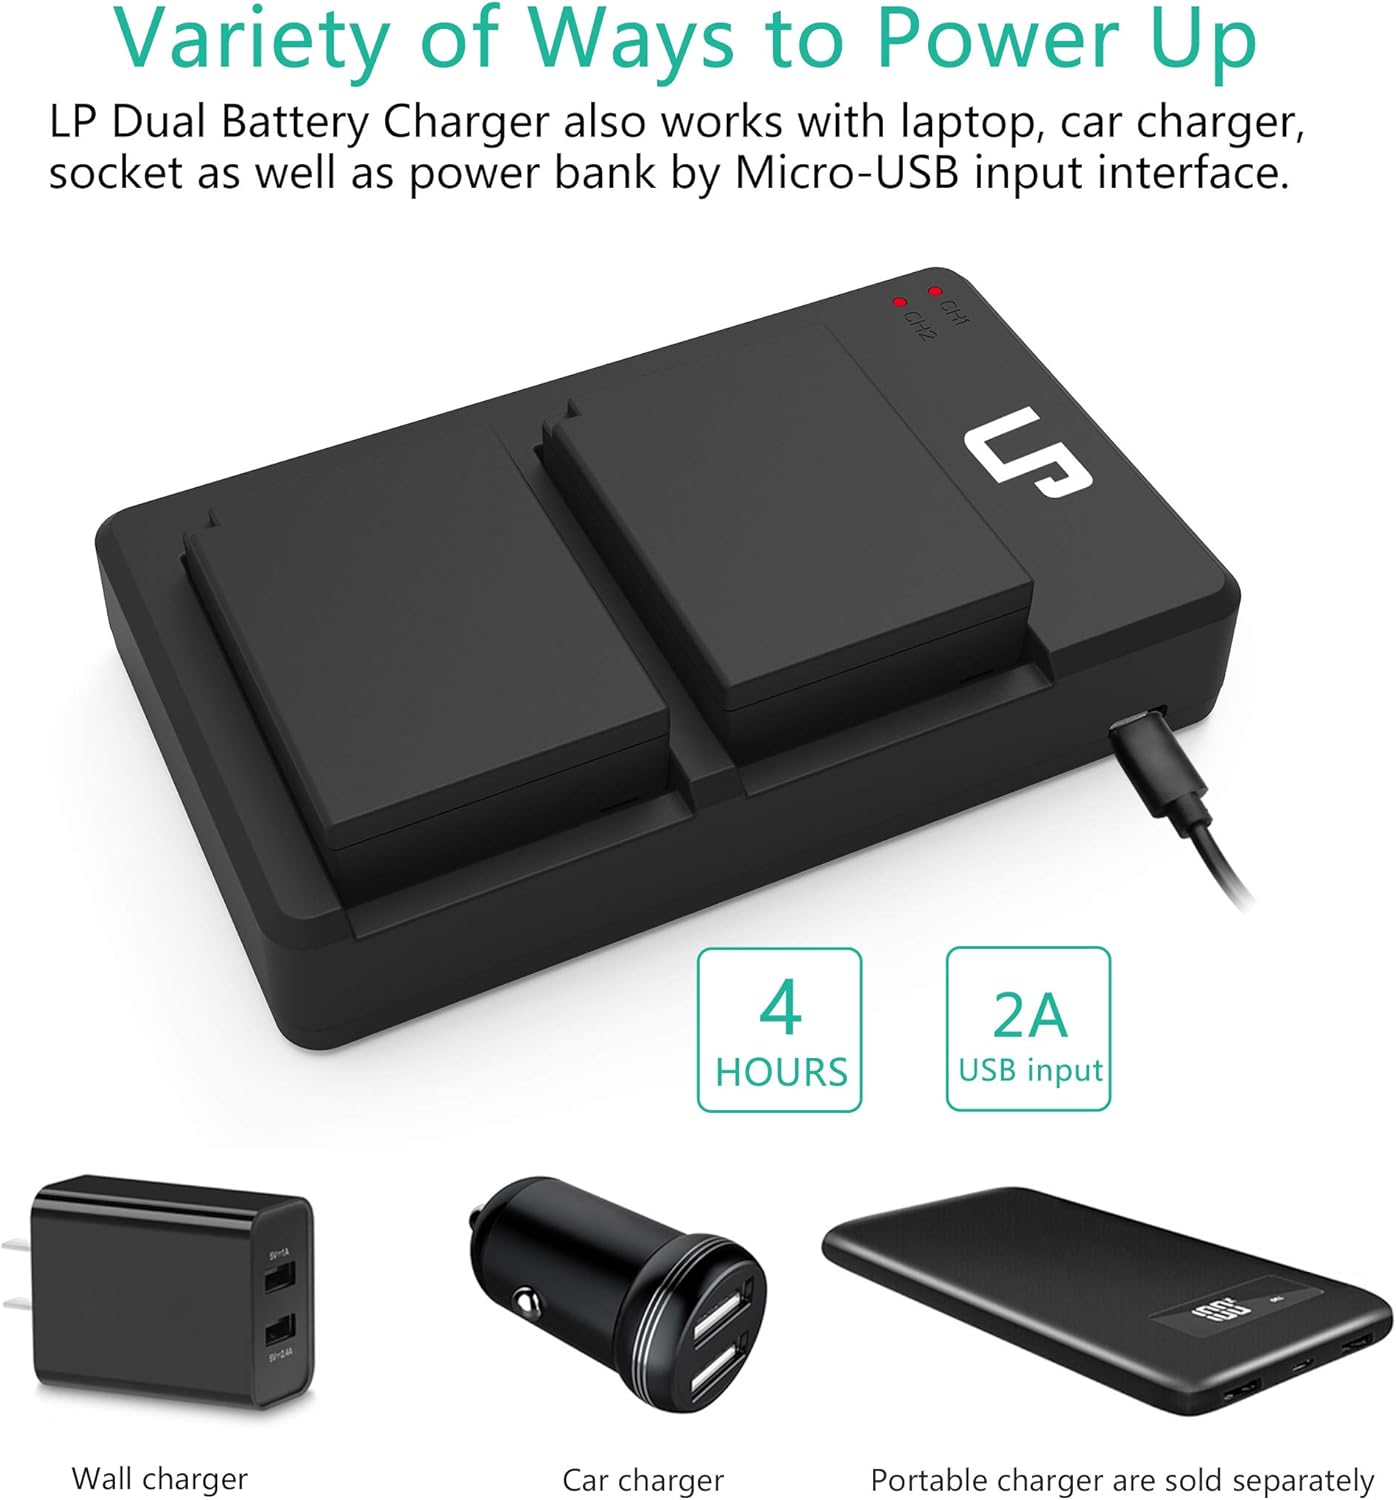
Image: A detailed view of the EN-EL10 battery, displaying its capacity (1200mAh), voltage (7.4V, note: product description states 3.4V, using 7.4V from image for accuracy), and safety warnings.
9. Warranty and Support
LP provides the following support for this product:
- Refund Policy: 30 Days Refund
- After-Sales Service: 1 Year
- Lifetime Service: Available
- Customer Response: 24-hour prompt and friendly response (weekdays)
For further assistance or to view other LP products, please visit the LP Store on Amazon.