Inkbird ITH-20R
Inkbird ITH-20R Wireless Thermometer Hygrometer User Manual
Model: ITH-20R | Brand: Inkbird
Introduction
The Inkbird ITH-20R is a wireless indoor/outdoor thermometer and hygrometer system designed to provide accurate temperature and humidity readings for various environments. This system includes a main display unit and three wireless remote sensors, allowing for comprehensive monitoring across multiple locations.

Image: The Inkbird ITH-20R main display unit showing indoor and outdoor temperature and humidity, alongside three compact wireless remote sensors.
Key features include:
- High Reliability & Accuracy: Monitors humidity and temperature instantly, displaying indoor and outdoor data simultaneously. Temperature range: -58~257°F (-50~125°C). Humidity range: 10~95%.
- Instant Read: Wireless transmission distance up to 300 feet (91 meters), with data updates every 10 seconds.
- Easy Operation: Features intuitive buttons for channel switching, clearing MIN/MAX data, and switching between Fahrenheit and Celsius.
- External Probe: Includes a waterproof external probe suitable for measuring temperature in liquids or narrow, enclosed environments, ideal for applications like brewing.
- Two Mounting Options: Designed for both tabletop placement and wall-mounting, making it versatile for various rooms.
Product Components
The Inkbird ITH-20R package typically includes the following items:
- 1. ITH-20R-I Main Display Unit: The central unit that displays temperature and humidity readings from all connected sensors.
- 2. ITH-20R-O Wireless Remote Sensors (x3): Three waterproof remote sensors for outdoor or remote indoor monitoring.
- 3. Screwdriver: A small screwdriver for battery compartment access on the remote sensors.
- 4. External Probes (x3): Three wired probes that can be connected to the remote sensors for liquid or specific area temperature measurement.
- 5. Packing Box: The retail packaging for the product.
- 6. Instruction Manual: This user manual provides detailed instructions for setup and operation.
- 7. Warranty Card: Information regarding product warranty.
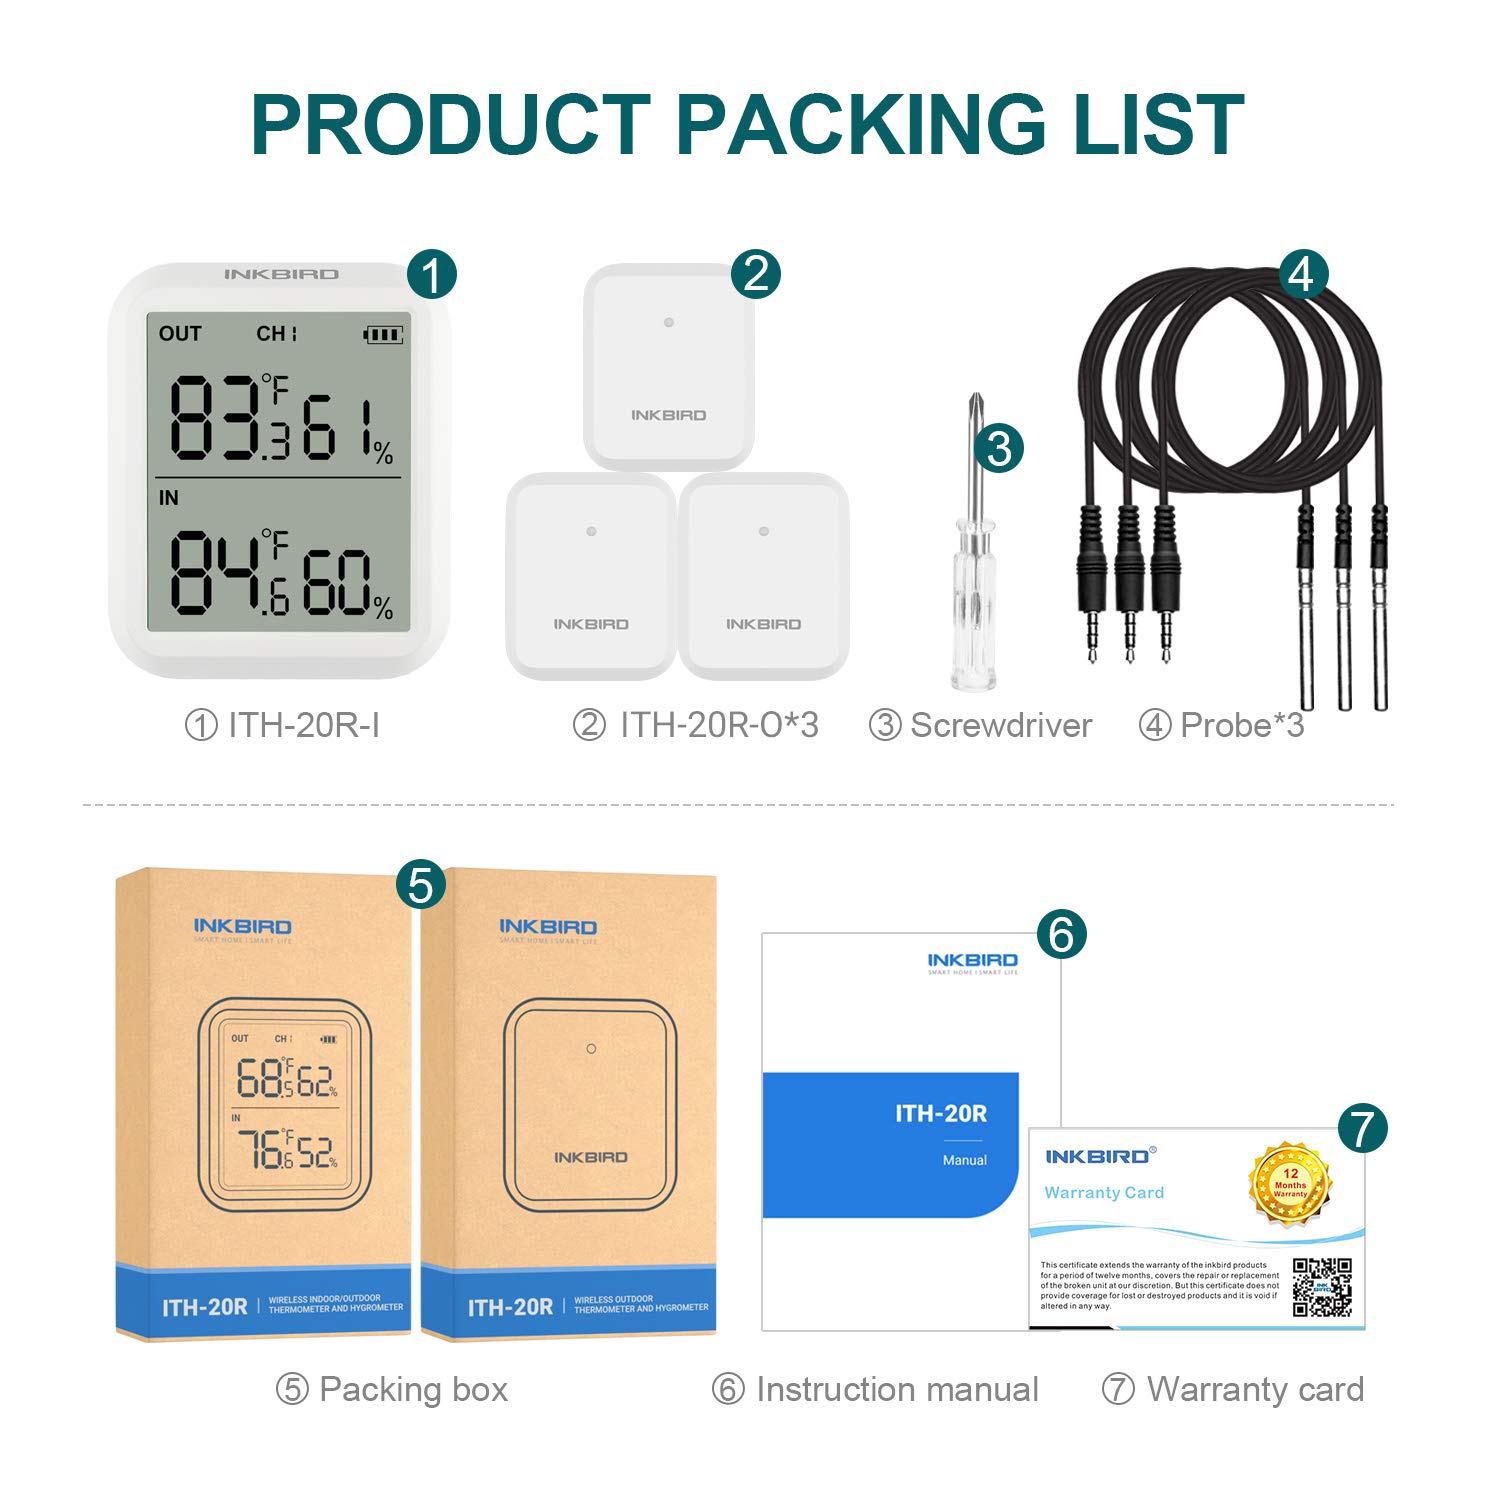
Image: A visual representation of the Inkbird ITH-20R product packing list, showing the main unit, three remote sensors, screwdriver, three external probes, packing box, instruction manual, and warranty card.
Setup Instructions
1. Battery Installation
The main display unit and each remote sensor require 2 x AAA batteries (not included). It is recommended to install batteries in the main unit first, then in each remote sensor one by one to ensure proper channel assignment.
- Main Display Unit: Open the battery compartment on the back and insert 2 AAA batteries, observing polarity (+/-). Close the compartment.
- Remote Sensors: Use the provided small screwdriver to remove the four screws on the back cover of each remote sensor. Insert 2 AAA batteries, observing polarity. It is advisable to leave the back cover unscrewed until the sensor is successfully linked to the main unit.

Image: Diagrams illustrating how to open the battery compartments and insert AAA batteries into both the main display unit and the remote sensors.
2. Pairing Sensors
Place the remote sensors near the main display unit during the initial setup. The sensors will automatically attempt to connect to the main unit. The sensor's indicator light will blink until a successful connection is established. If a sensor does not connect, try removing and re-inserting its batteries.
The channel number for each remote sensor is determined by the order in which they are powered on. If you need to re-assign channels, remove batteries from all units, then re-insert them one by one, starting with the main unit, then Sensor 1, Sensor 2, and Sensor 3.
3. External Probe Connection (Optional)
Each remote sensor has a port for an external temperature probe. If you wish to use an external probe, plug it into the designated port on the remote sensor. The remote sensor will then display the temperature from the external probe instead of its internal sensor.

Image: A remote sensor mounted on a wall with its external probe submerged in a glass of water, demonstrating its use for liquid temperature measurement.
4. Placement
Once connected, place the main display unit and remote sensors in their desired locations. The main unit can be placed on a tabletop or mounted on a wall. Remote sensors are waterproof and can be placed outdoors or in environments like refrigerators, freezers, or brewing vessels (with the external probe).
Operating Instructions
Main Display Unit Buttons:
- [CH/R] Button: Press to switch between displaying data from different remote sensor channels (CH1, CH2, CH3). The main unit can also cycle through channels automatically.
- [CLEAR] Button: Press and hold for 2 seconds to clear the recorded MIN/MAX temperature and humidity data.
- [°F/°C] Button: Press to switch the temperature display between Fahrenheit (°F) and Celsius (°C).
Reading the Display:
The LCD screen on the main unit displays the indoor temperature and humidity (labeled "IN") and the outdoor/remote temperature and humidity (labeled "OUT"). The "CH" indicator shows which remote sensor's data is currently being displayed.
Maintenance
Battery Replacement:
When the battery indicator on the display unit or a sensor shows low power, replace the batteries promptly. For remote sensors, remember to use the small screwdriver to access the battery compartment. It is recommended to replace all batteries at the same time to maintain consistent performance and avoid re-pairing issues.
Note: If replacing batteries in the main unit, you may need to re-pair the remote sensors by removing and re-inserting their batteries in the desired channel order.
Cleaning:
Wipe the units with a soft, damp cloth. Do not use abrasive cleaners or immerse the main unit in water. The remote sensors are waterproof but should not be submerged for extended periods unless specifically designed for that application (e.g., the external probe).
Troubleshooting
- No Reading on Display / Sensor Not Connecting:
- Ensure batteries are installed correctly with correct polarity and are not depleted.
- Try replacing batteries in both the main unit and the problematic sensor.
- Place the sensor closer to the main unit during pairing.
- Remove batteries from all sensors and the main unit, then re-install them one by one (main unit first, then sensor 1, sensor 2, sensor 3) to re-establish connections and channel assignments.
- Inaccurate Readings:
- Ensure sensors are not placed in direct sunlight, near heat sources, or in areas with extreme drafts, which can affect readings.
- Allow sufficient time (e.g., 30 minutes) for readings to stabilize after placement or significant environmental changes.
- If using external probes, ensure they are fully inserted and not damaged.
- Short Transmission Range:
- Obstacles like thick walls, metal structures, or other electronic devices can interfere with the wireless signal. Try repositioning the units.
- Low batteries can also reduce transmission range.
Specifications
| Parameter | Value |
|---|---|
| Temperature Measurement Range | -58~257°F (-50~125°C) |
| Humidity Measurement Range | 10~95% |
| Transmission Distance | Up to 300 feet (91 meters) |
| Data Update Interval | 10 seconds |
| Power Supply (Main Unit) | 2 x AAA batteries (excluded) |
| Power Supply (Remote Sensor) | 2 x AAA batteries (excluded) |
| Product Dimensions (Main Unit) | 2.95"W x 2.52"H (75mm x 64mm) |
| Product Dimensions (Remote Sensor) | 2.95"W x 2.52"H (75mm x 64mm) |
| External Probe Length | 6.56 feet (2 meters) |
| Mounting Options | Tabletop, Wall Mount |

Image: A diagram showing the dimensions of the Inkbird ITH-20R main unit, remote sensor, and external probe.
Warranty and Support
Inkbird products come with a warranty. Please refer to the included Warranty Card in your product package for specific terms and conditions. For technical support, troubleshooting assistance, or warranty claims, please visit the official Inkbird website or contact their customer service.
Official Website: www.ink-bird.com
A digital version of the user manual may also be available for download from the manufacturer's website or via the following link: User Manual (PDF)
Typical Usage Scenarios
The Inkbird ITH-20R is versatile and can be used in a variety of settings to monitor temperature and humidity:
- Home: Monitor indoor comfort levels in bedrooms, living rooms, or baby rooms.
- Basements & Cellars: Ideal for monitoring humidity to prevent mold or for wine/food storage.
- Greenhouses: Ensure optimal growing conditions for plants.
- Warehouses & Storage Areas: Maintain suitable environmental conditions for stored goods.
- Brewhouses: Use external probes to monitor liquid temperatures during brewing processes.
- Refrigerators & Freezers: Monitor appliance temperatures to ensure food safety (using external probes).

Image: A collage showing the Inkbird ITH-20R main unit and remote sensors being used in different environments such as a bedroom, baby room, greenhouse, home, basement, and warehouse.